You are browsing camaro6 
 09-29-2023, 08:25 AM
|
#29 |
 
Drives: 2016 Camaro 2SS "Convertibobble" Join Date: Mar 2022
Location: Peoria, IL
Posts: 280
|
And I thought I was being a big wheel, twenty years ago when I had money, for "splurging" on Monster Cable for all component and speaker hookups on my <gulp> Sony home sound system!
Incredible stuff here. K_H_A, am gonna PM you shortly on another audio-related topic.
__________________
'16 2SS Garnet Red ~24K
"Mods": GM wind deflector, home-made rear seat delete & platform, not-quite garnet red key fob cover (+10rwhp) '99 4Runner 367K '94 ST1100 146K |

|

|
|
10-02-2023, 06:36 PM
|
#30 |
|
Electrical Engineer

Drives: 2023 1SS A10 Black Join Date: Apr 2022
Location: Illinois
Posts: 779
|
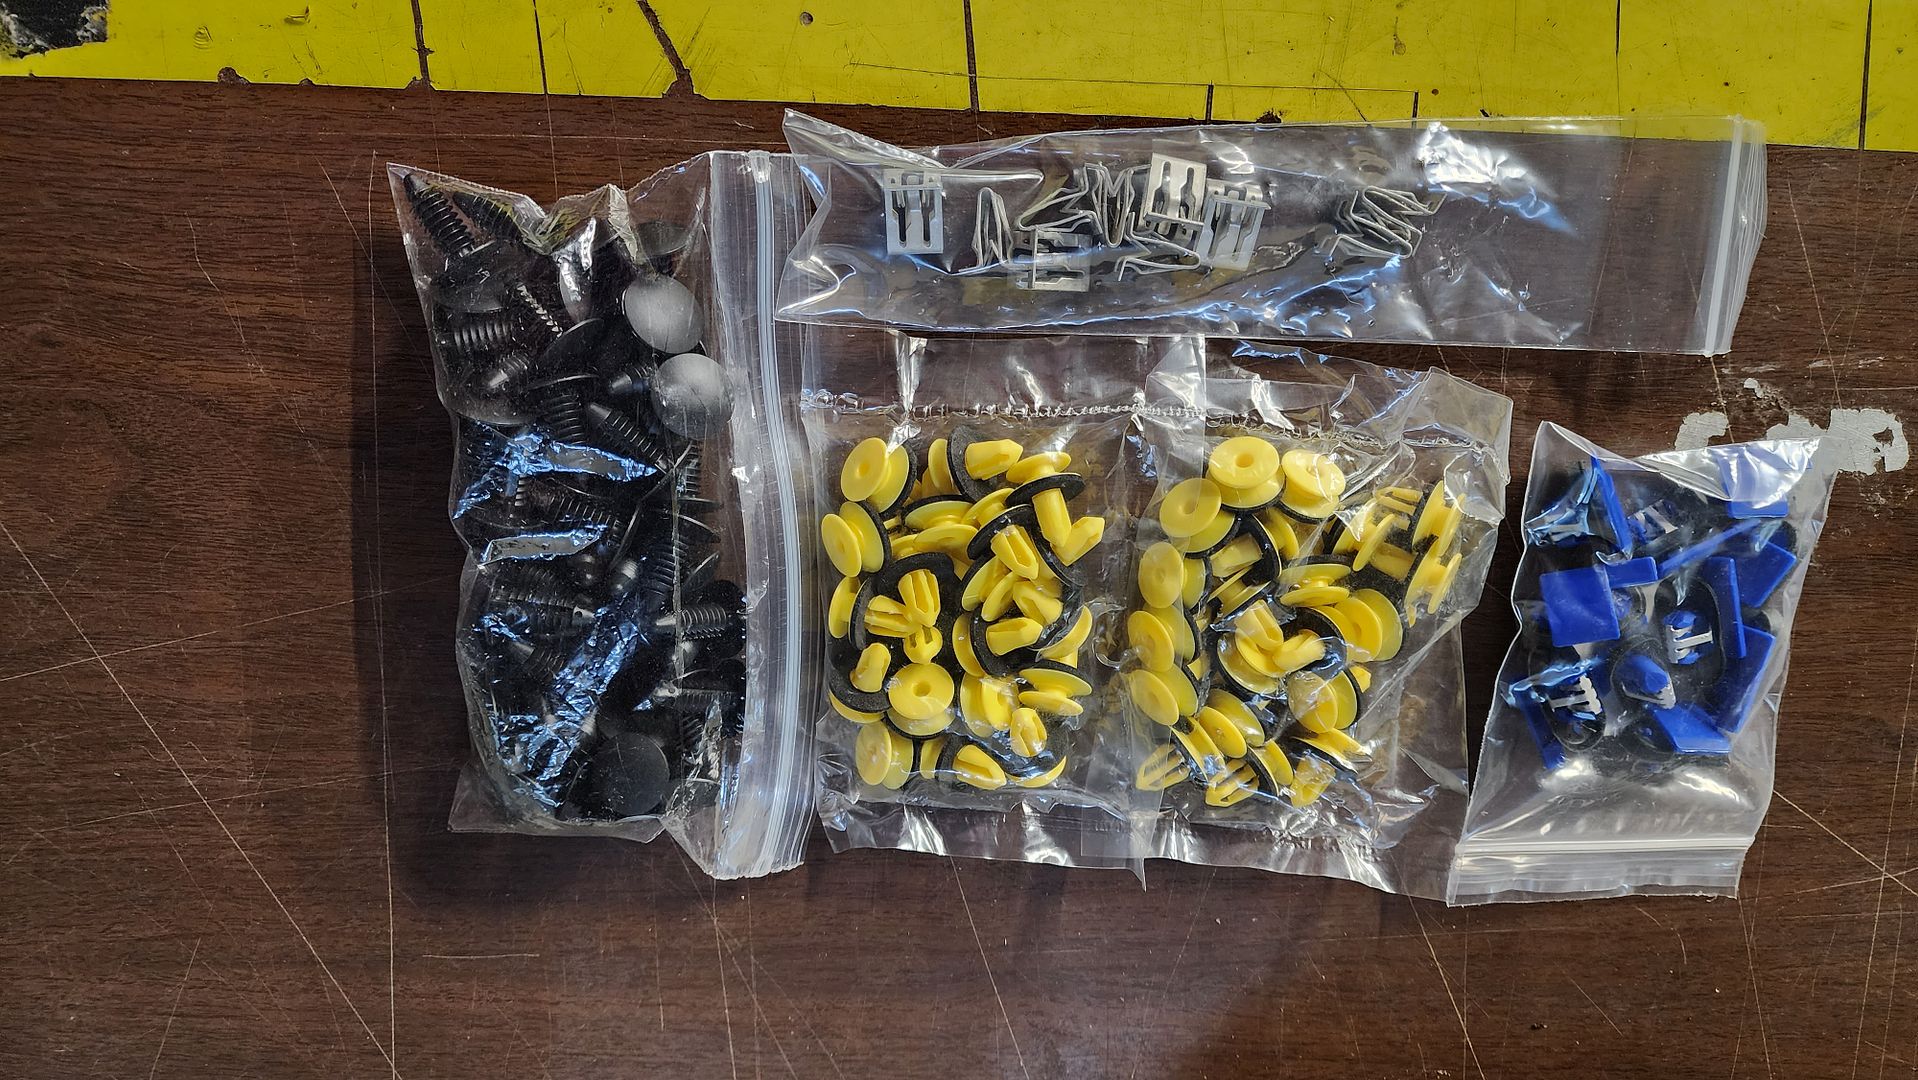
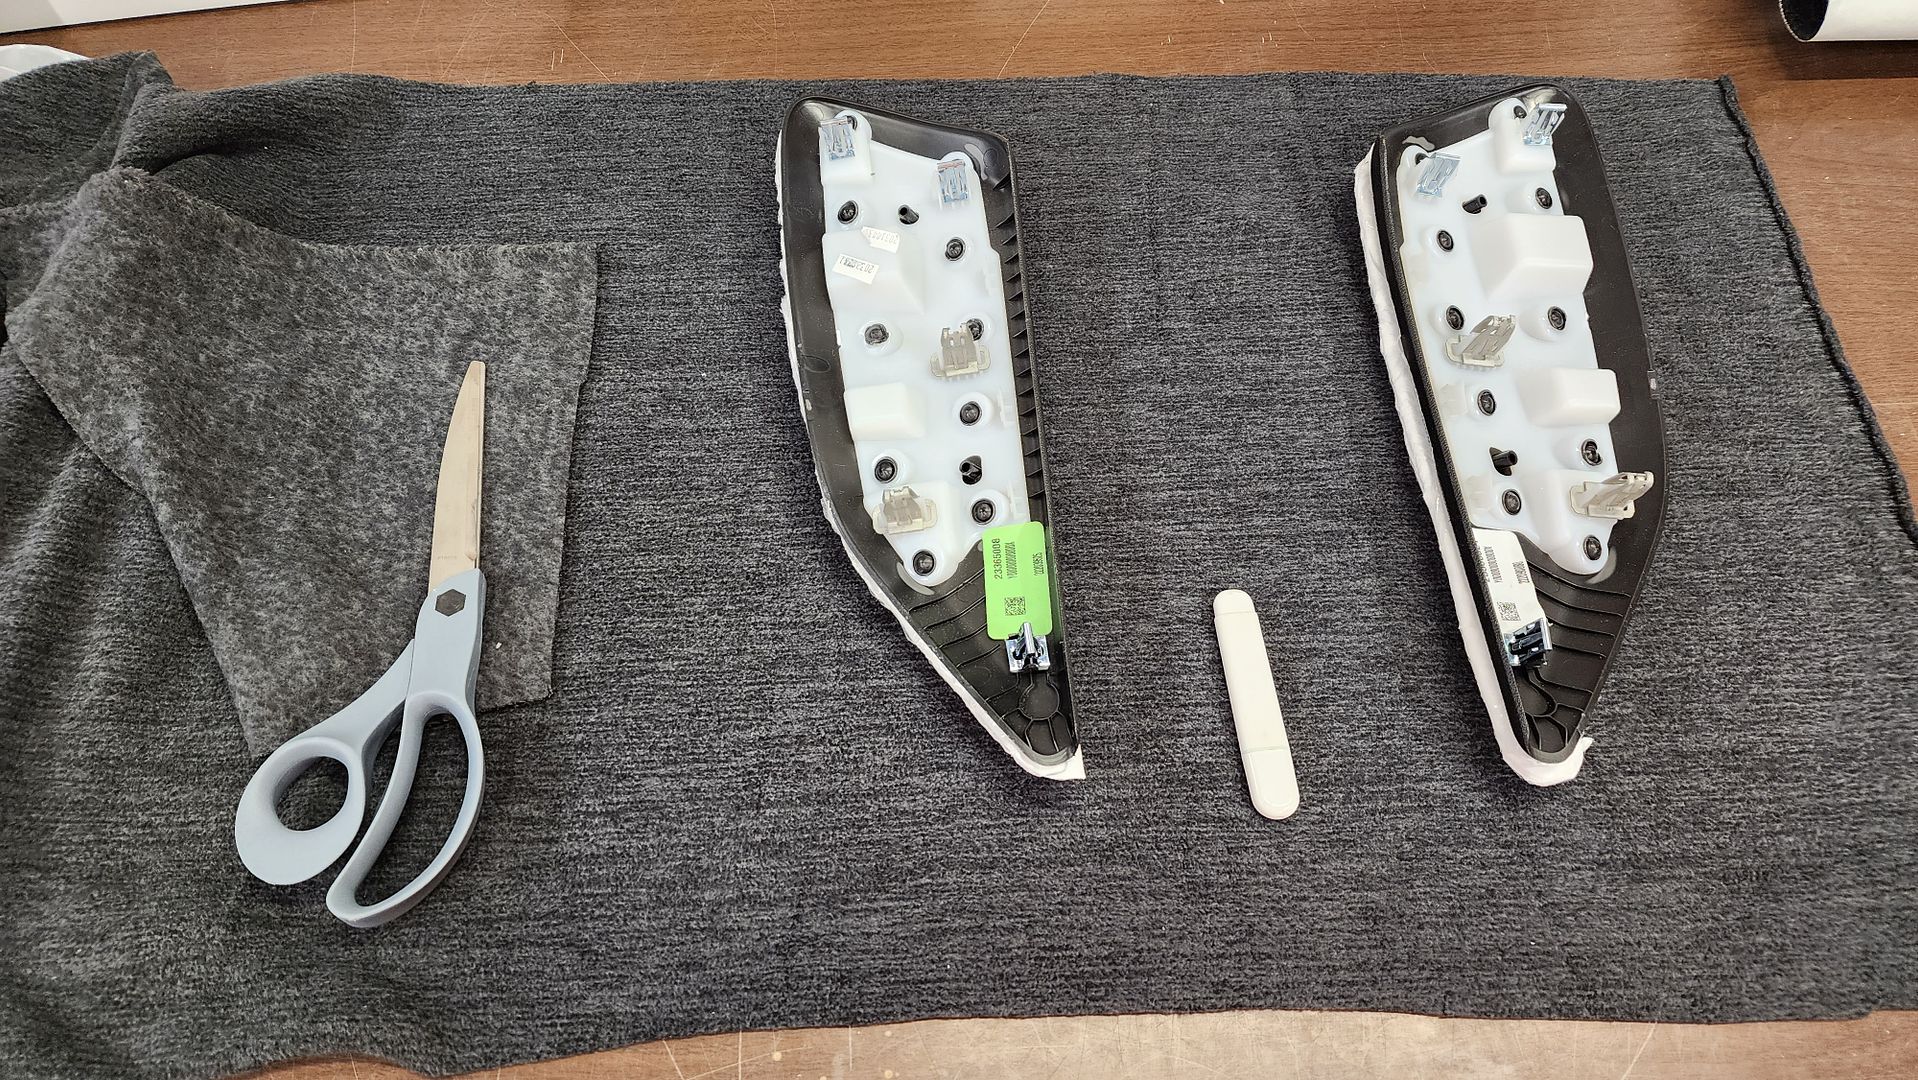
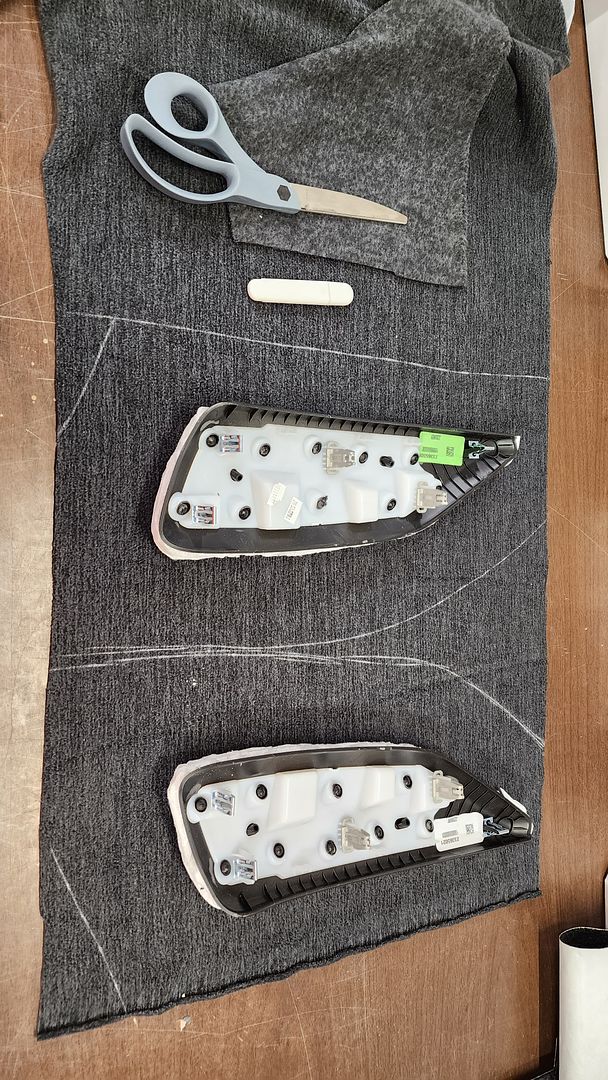
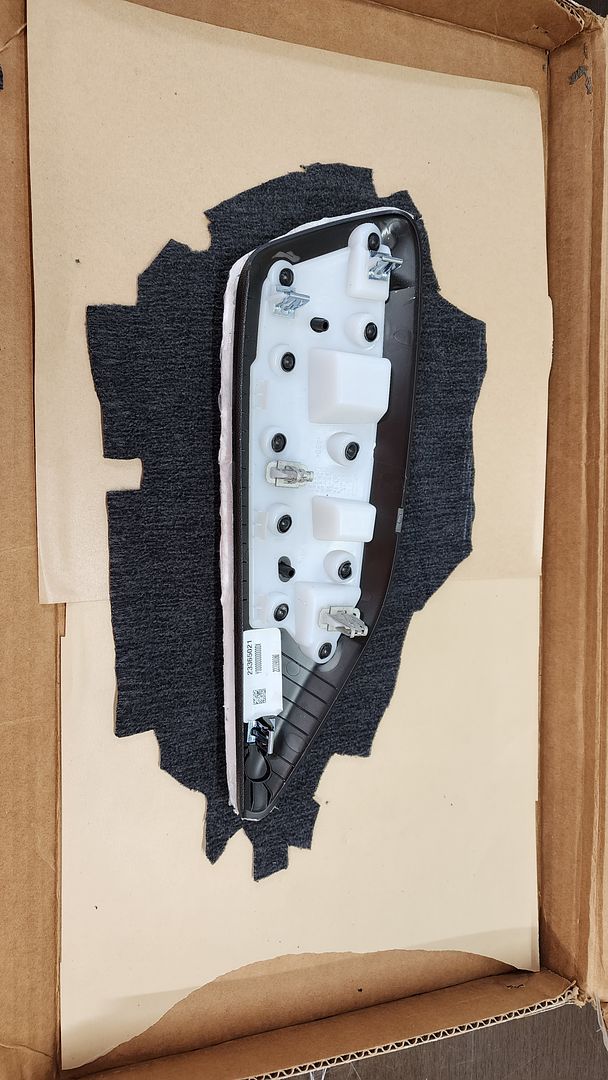
Ordered new clips to replace the stock clips that aren't in good shape (some appear to be single-use).
 Tessa tape on the connectors and wiring and sealant on the back of the adapter. 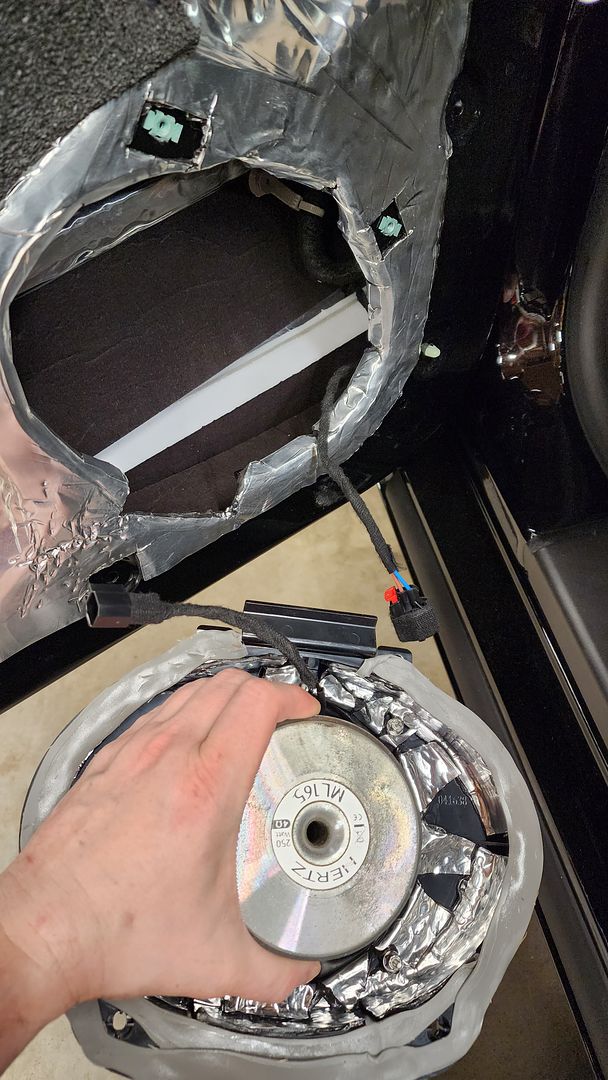 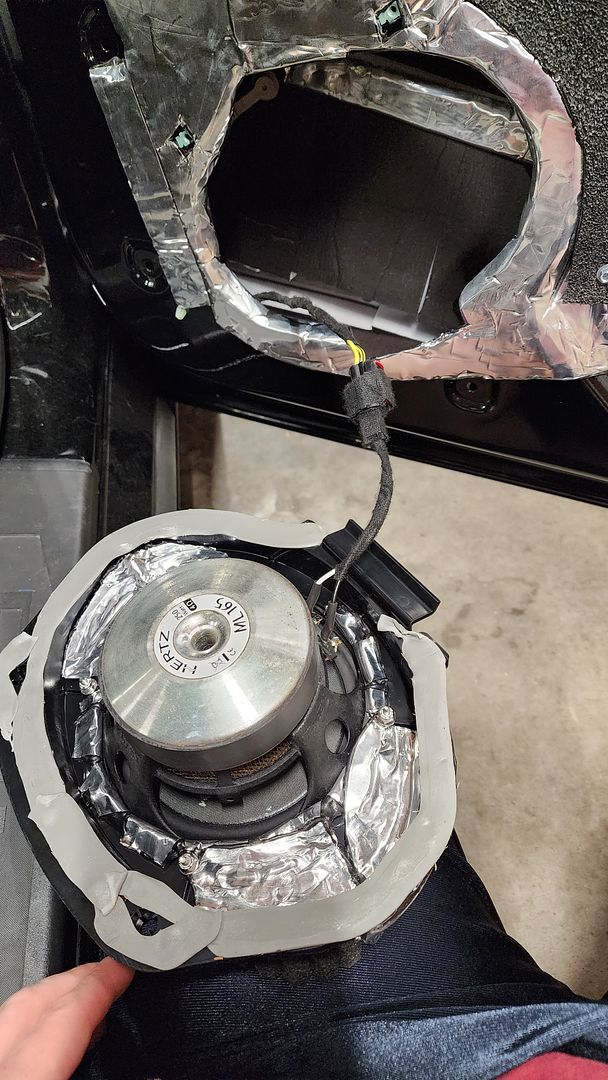 end result 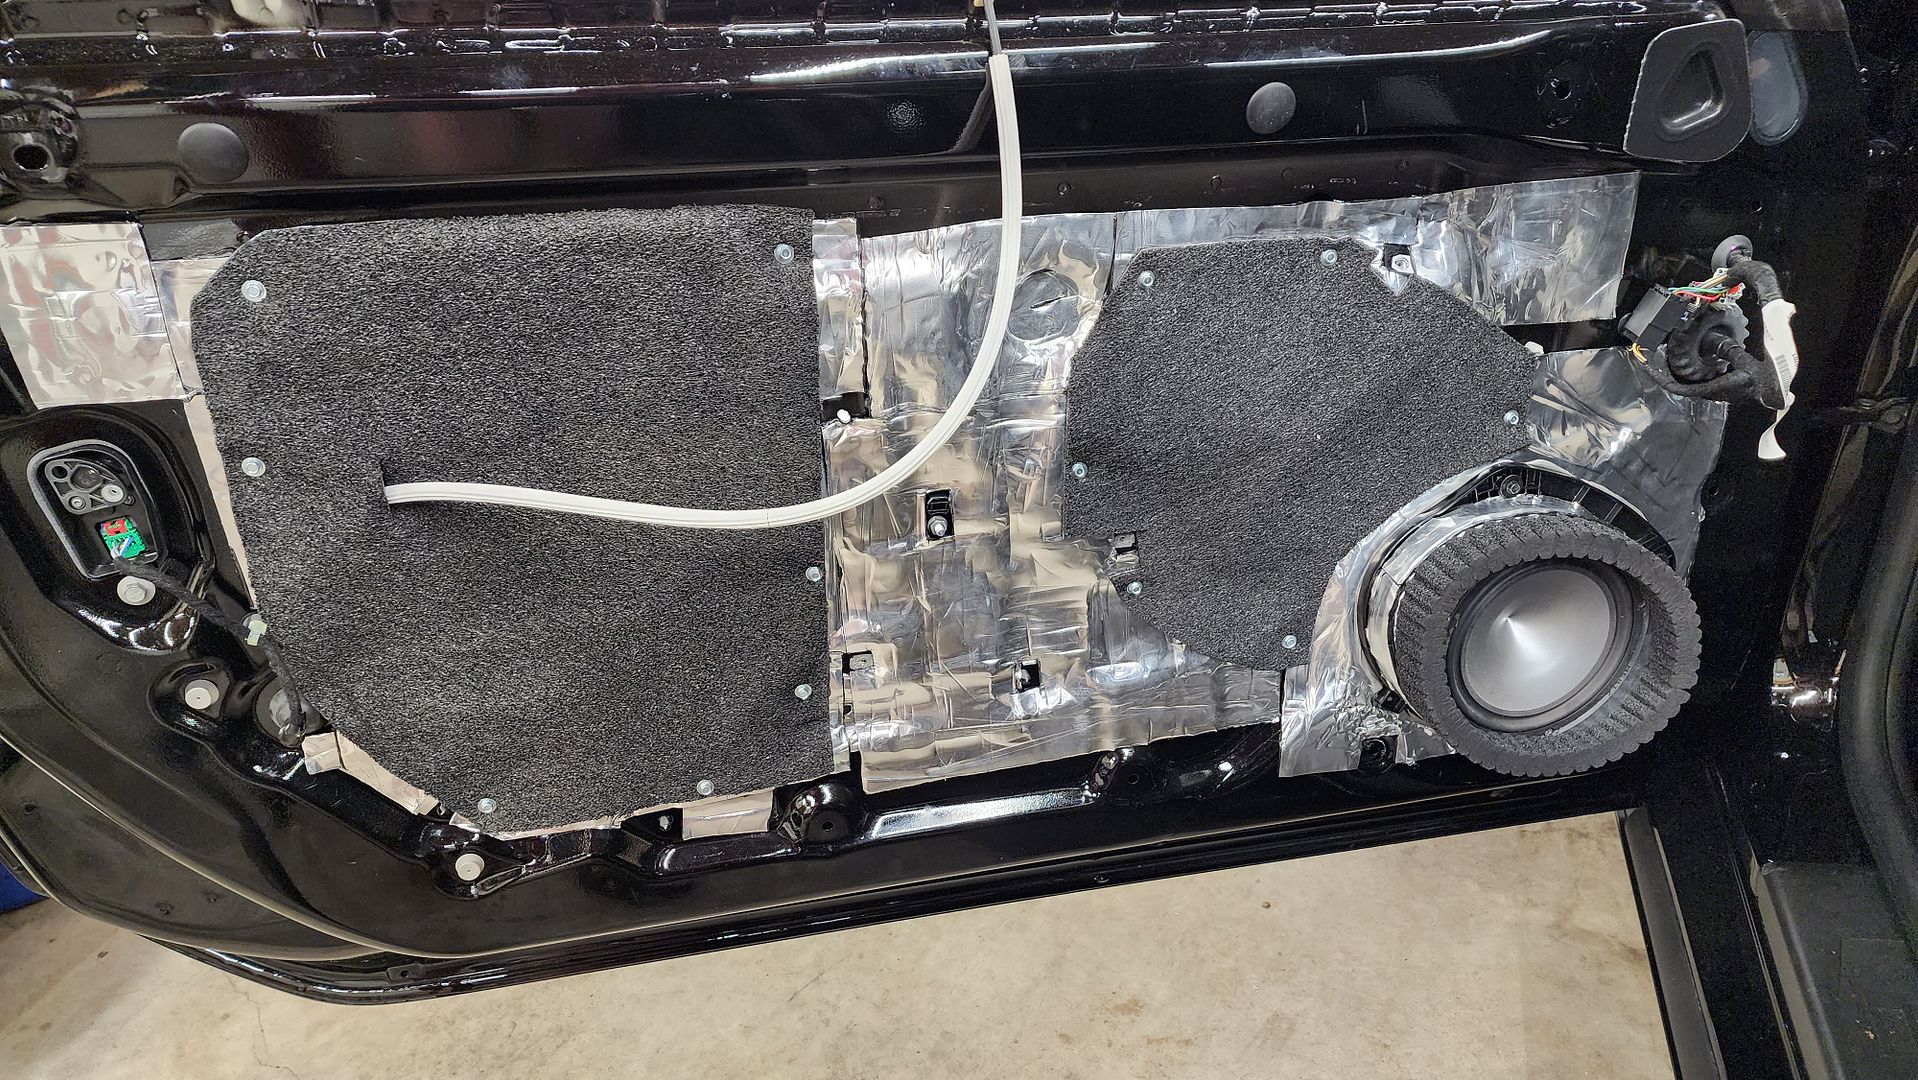 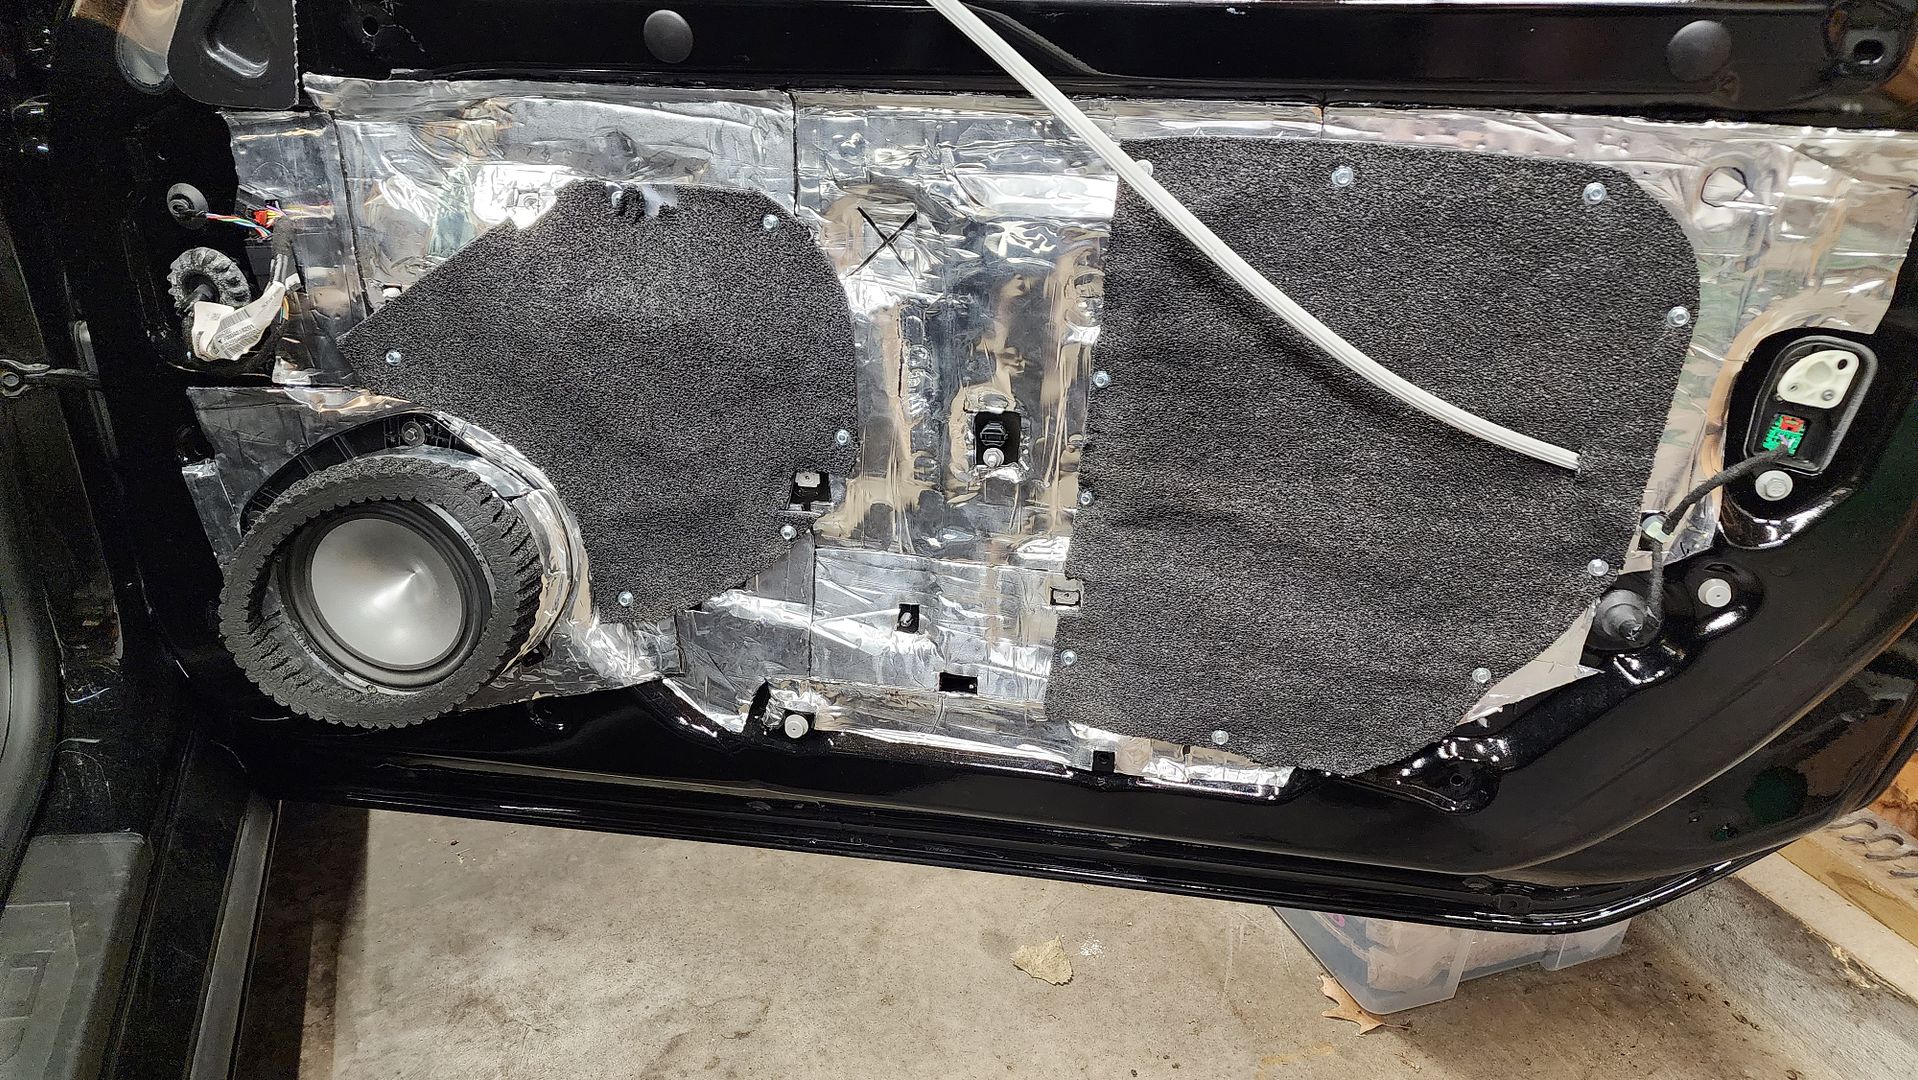 The rear deck is so tight, you cannot fit a useful speaker back there. If these are going to be in the rear deck, it will have to be from below. I haven't decided yet if they are even worth the effort, but the nice thing about mount from below is that I don't have to make my mind up now, I just need to prepare it. I have some stainless thumb-turn screws that I can embed into the mount, so I won't need access to the top of the bracket. 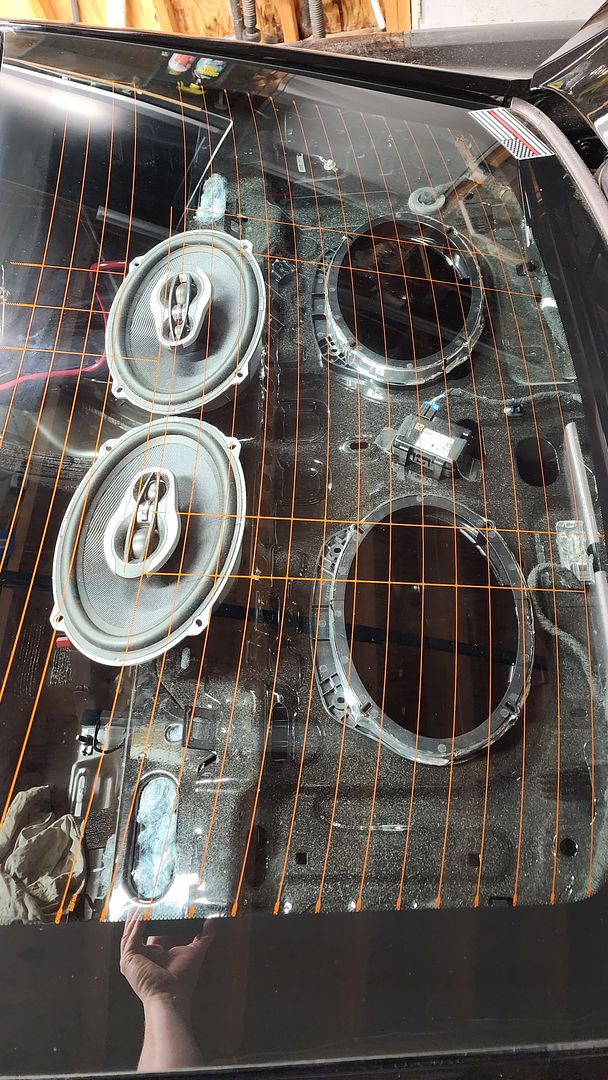 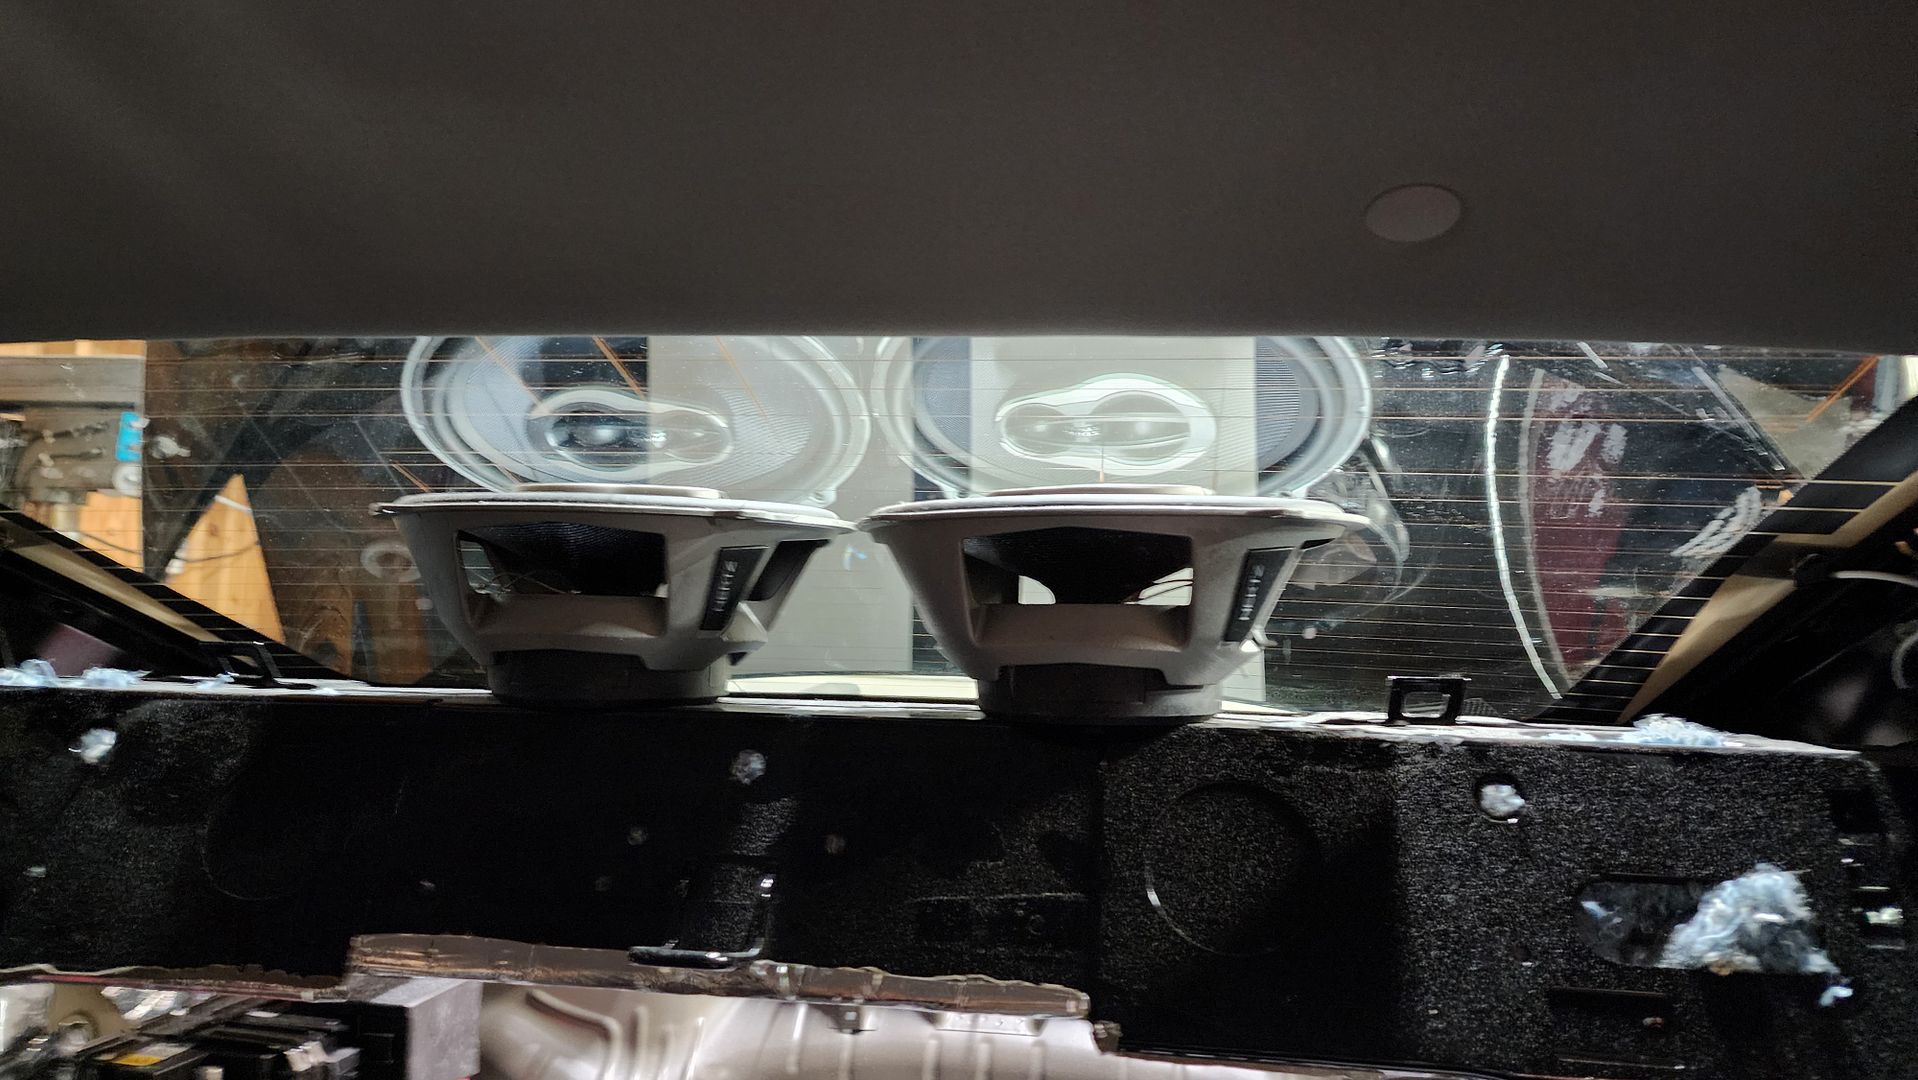
__________________
2023 1SS A10 Black NPP/C2U/H72 - Daily Driver
Historically an Accord and Camry owner with self-performed maintenance/repair. 1100: 5/3/22 . . . . . . . 2000: 6/25/22 . . . . . .4000: 8/17/22 . . . . . . . 6000: 9/10/22 Daily Driver mileage update: 22k mi. @ April 2024 New Engine @ 22,600 Build Log: https://www.camaro6.com/forums/showt...6#post11353116 |
|
|
|
|
10-20-2023, 11:54 AM
|
#31 |
|
Electrical Engineer
Drives: 2023 1SS A10 Black Join Date: Apr 2022
Location: Illinois
Posts: 779
|
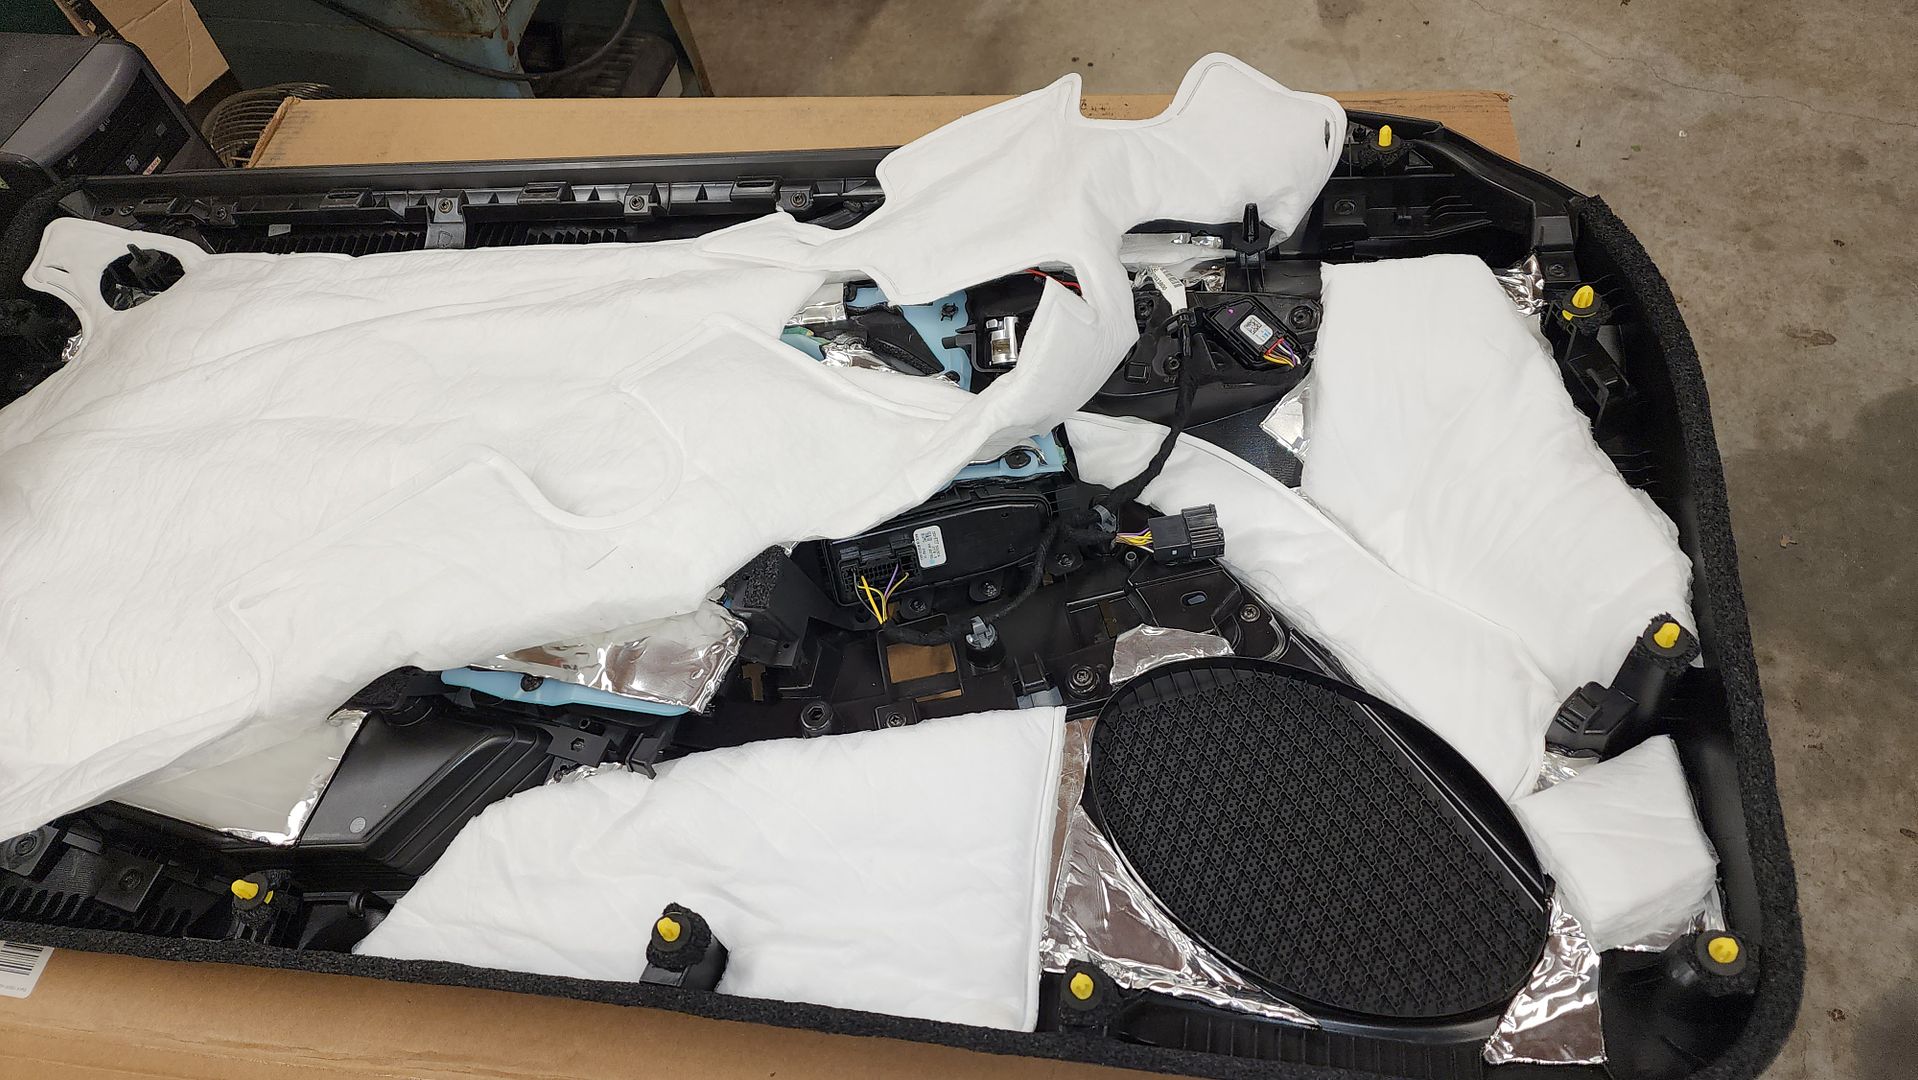
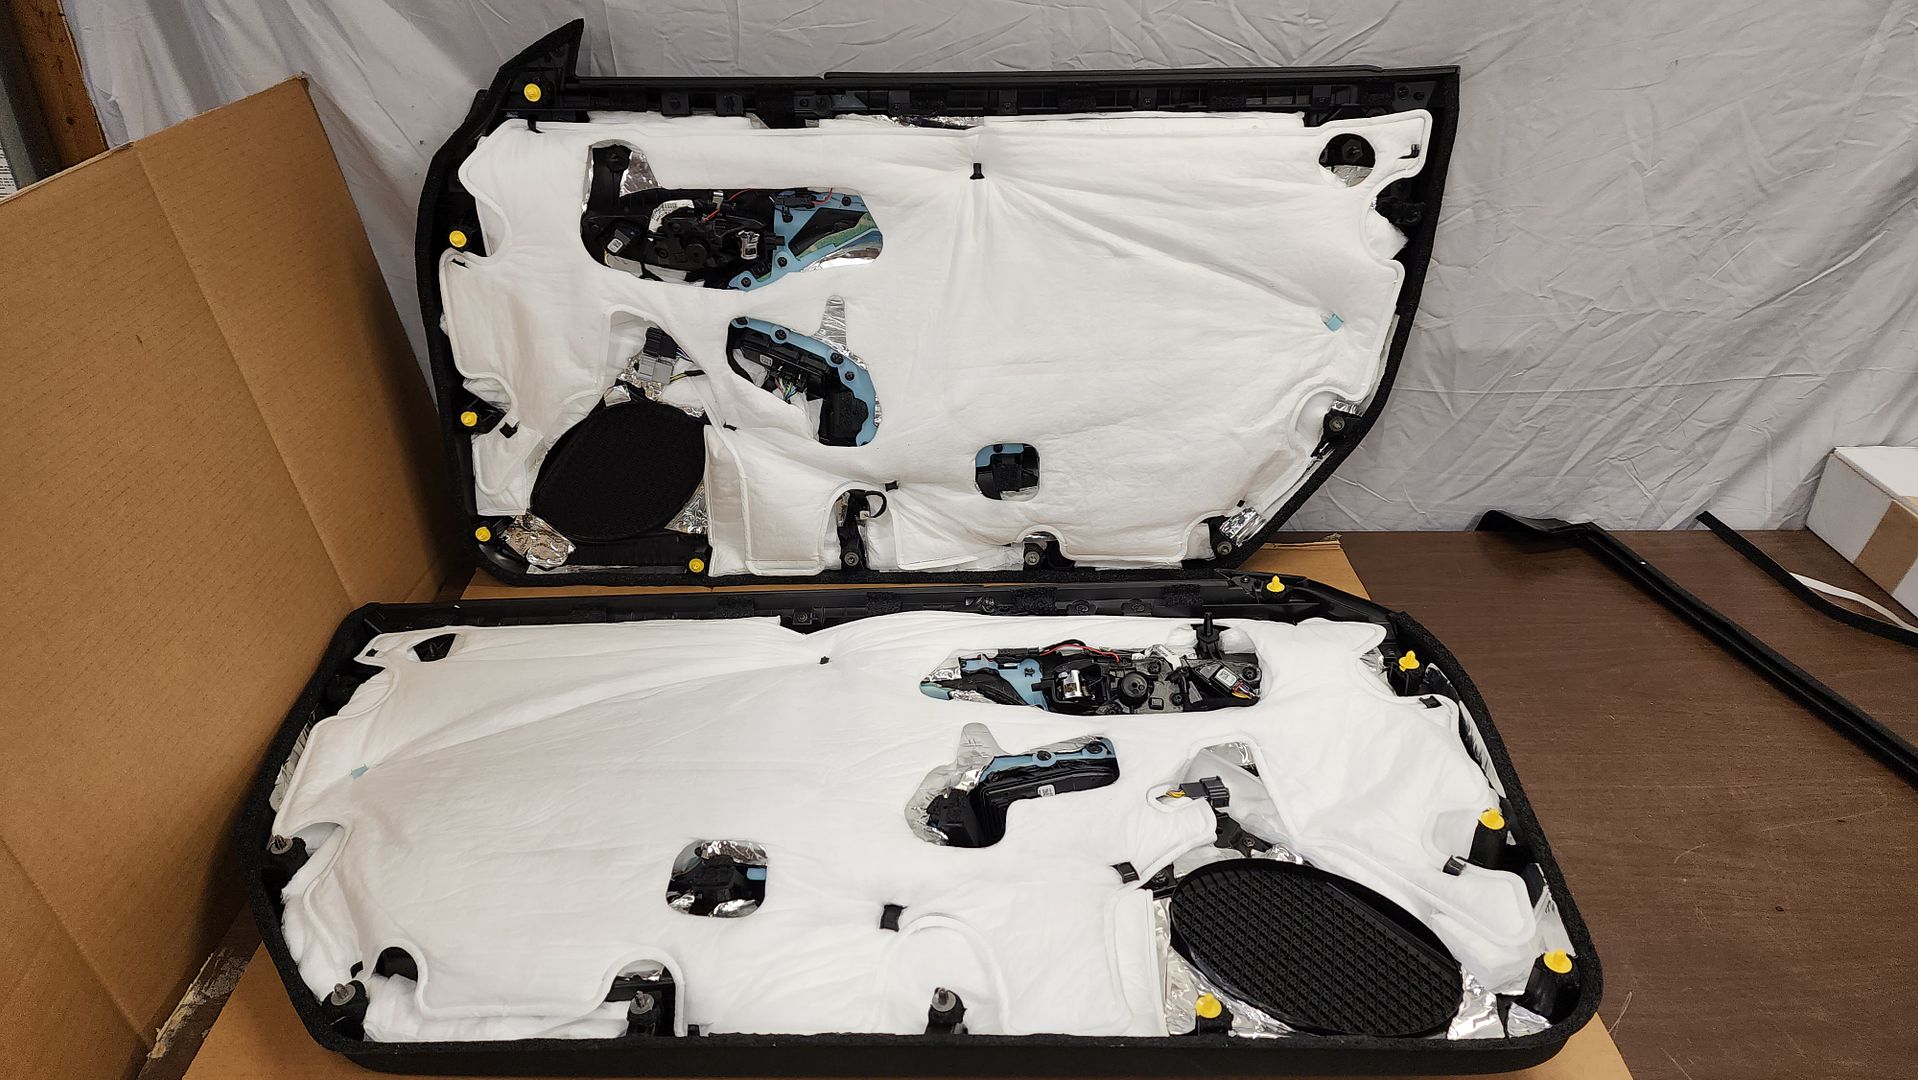
The doors are finally done and reassembled!
The door panels require a lot of attention to detail in order to be acoustically dead. I spent about 2 hours per door panel. Before vs After 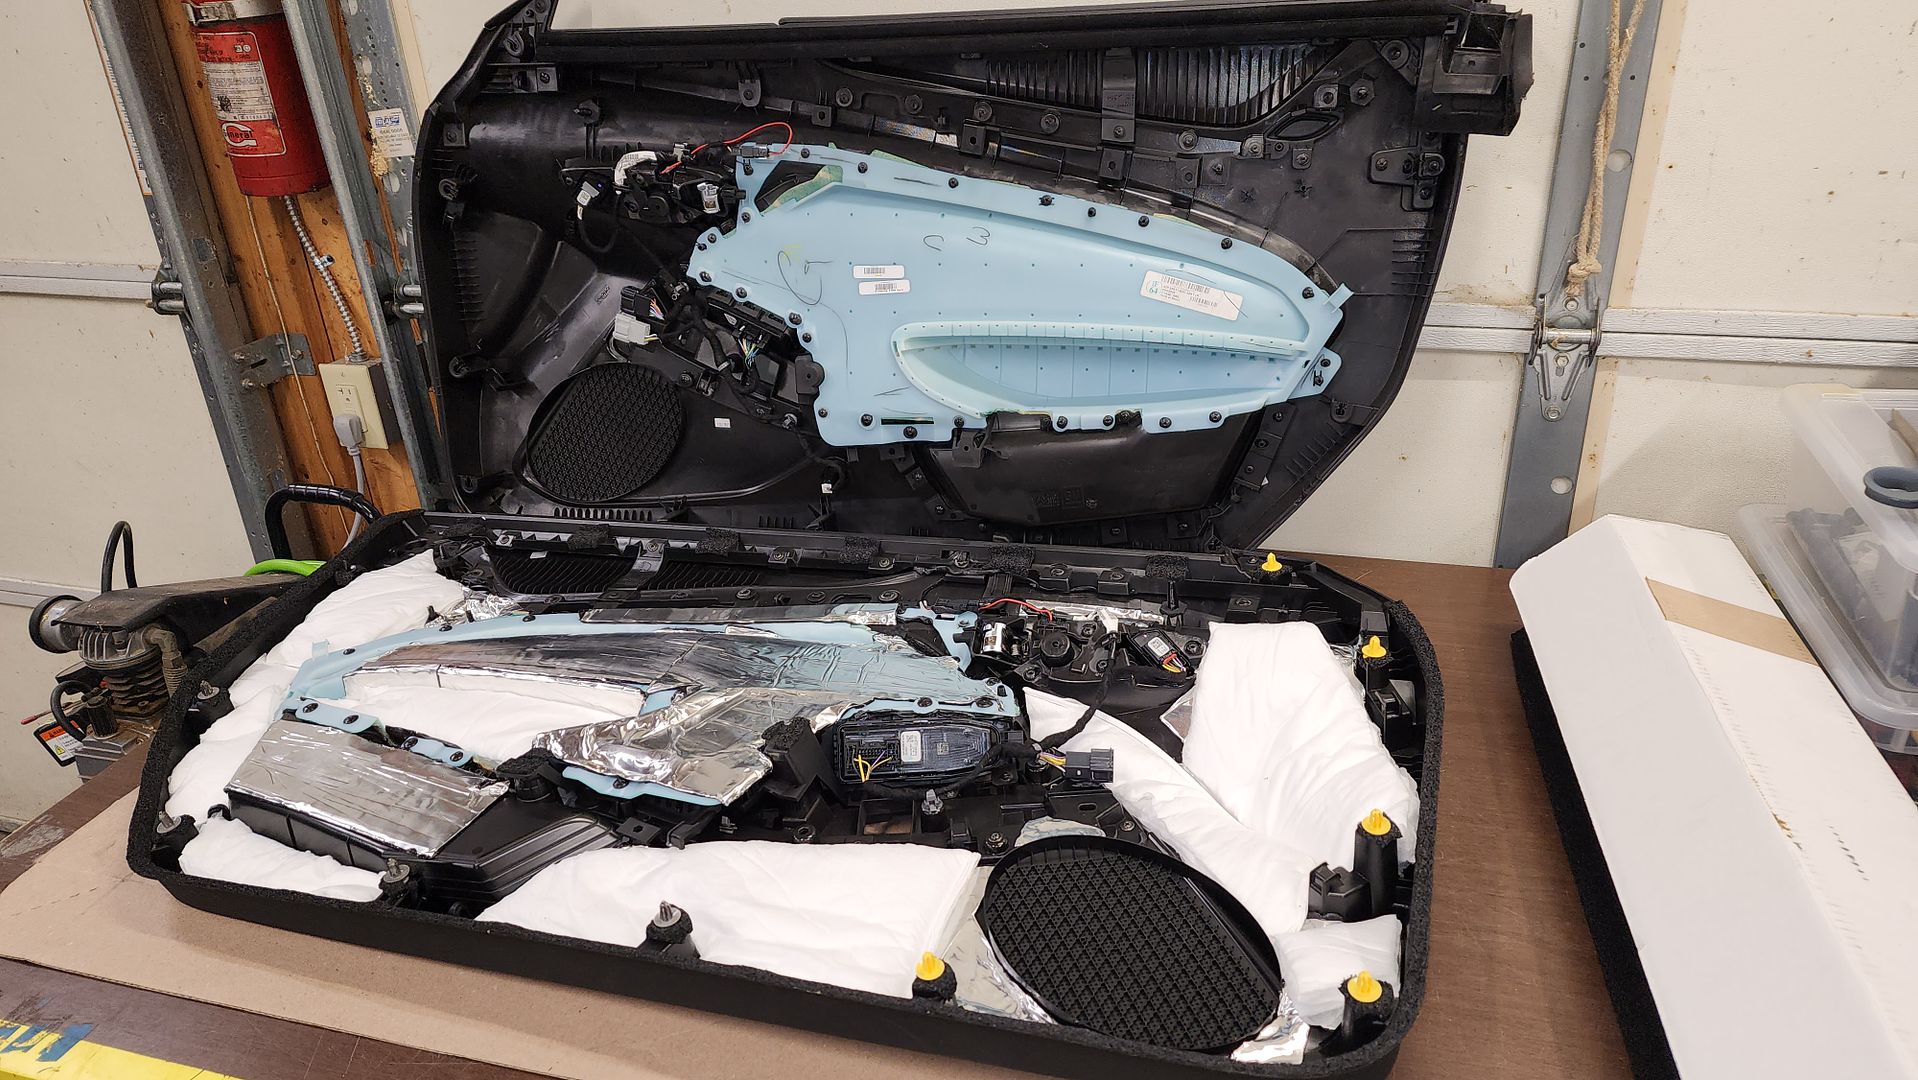 I used Resonix CLD, Butyl Rope, thin CCF, and Fibermat 45. Start by cleaning the panel off then removing necessary items to identify gaps and parts/pieces that require Butyl Rope. Stuff the Butyl Rope by first removing sections then warming/stretching to make it pliable then stuff it into the gaps. This is tedious, but is an important step to prevent rattles/buzzing from those annoying plastic parts. This works well around loose connectors as well. Then apply CLD by using the largest pieces you can manage. Lots of small pieces aren’t effective, so just stick to the large areas. Be creative and use paper to build templates, these areas are weird.  Next, cut the CCF into thin strips and apply to the parts and pieces you removed to keep them from buzzing. Then you can also do any mating surfaces with the door metal itself. Lastly, foam the door clip locations as they can buzz/rattle in the door. 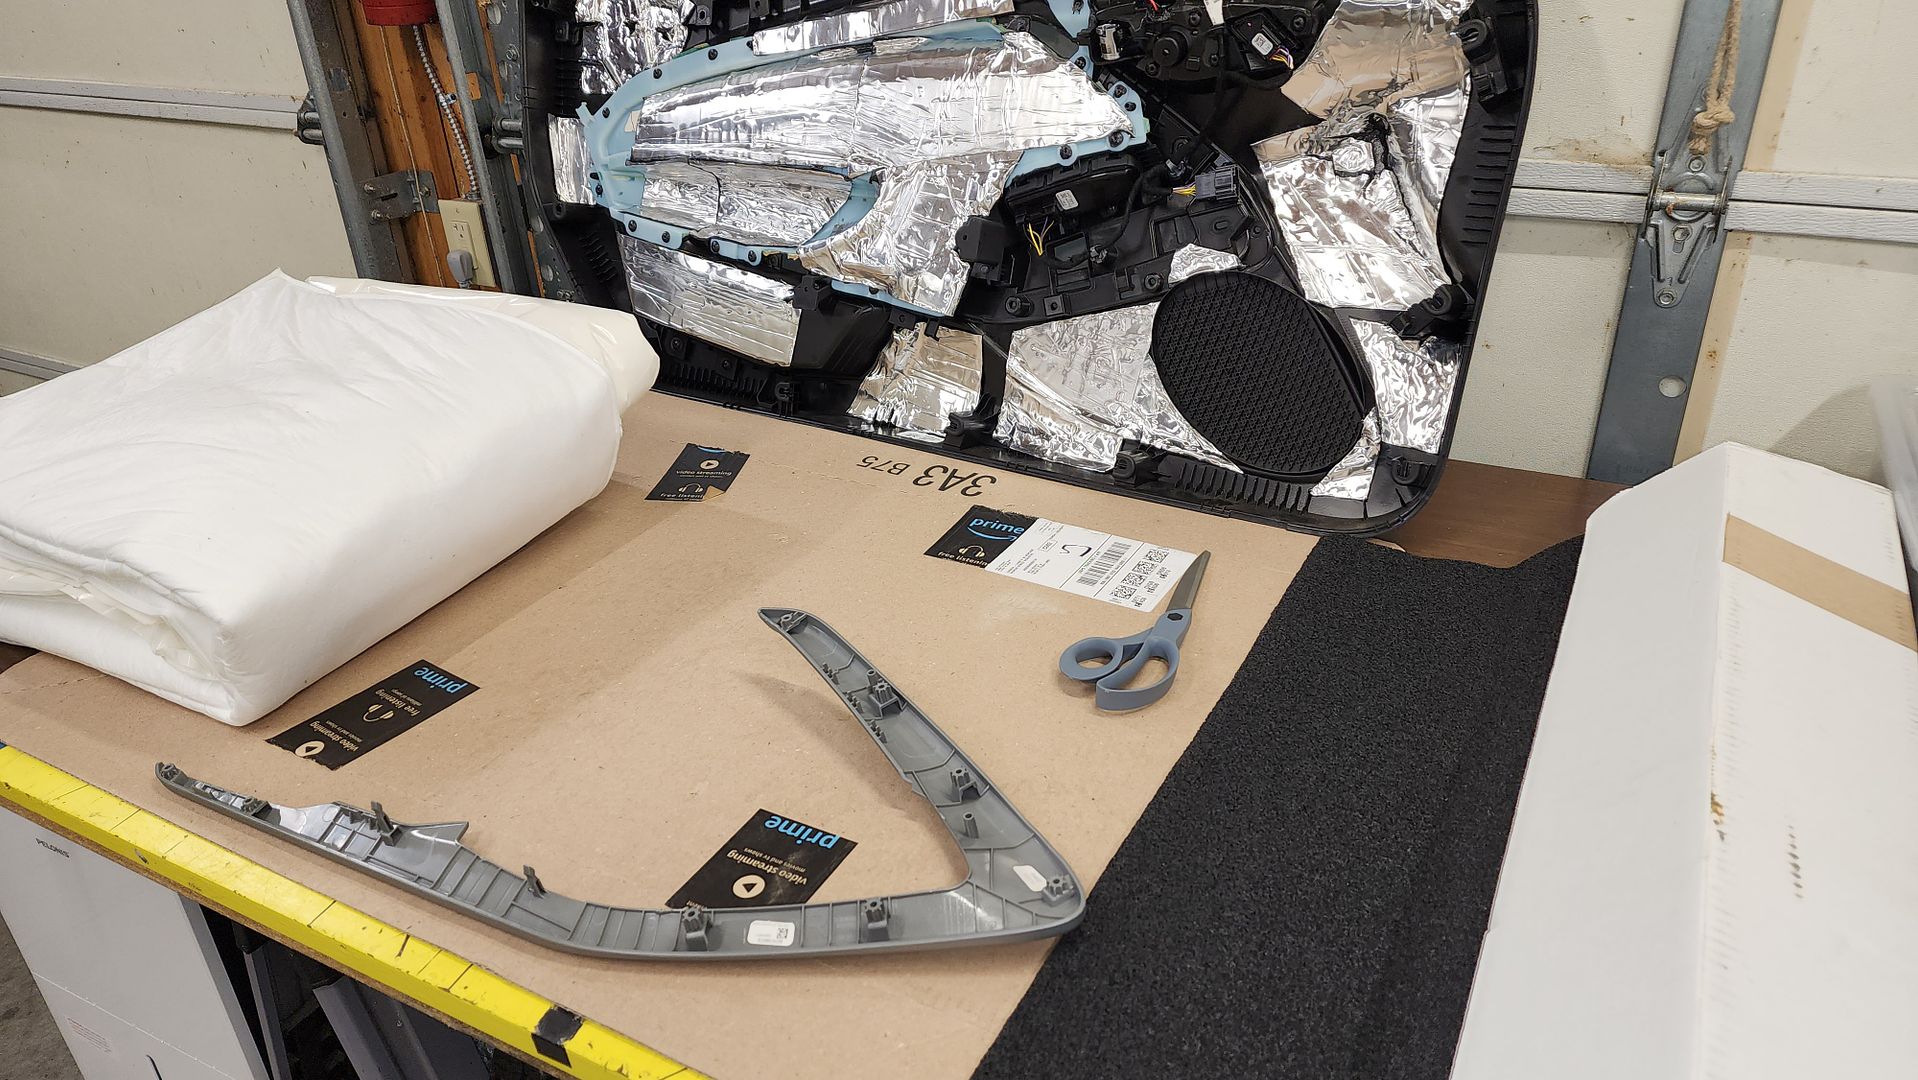 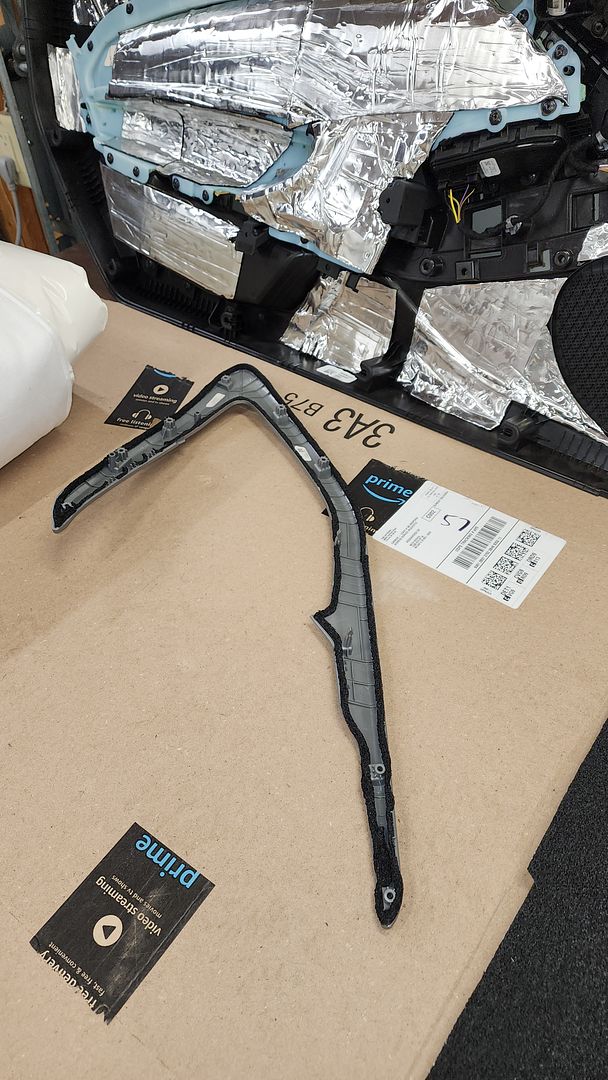 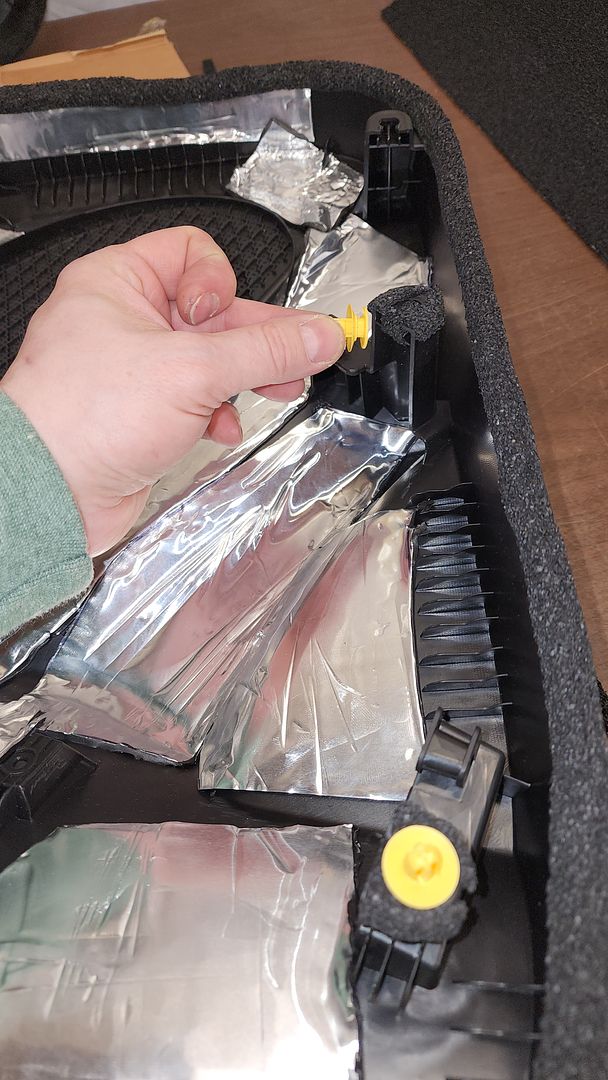  
__________________
2023 1SS A10 Black NPP/C2U/H72 - Daily Driver
Historically an Accord and Camry owner with self-performed maintenance/repair. 1100: 5/3/22 . . . . . . . 2000: 6/25/22 . . . . . .4000: 8/17/22 . . . . . . . 6000: 9/10/22 Daily Driver mileage update: 22k mi. @ April 2024 New Engine @ 22,600 Build Log: https://www.camaro6.com/forums/showt...6#post11353116 |
|
|
|
|
10-20-2023, 11:55 AM
|
#32 |
|
Electrical Engineer
Drives: 2023 1SS A10 Black Join Date: Apr 2022
Location: Illinois
Posts: 779
|
Now you’re ready for Fibermat. This is fairly easy but tedious as well. Fit as much as you can before putting the factory sound absorption back over. Templates work very well here, as do large/sharp scissors. When you’re dealing with interior pieces, you need to carefully pull the adhesive away from the rear layer by rolling it with your fingers in a corner, otherwise you’ll just pull the whole adhesive layer off.
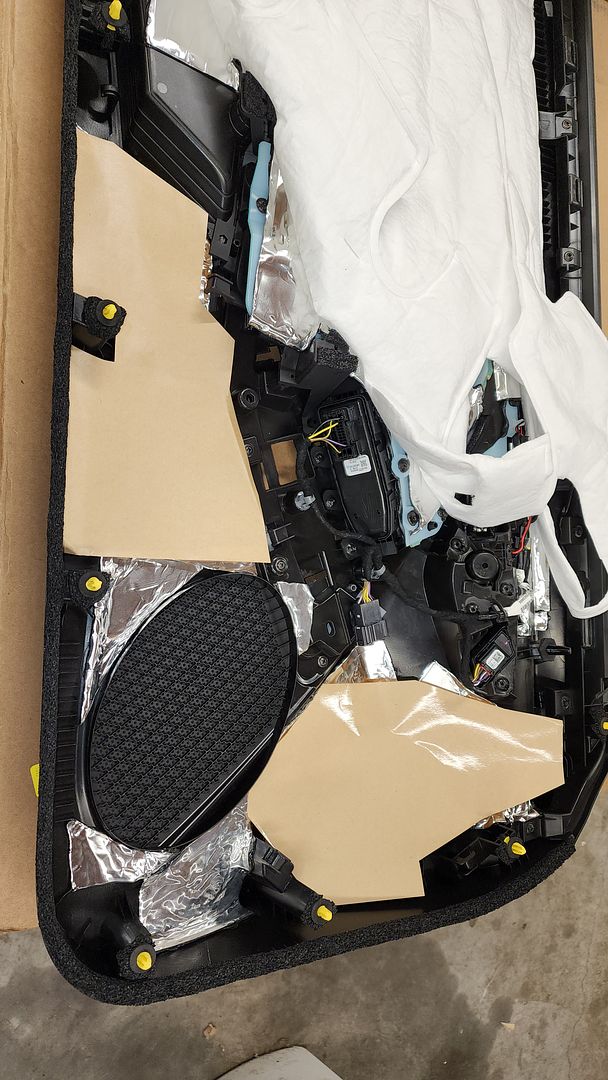  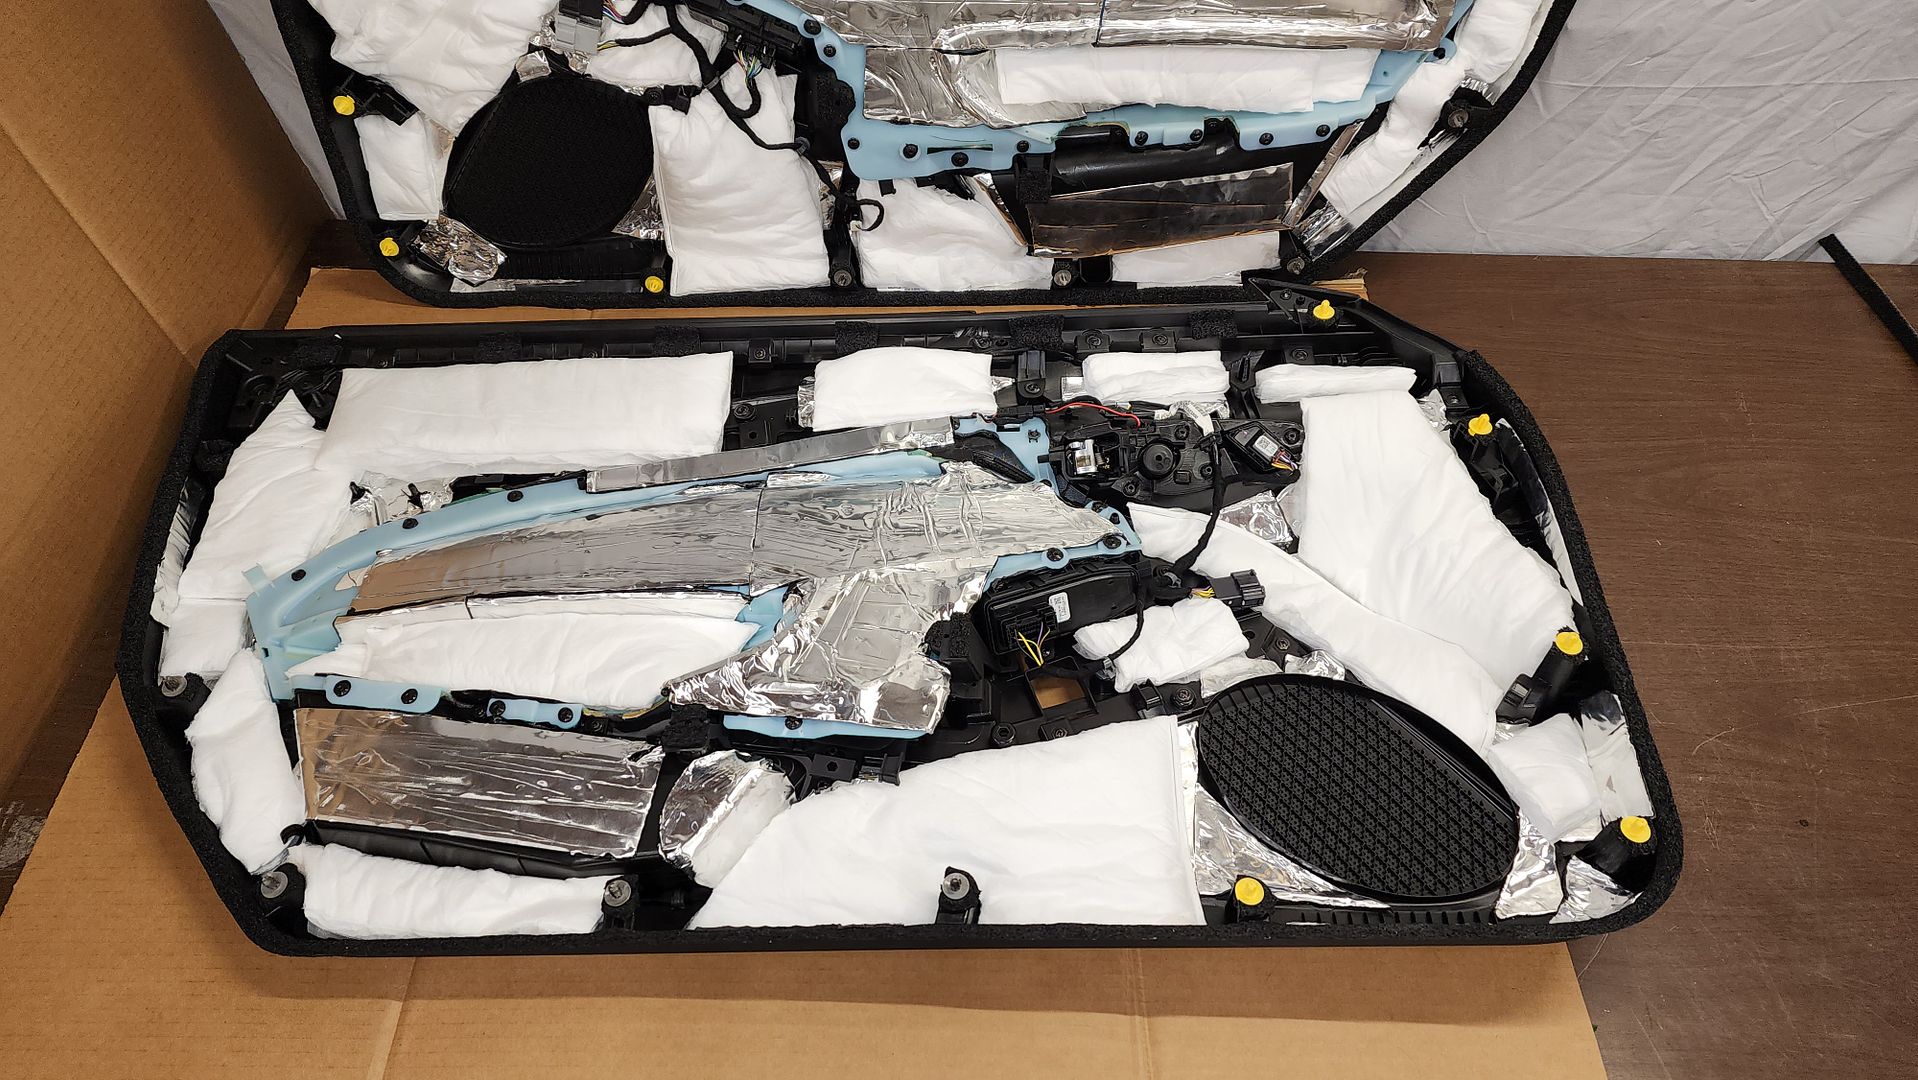 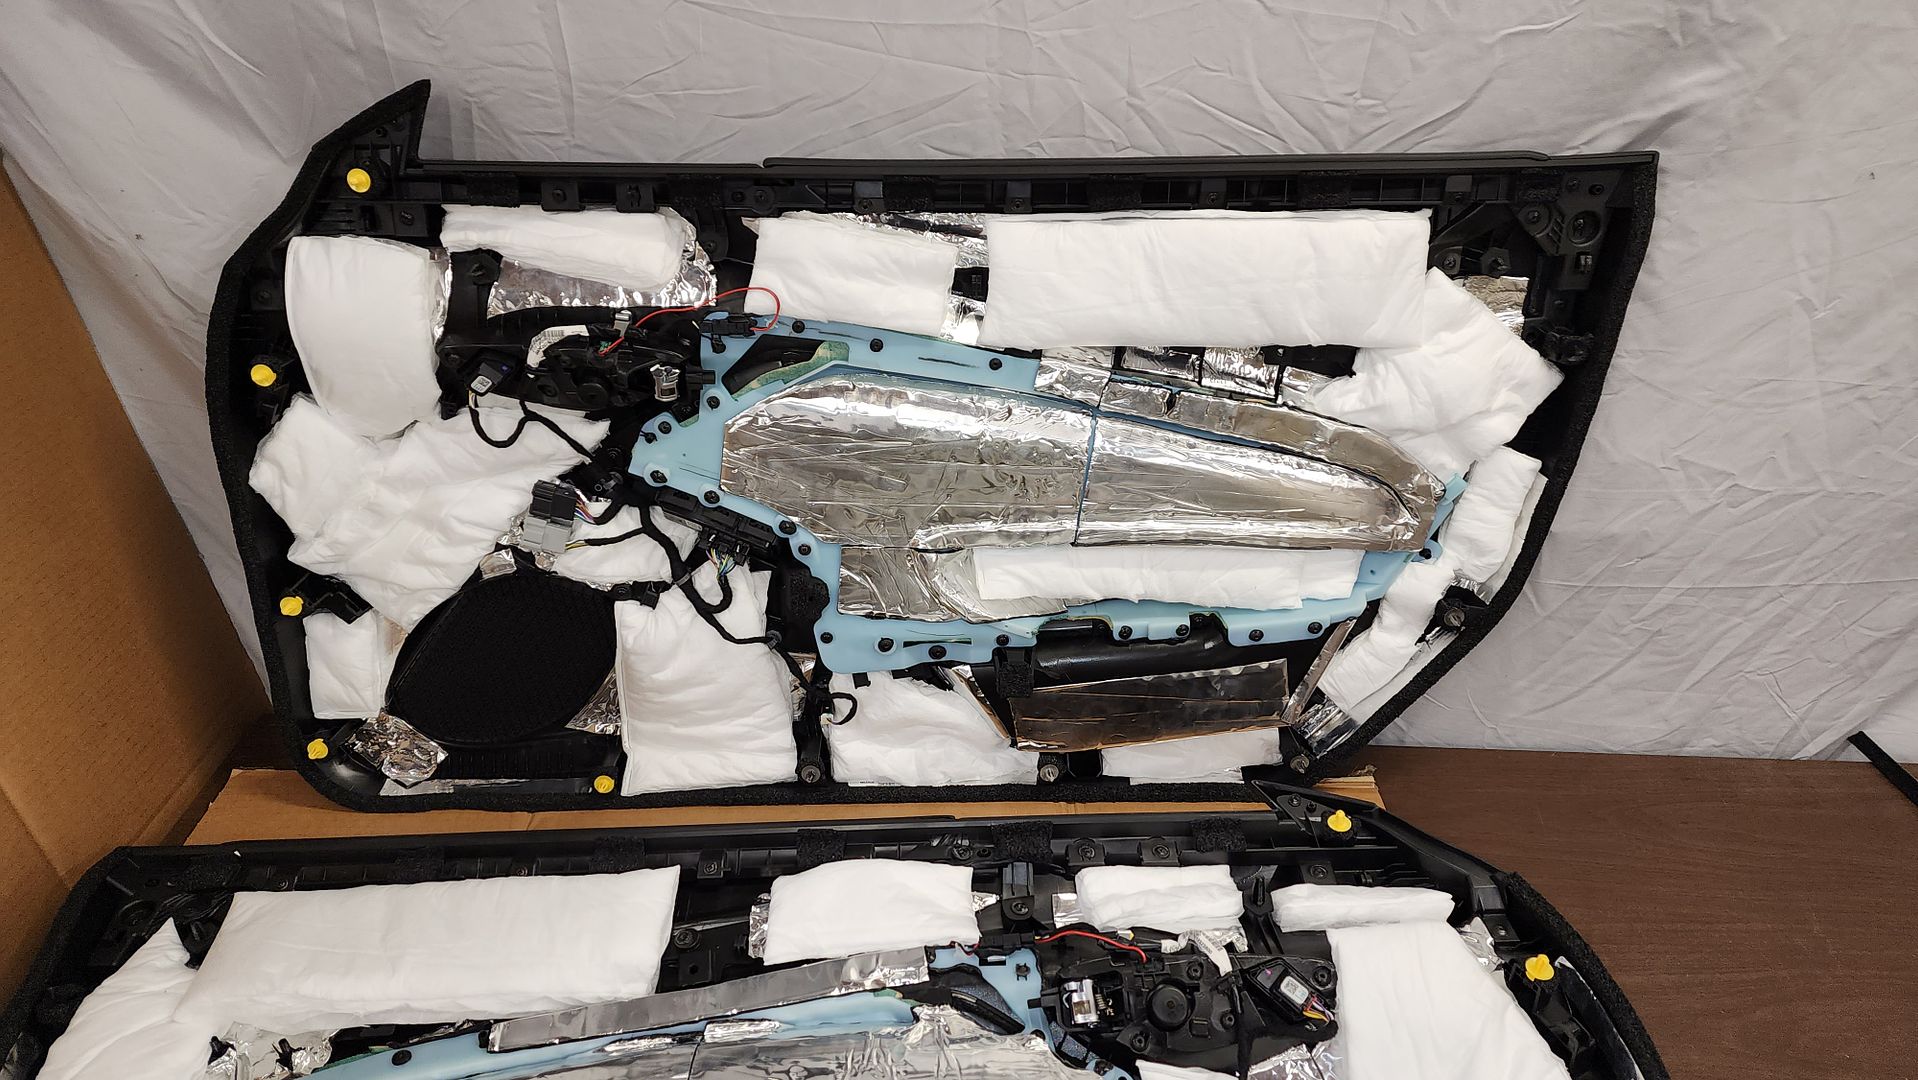 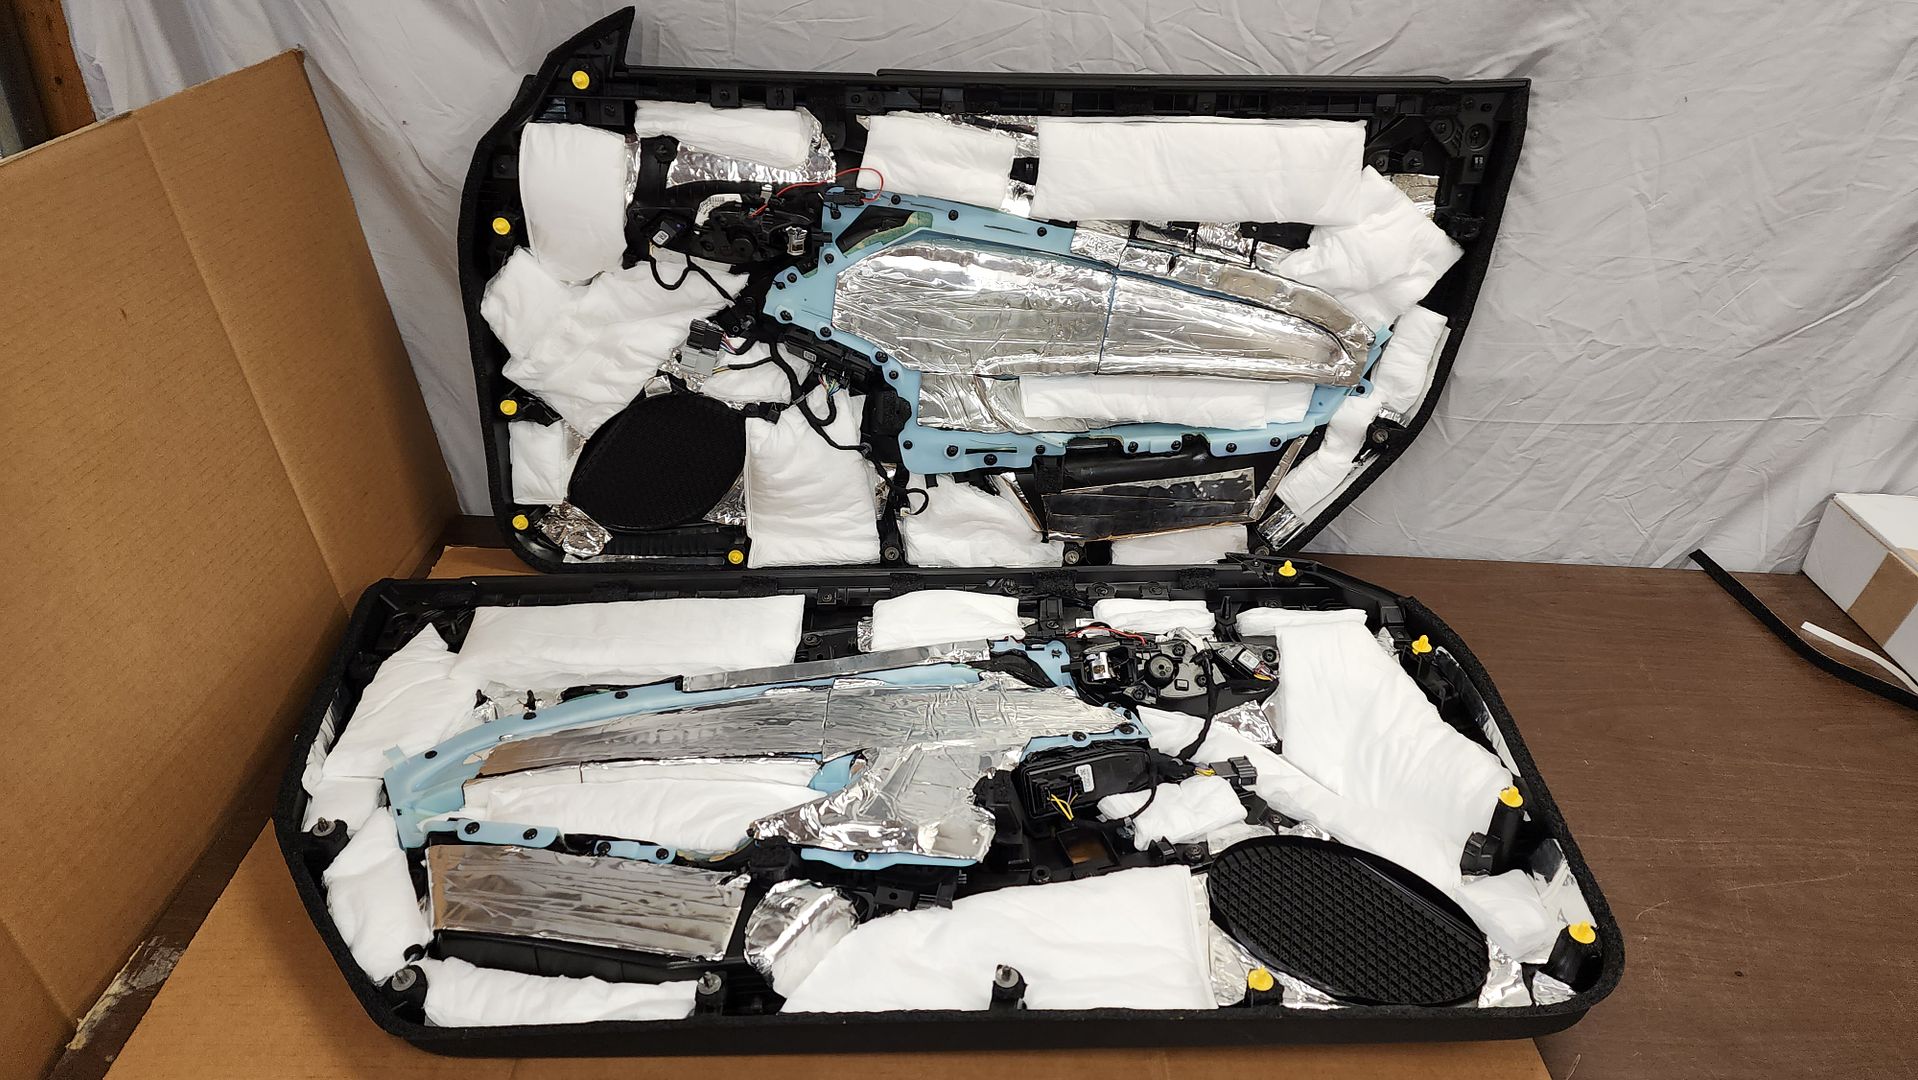  You’re now ready for reinstallation. The upper door molding clips are a PITA. They actually clip onto the door metal then the weatherstripping falls onto them. You have to align them with the door panel holes, which is made easier with a strip of masking tape to mark the hole locations then transfer to the door panel. This was the most annoying part of the whole process. 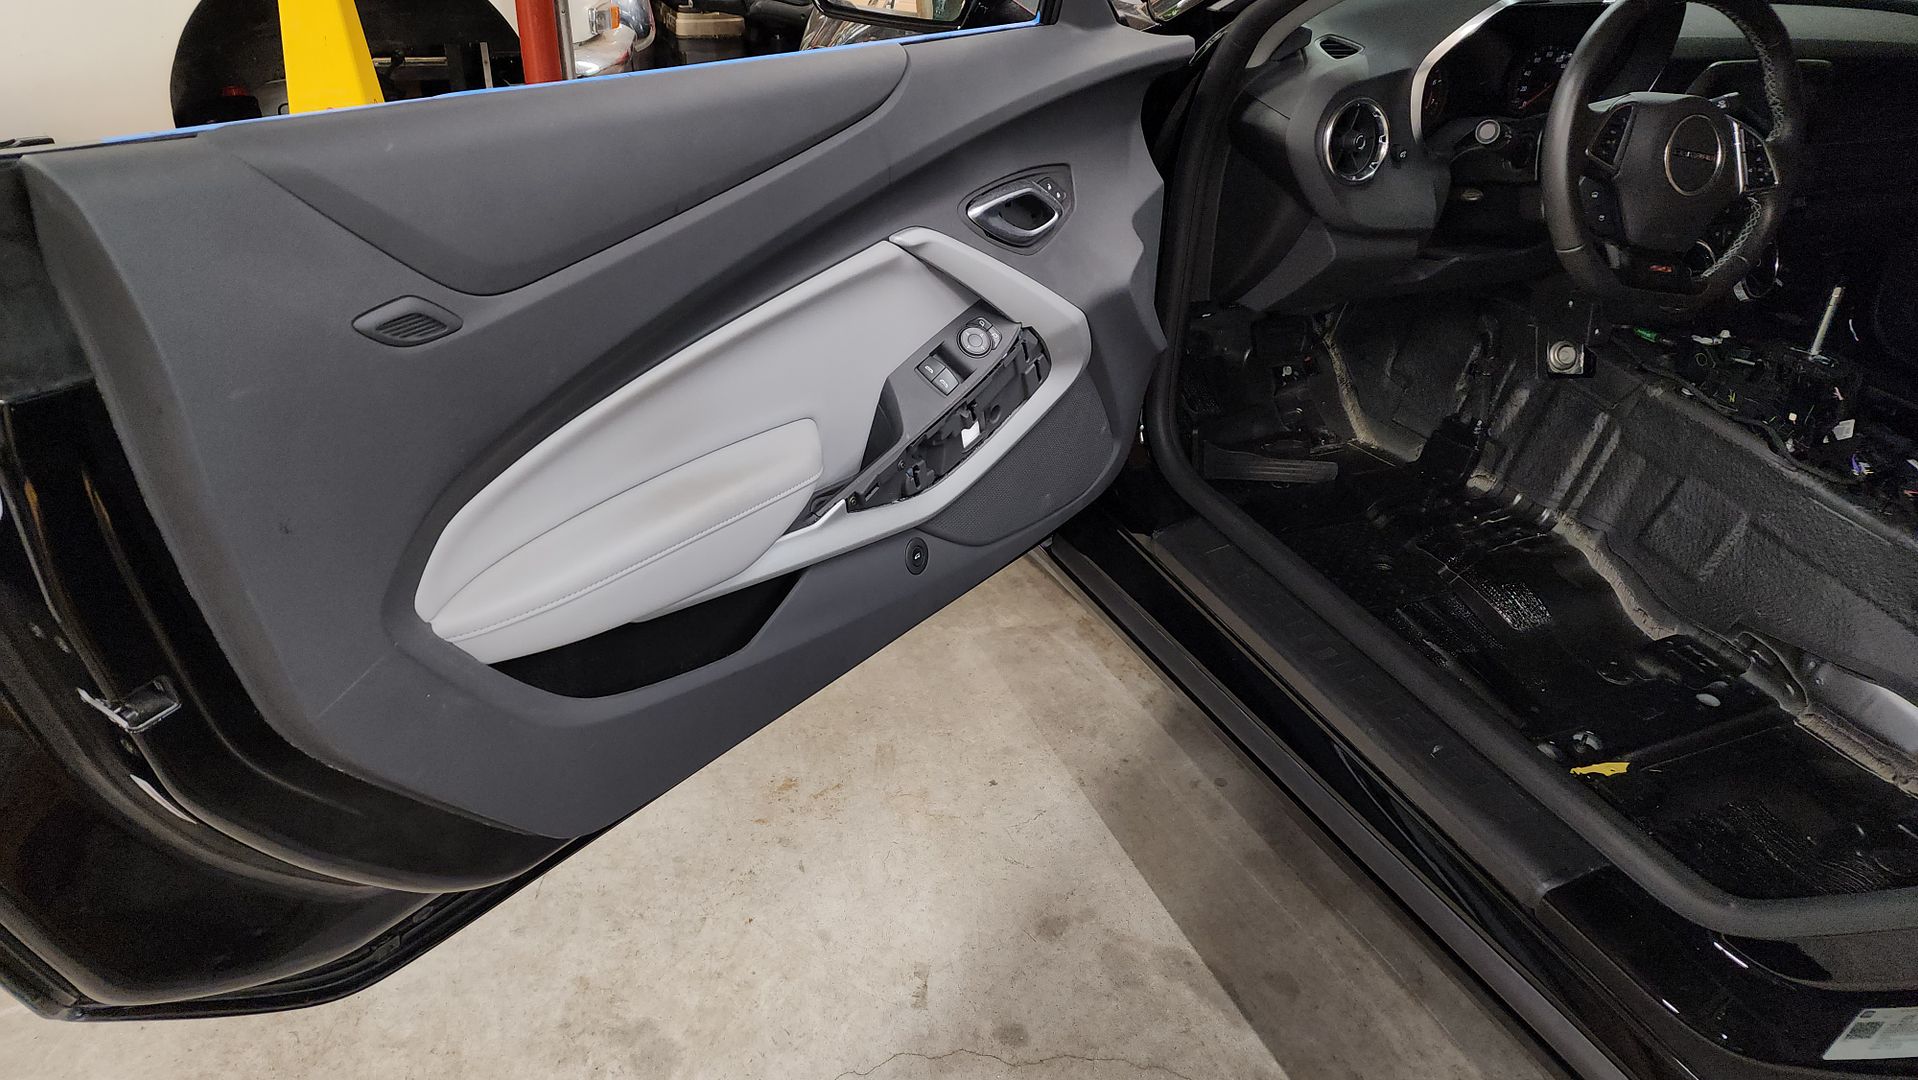 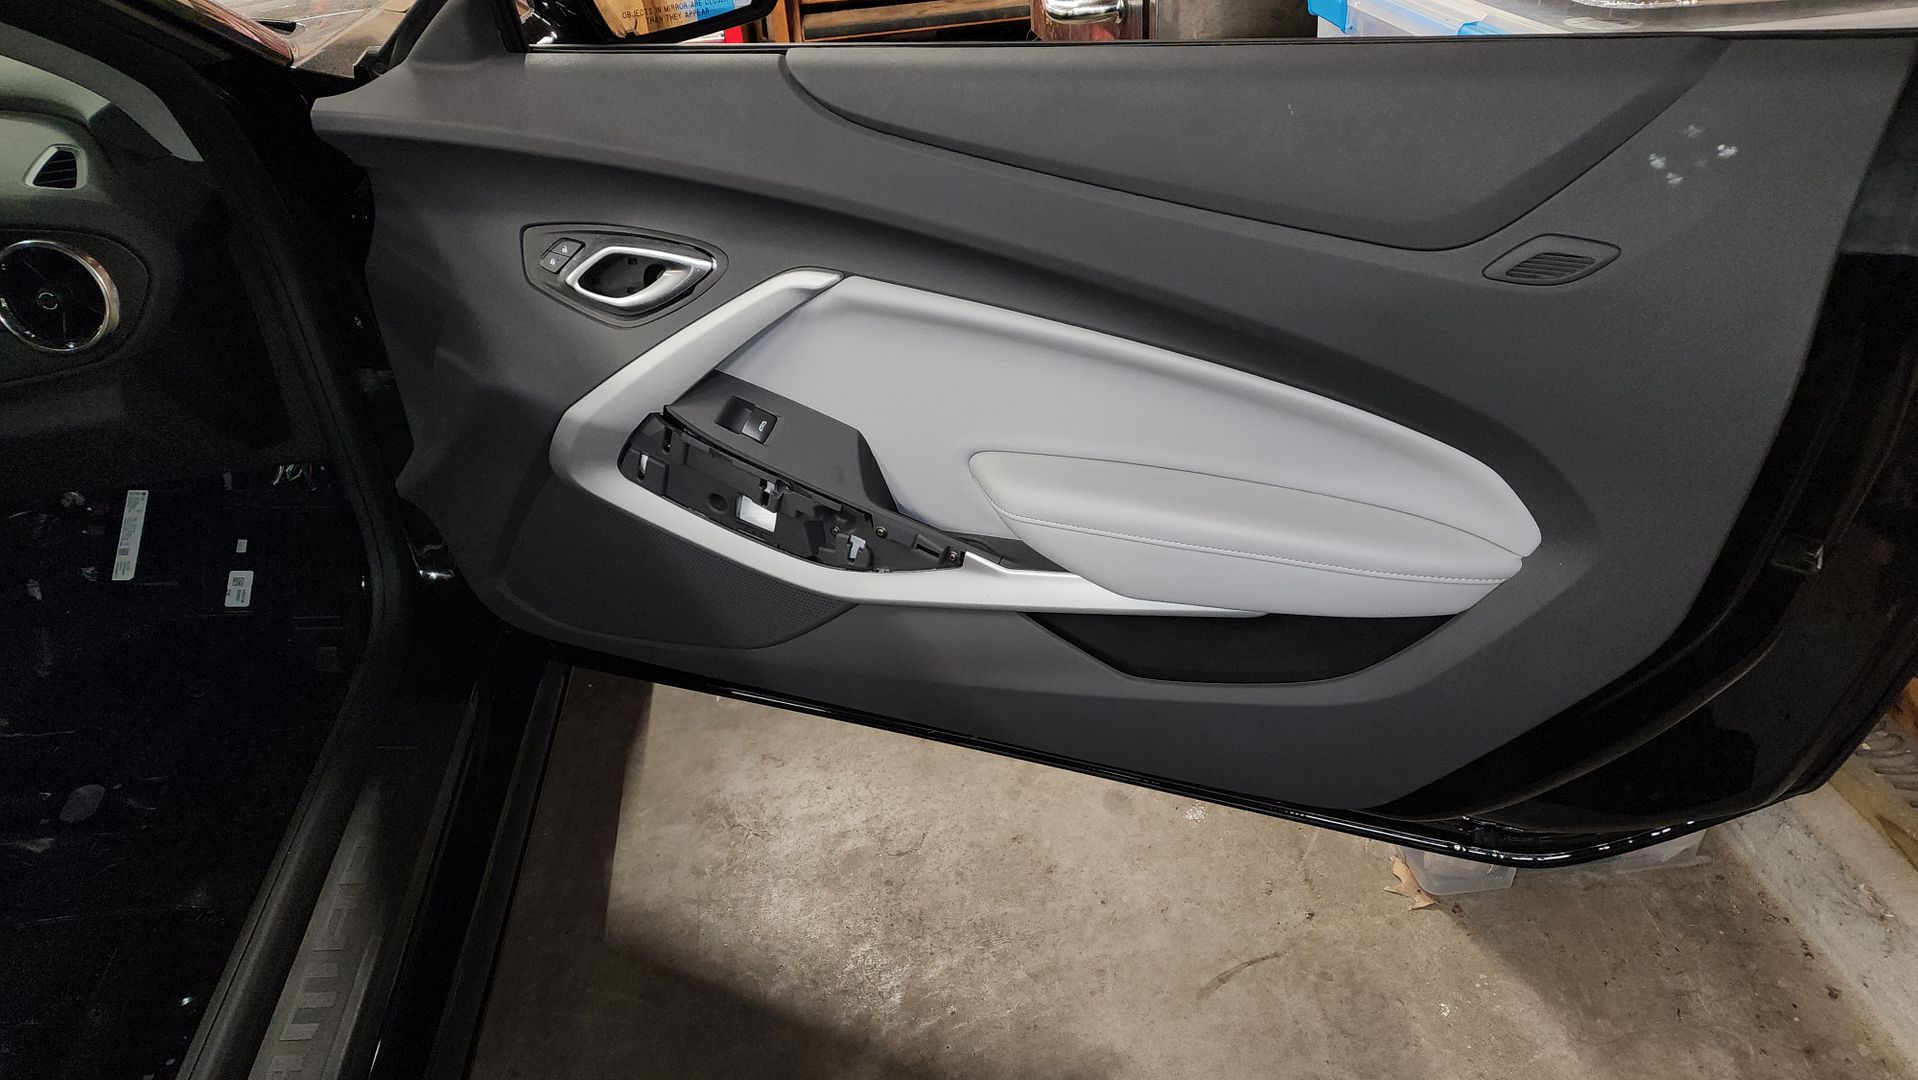 It’s also helpful to do a quick test fit and then check your speaker gasket foam for an indentation, it should have a clear and clean mark where the door panel plastic fits against the foam. 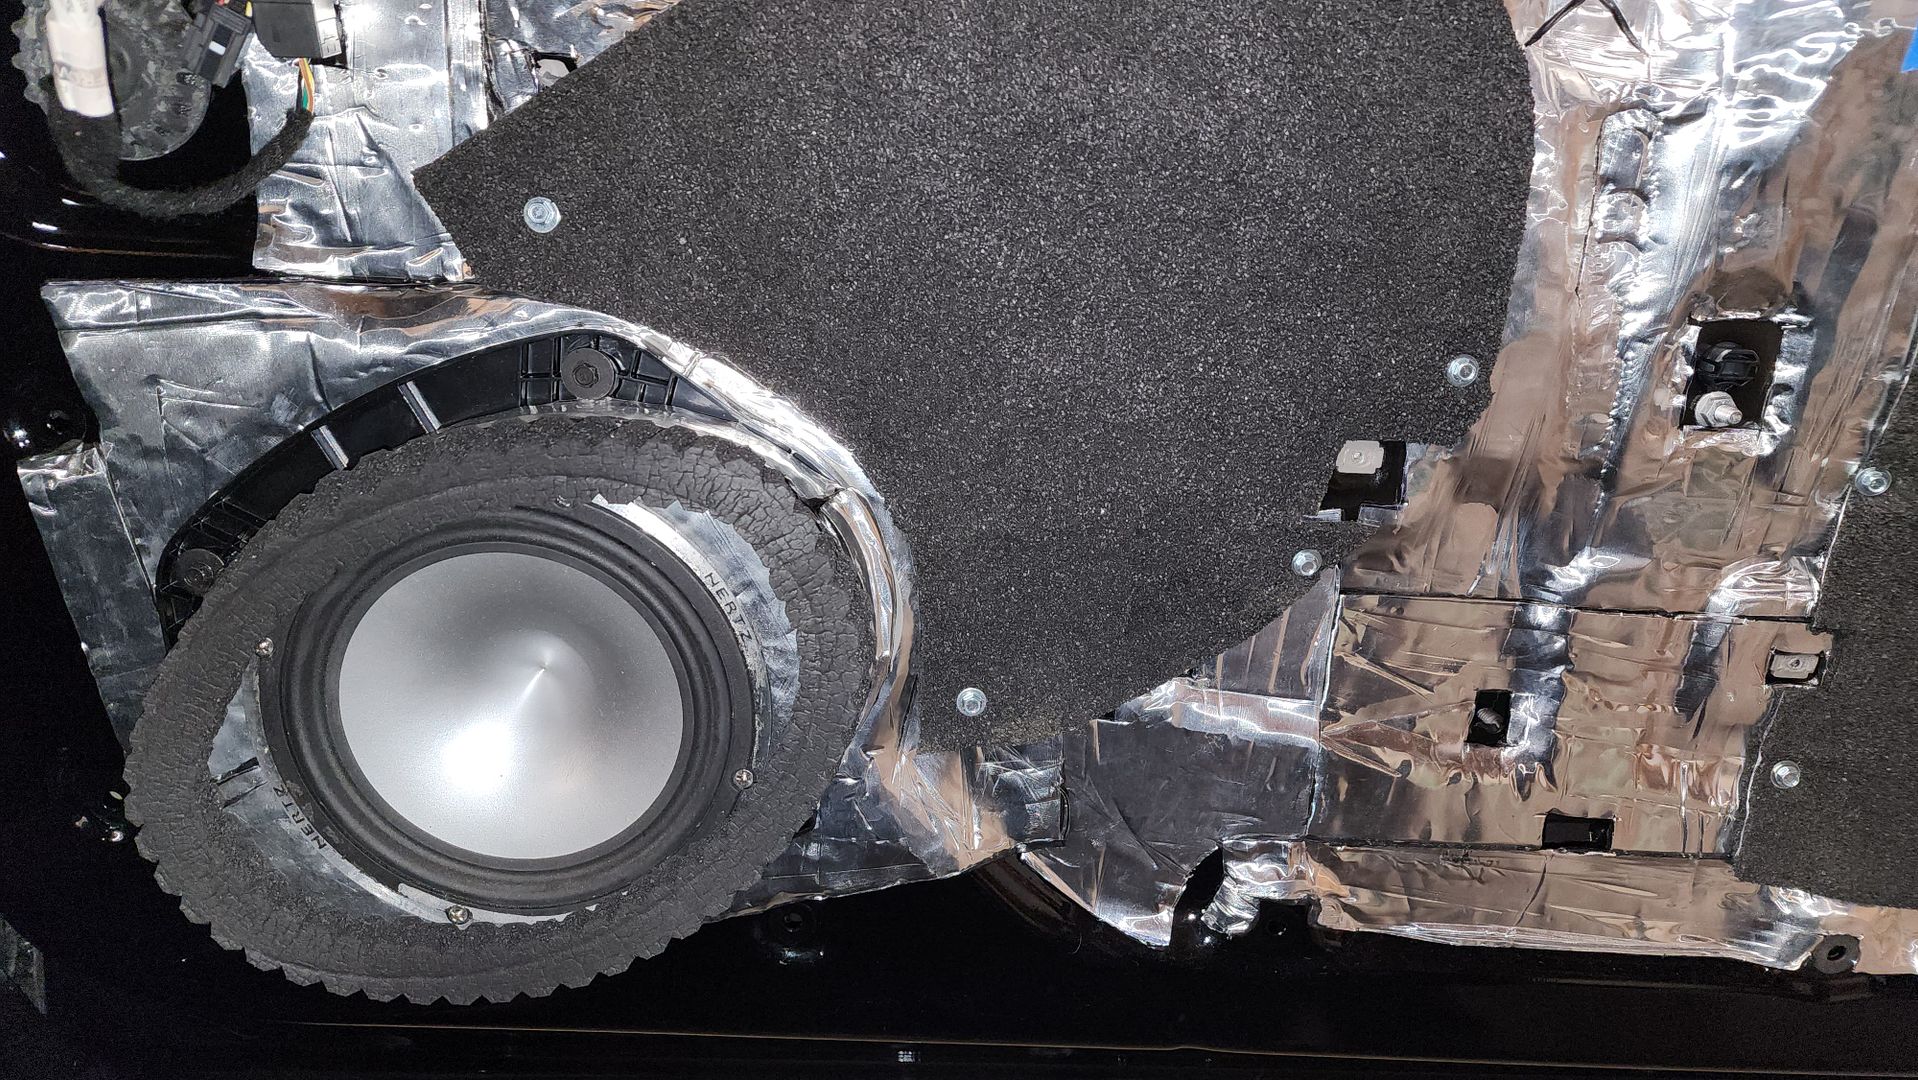 With the door panels installed, a major milestone has been hit.
__________________
2023 1SS A10 Black NPP/C2U/H72 - Daily Driver
Historically an Accord and Camry owner with self-performed maintenance/repair. 1100: 5/3/22 . . . . . . . 2000: 6/25/22 . . . . . .4000: 8/17/22 . . . . . . . 6000: 9/10/22 Daily Driver mileage update: 22k mi. @ April 2024 New Engine @ 22,600 Build Log: https://www.camaro6.com/forums/showt...6#post11353116 |
|
|
|
|
10-24-2023, 11:22 AM
|
#33 |
|
Electrical Engineer
Drives: 2023 1SS A10 Black Join Date: Apr 2022
Location: Illinois
Posts: 779
|
Once the doors were done, it was time to focus on the floor. The floor in these vehicles is pretty stiff, thanks to the awesome chassis, but all metal is resonant.
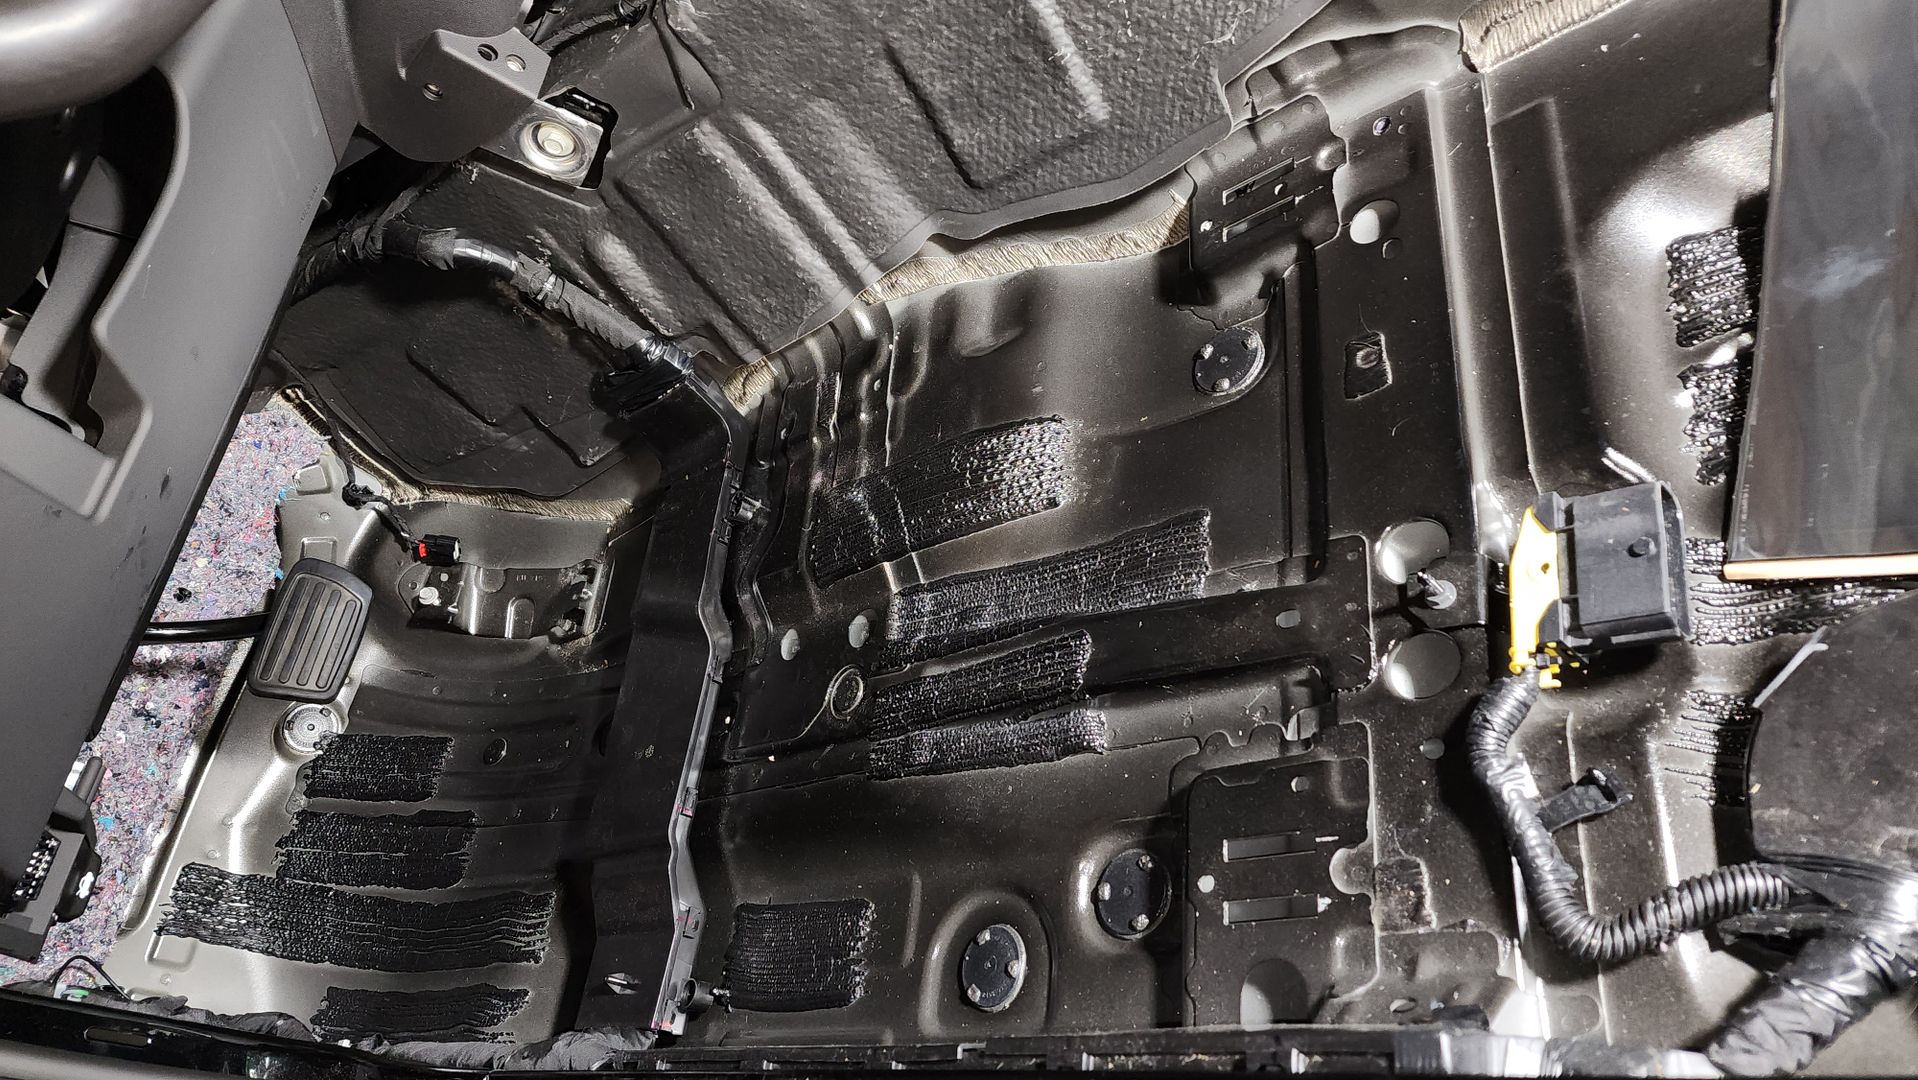 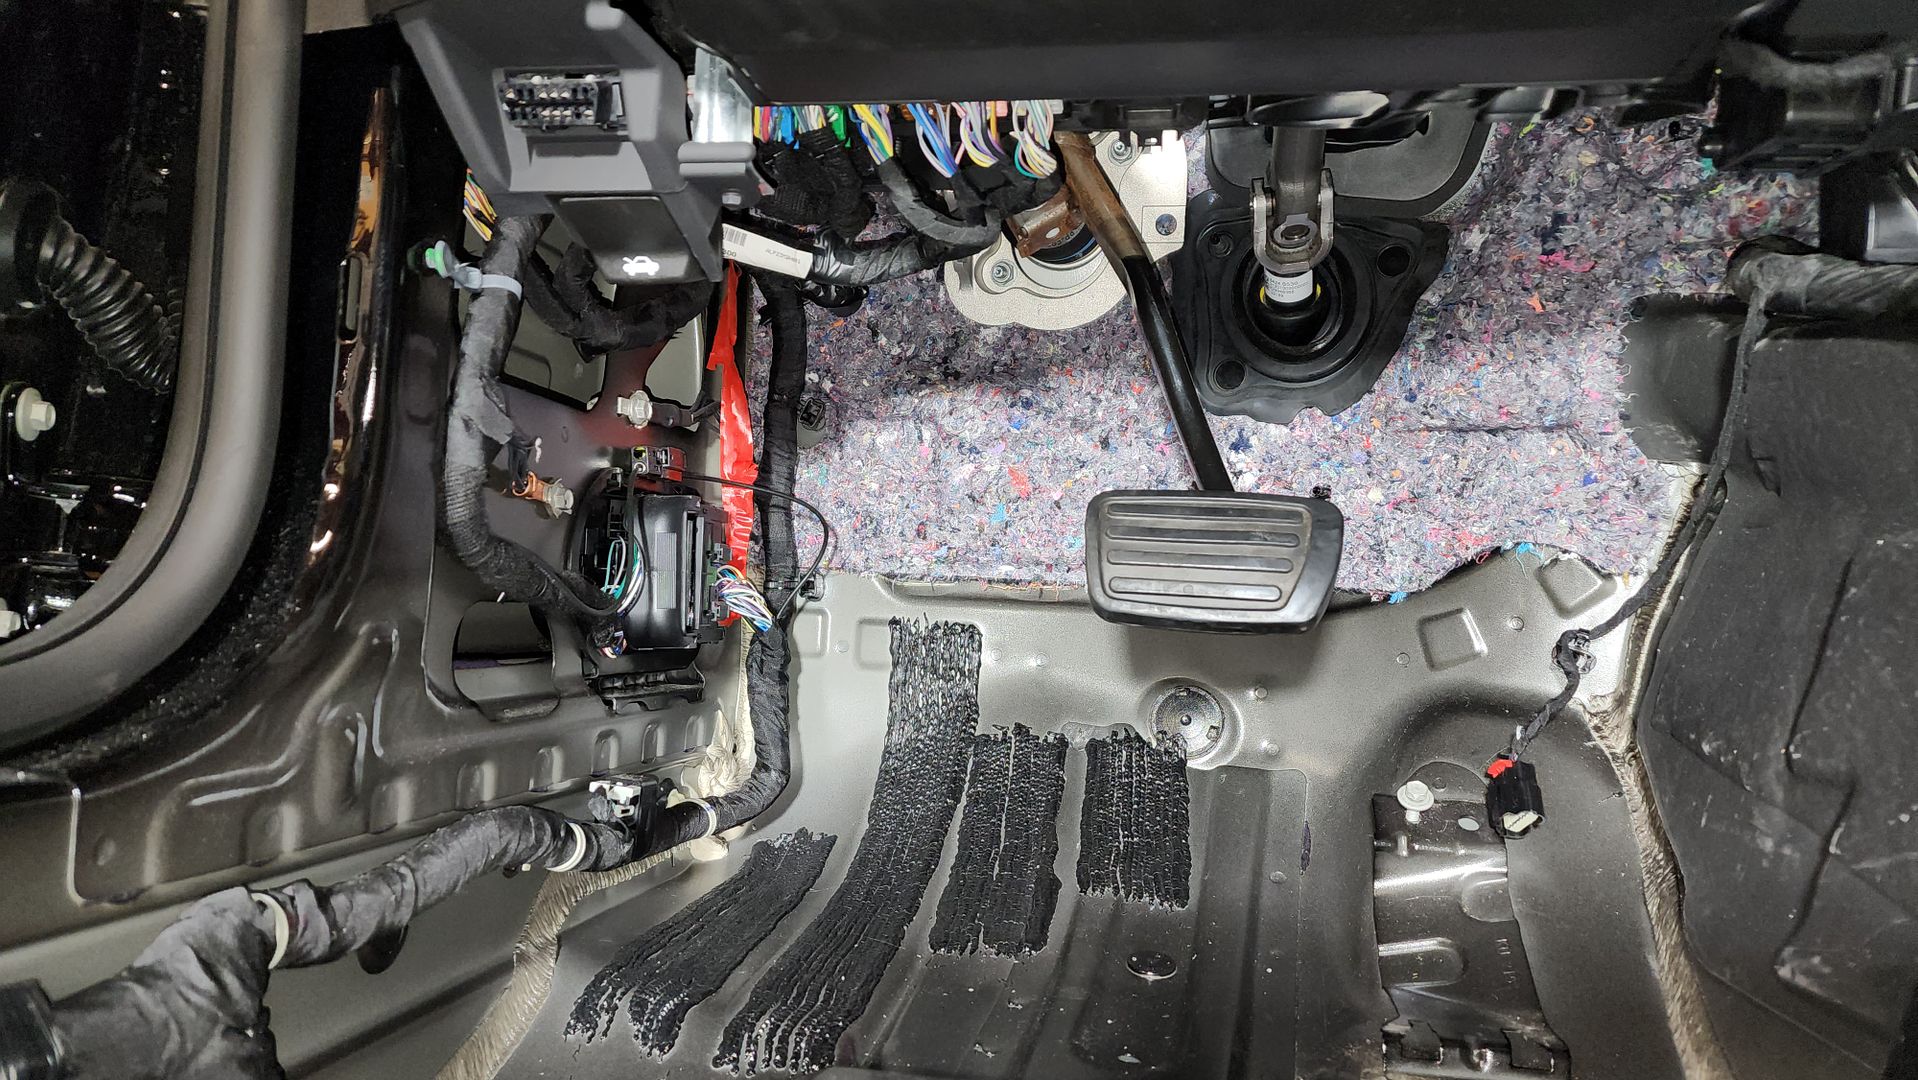 I plan on using the Resonix Barrier to build covers for the front kick panel openings as that is a source of tire noise. I will stuff Fibermat inside those cavities as well. I lifted the wiring channels up off the floor to gain access, a bungee cord worked well. 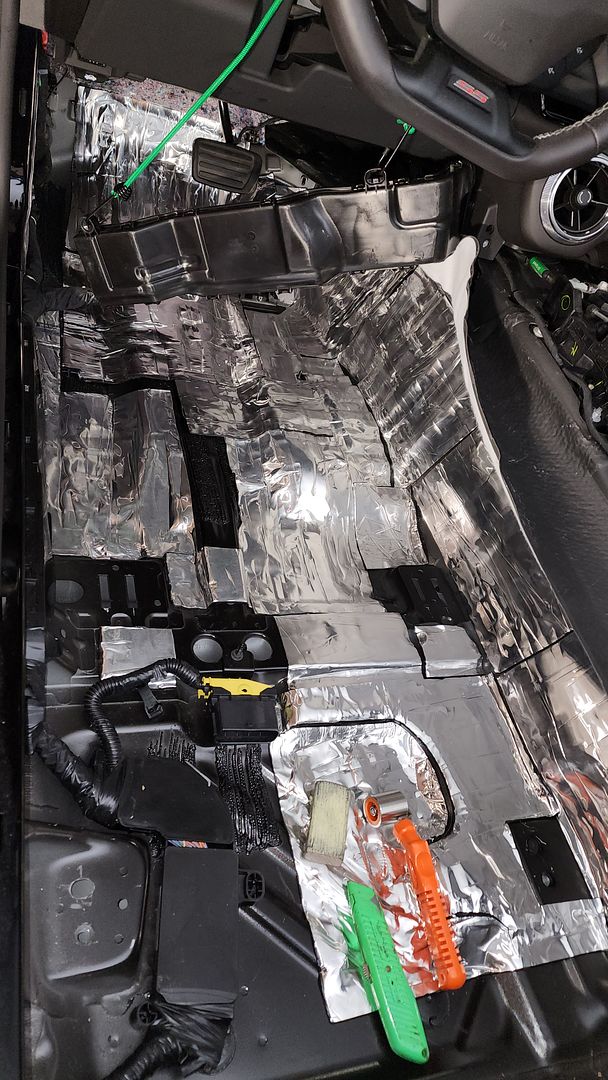 I even foamed under the Styrofoam blocking to prevent any squeaking. The Resonix CCF is awesome to work with. 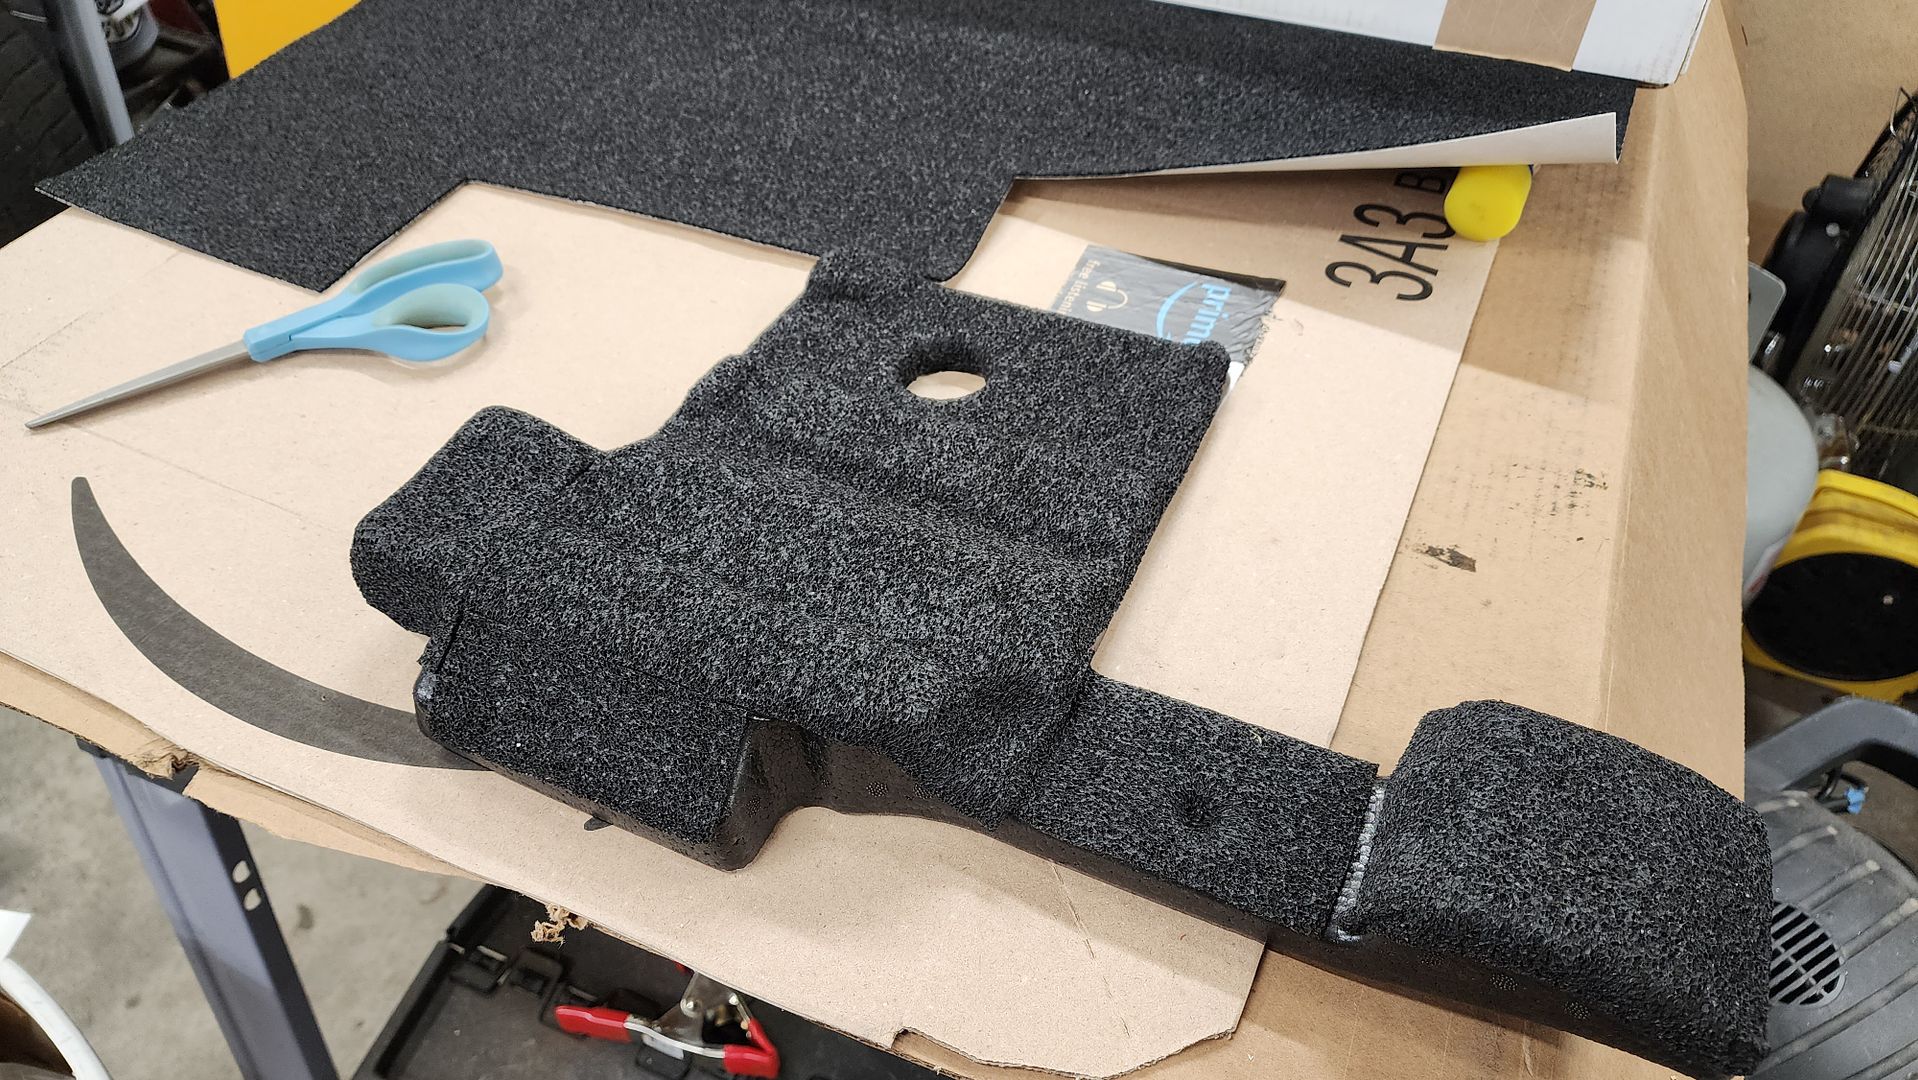 With the floors treated, the cabin is much less resonant. 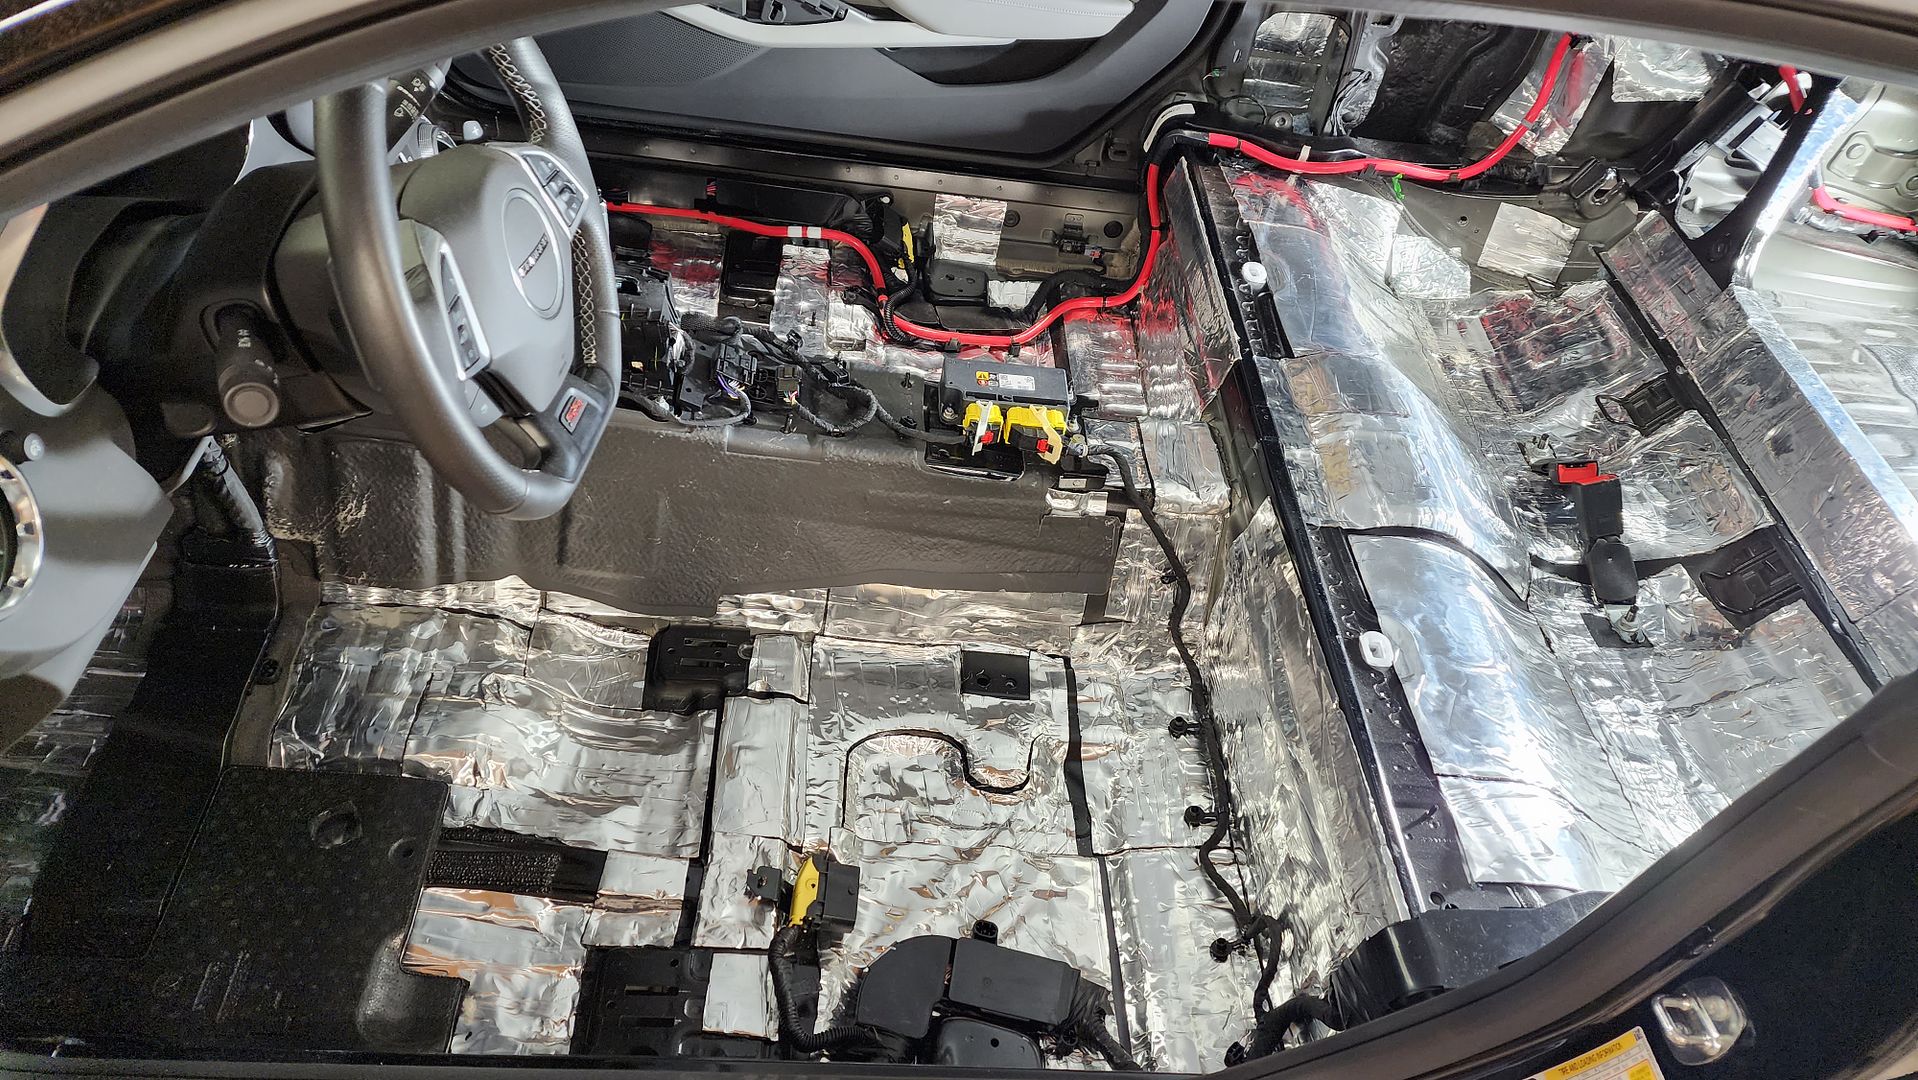 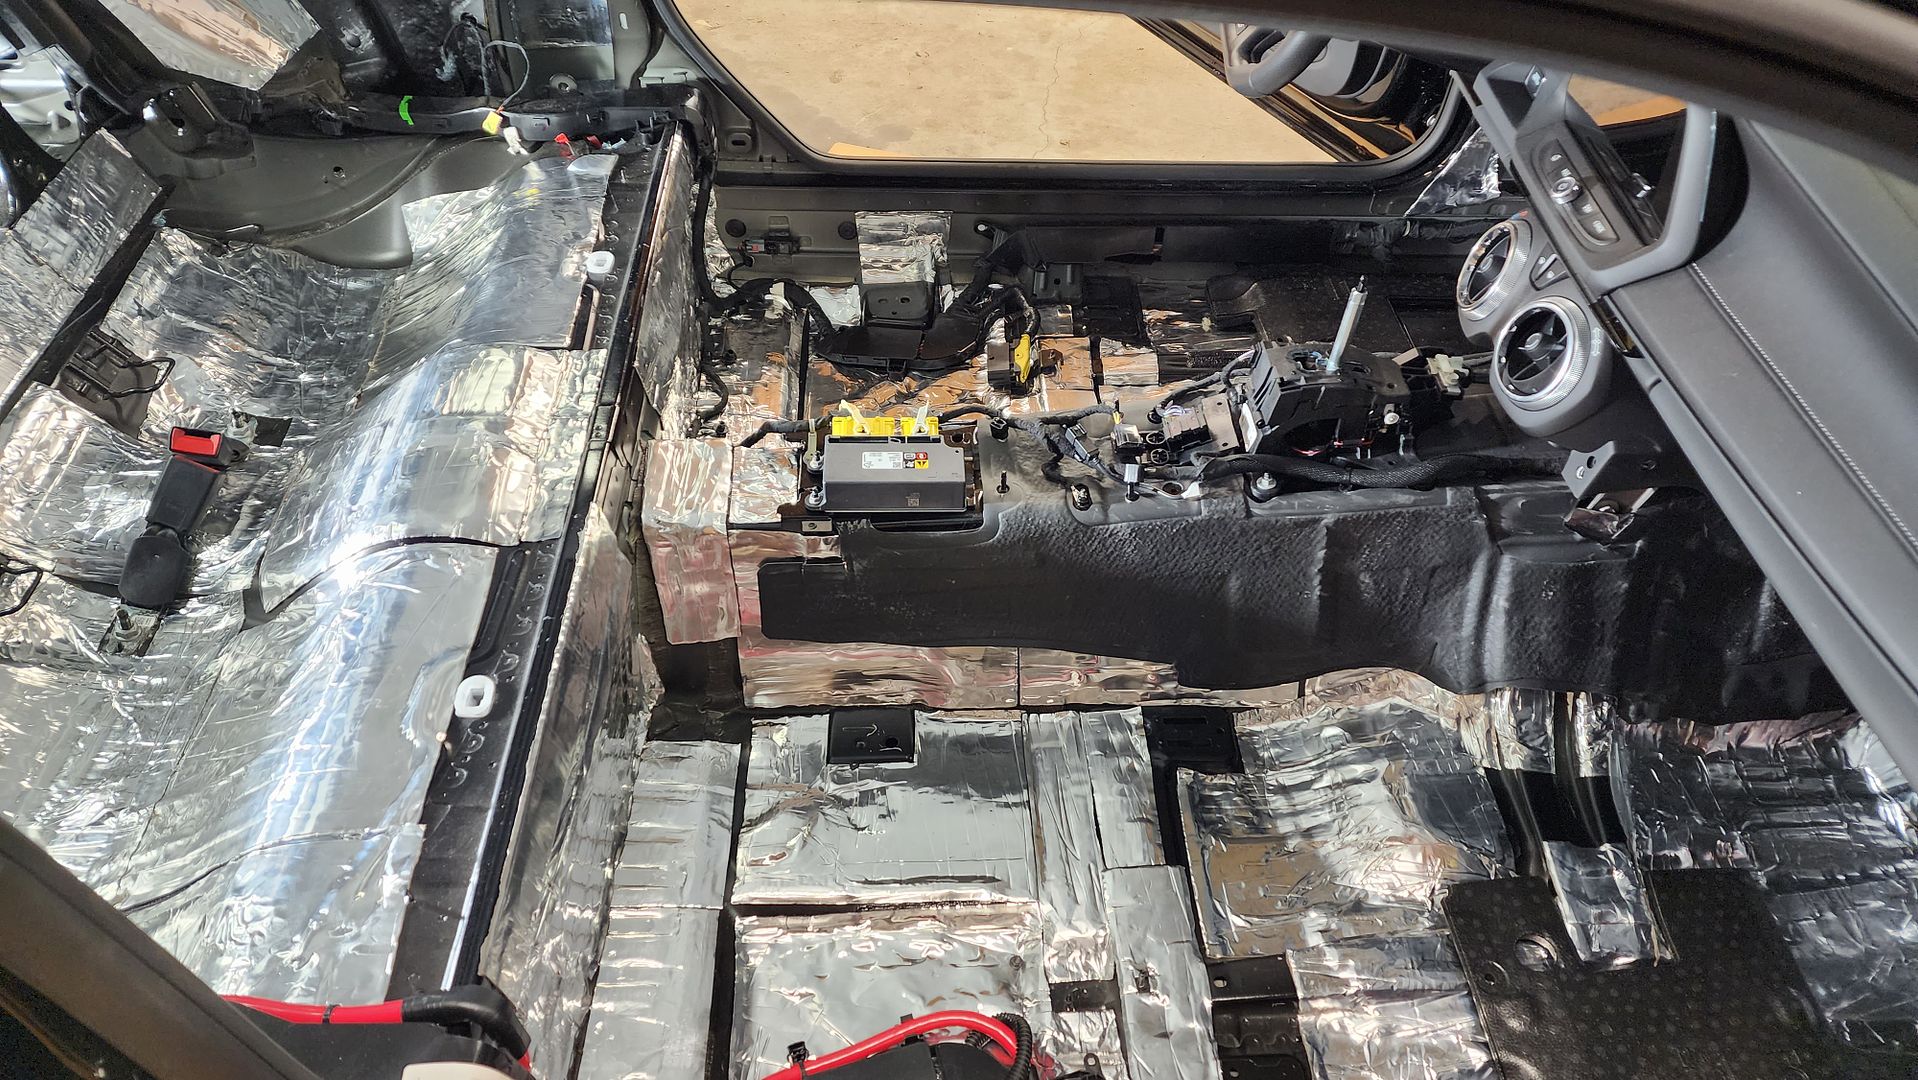 This process will continue throughout the rear of the vehicle.
__________________
2023 1SS A10 Black NPP/C2U/H72 - Daily Driver
Historically an Accord and Camry owner with self-performed maintenance/repair. 1100: 5/3/22 . . . . . . . 2000: 6/25/22 . . . . . .4000: 8/17/22 . . . . . . . 6000: 9/10/22 Daily Driver mileage update: 22k mi. @ April 2024 New Engine @ 22,600 Build Log: https://www.camaro6.com/forums/showt...6#post11353116 |
|
|
|
|
10-28-2023, 01:59 AM
|
#34 |
|
Electrical Engineer
Drives: 2023 1SS A10 Black Join Date: Apr 2022
Location: Illinois
Posts: 779
|
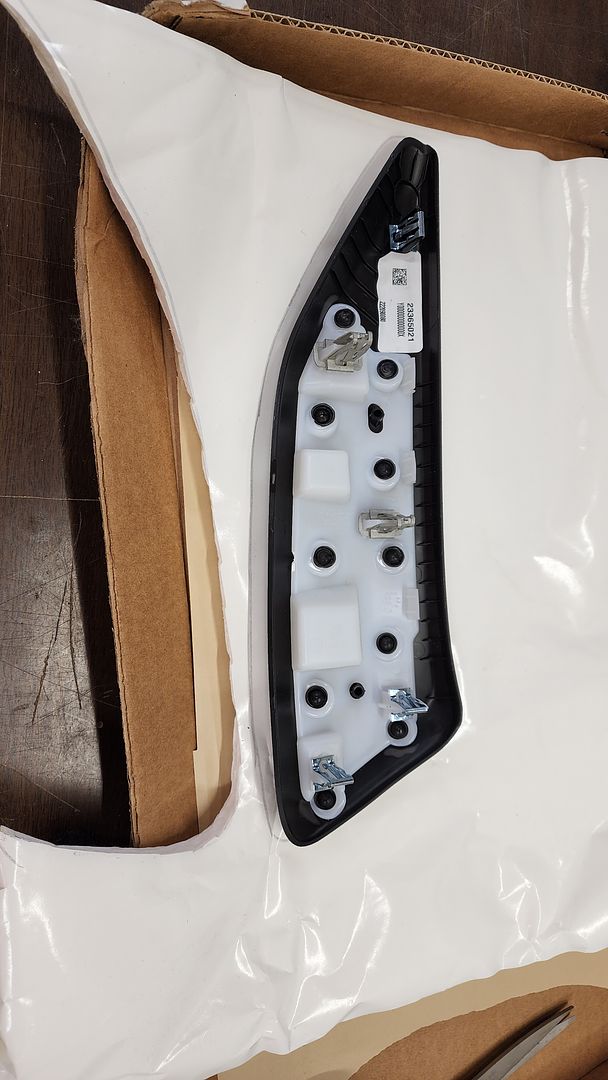
For most of the past year, my expectation is that I was going to install the Hertz HCX690 coaxial speakers in the rear deck of the Camaro. I’ve been excited about these, as they are the best sounding coaxial speakers I’ve heard. However, this car does not lend itself to a rear speaker installation given the very short distance between glass and deck. With the rear glass removed, it’s possible to do an awesome install. Installation from below is complicated by a lack of access to one screw hole and a lip that prevents proper mating to the mounting adapter.
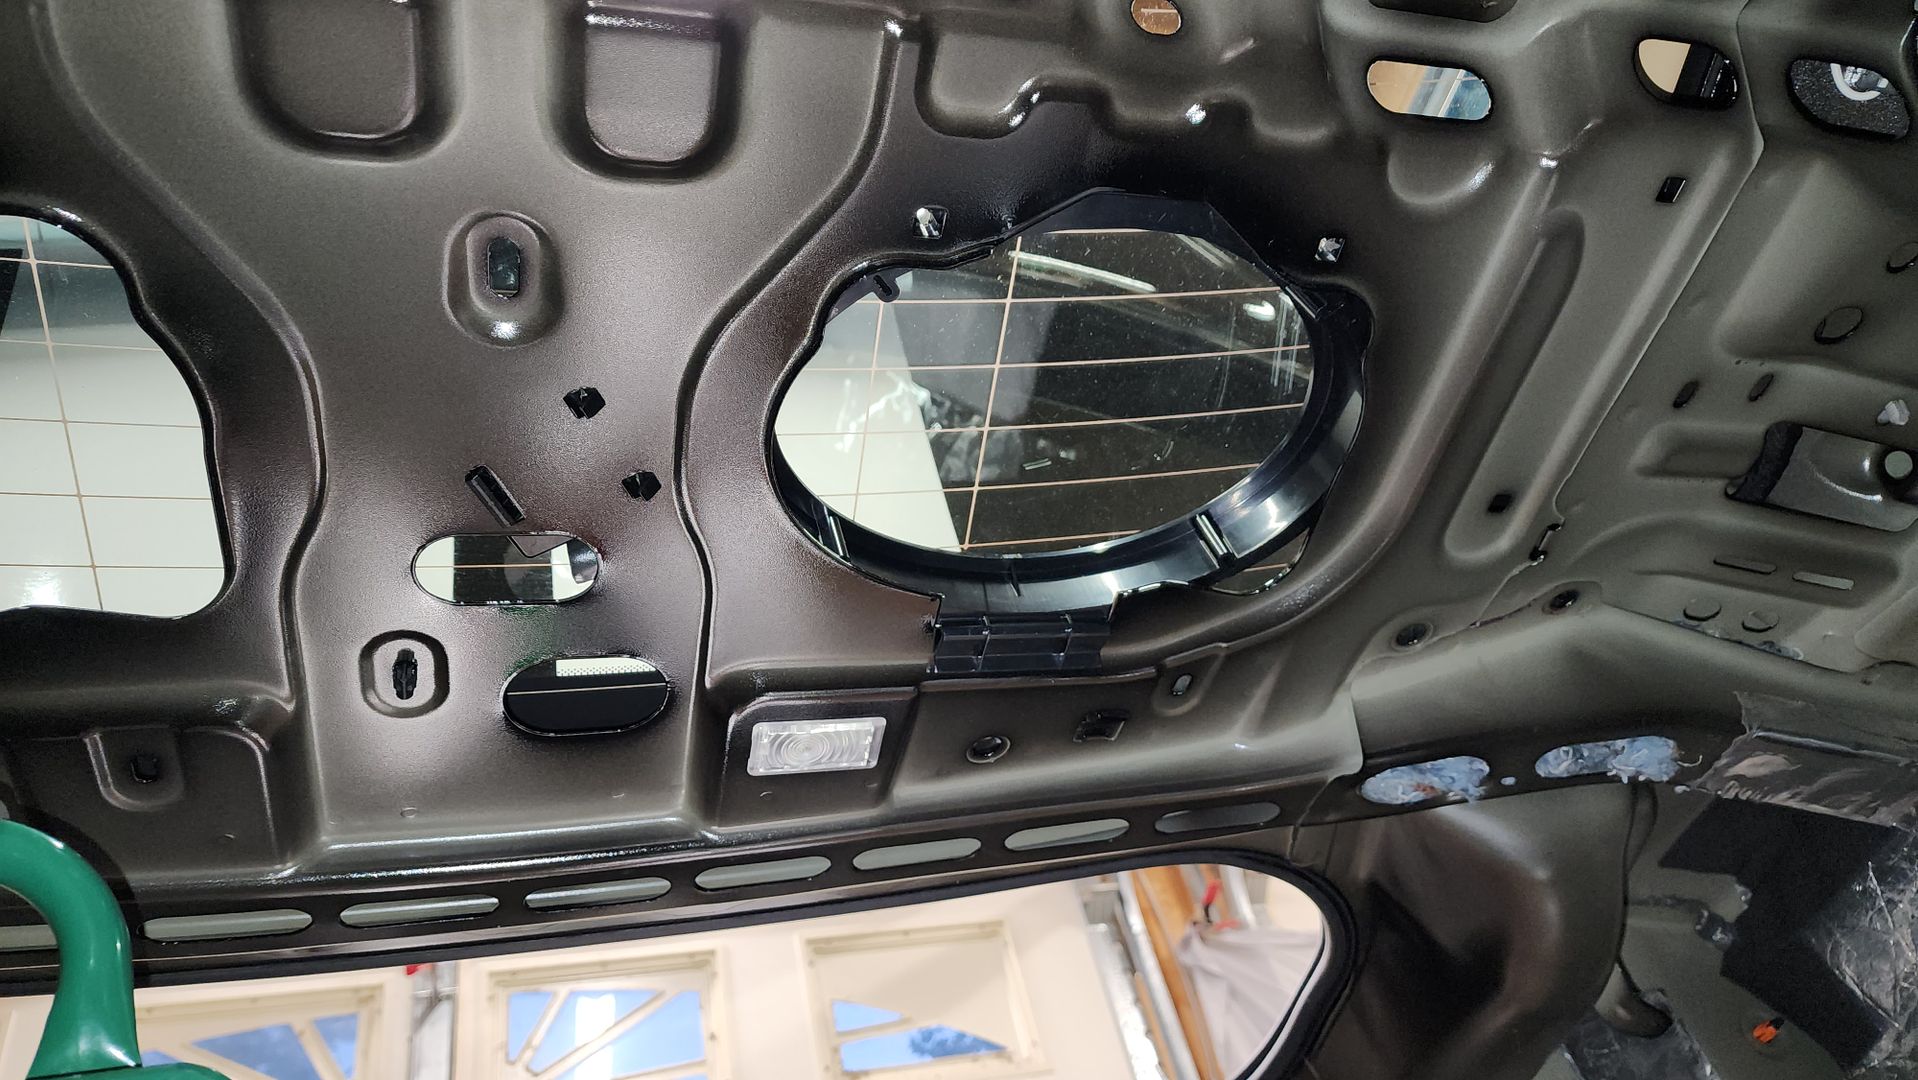 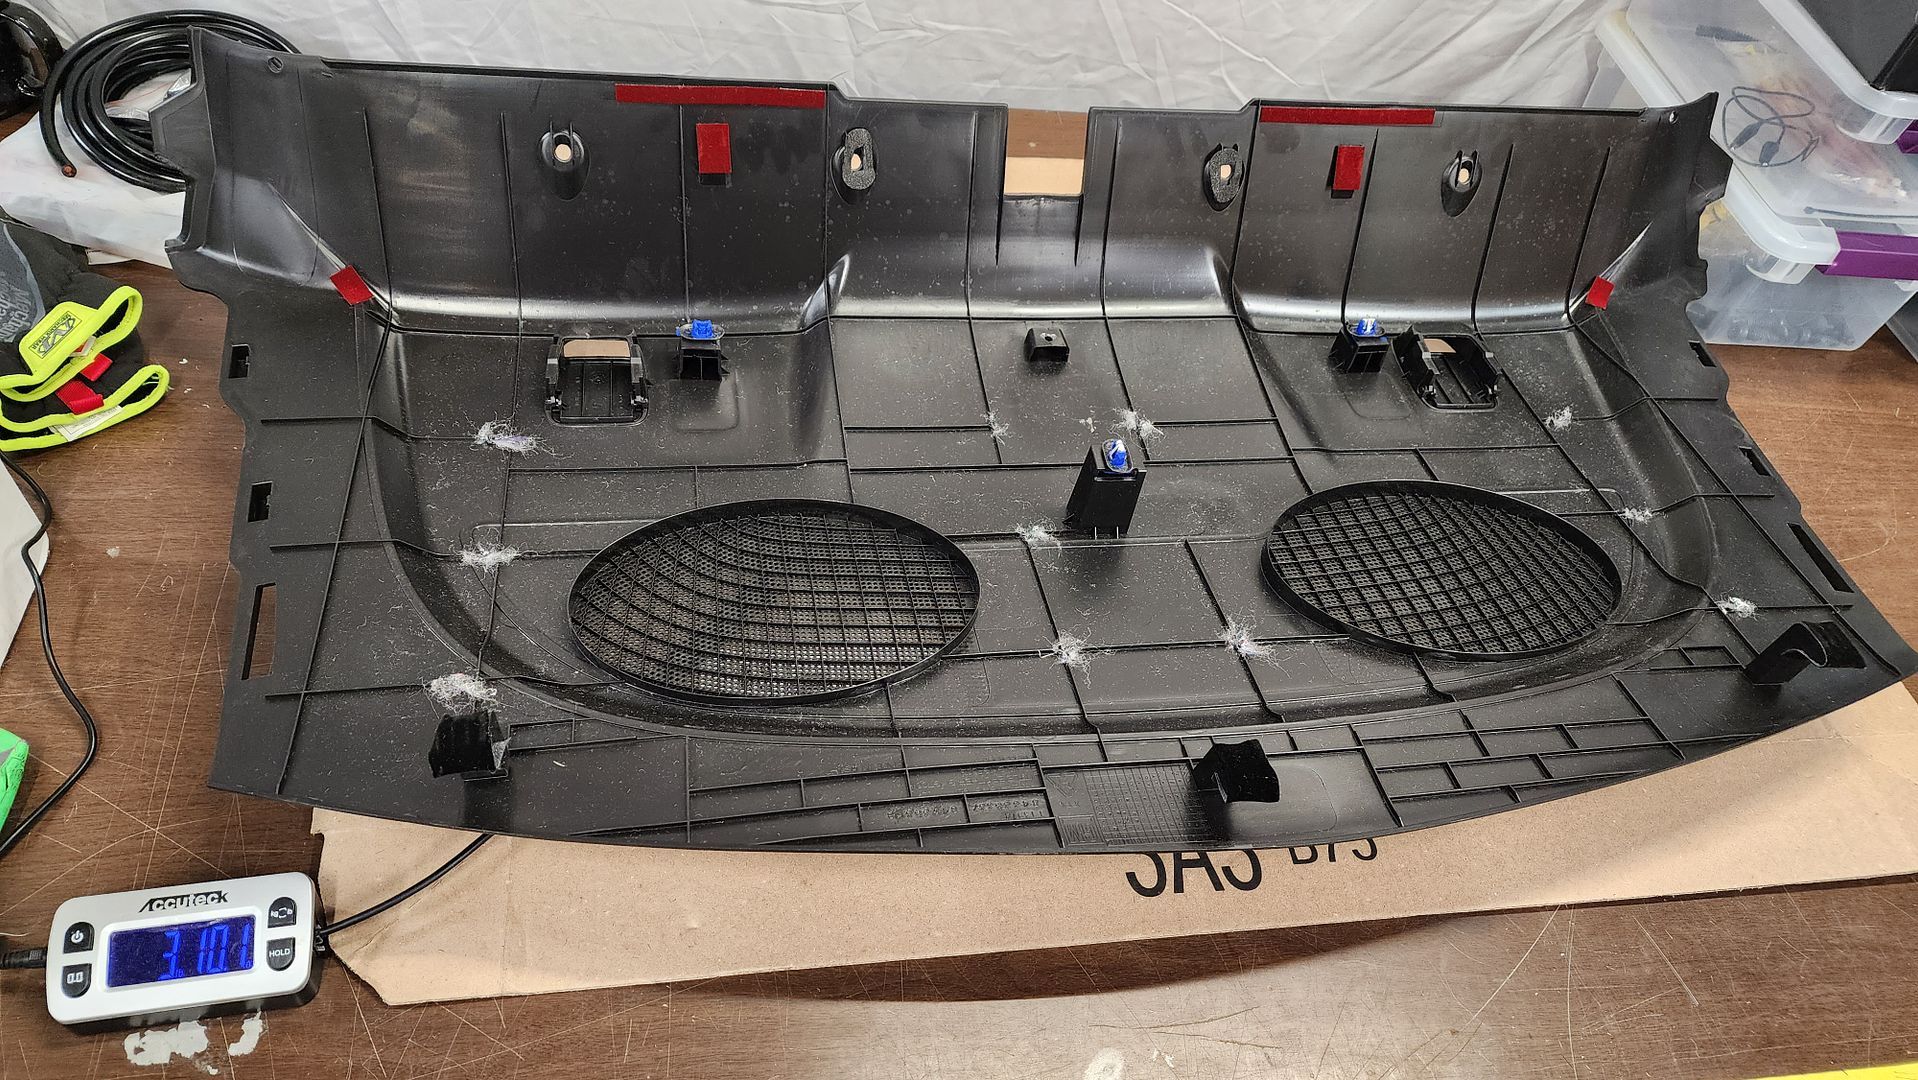 So this effort included Resonix CLD on the rear deck cover, which doubled the weight. I then applied Resonix Fibermat45 and CL3 CCF gasketing, 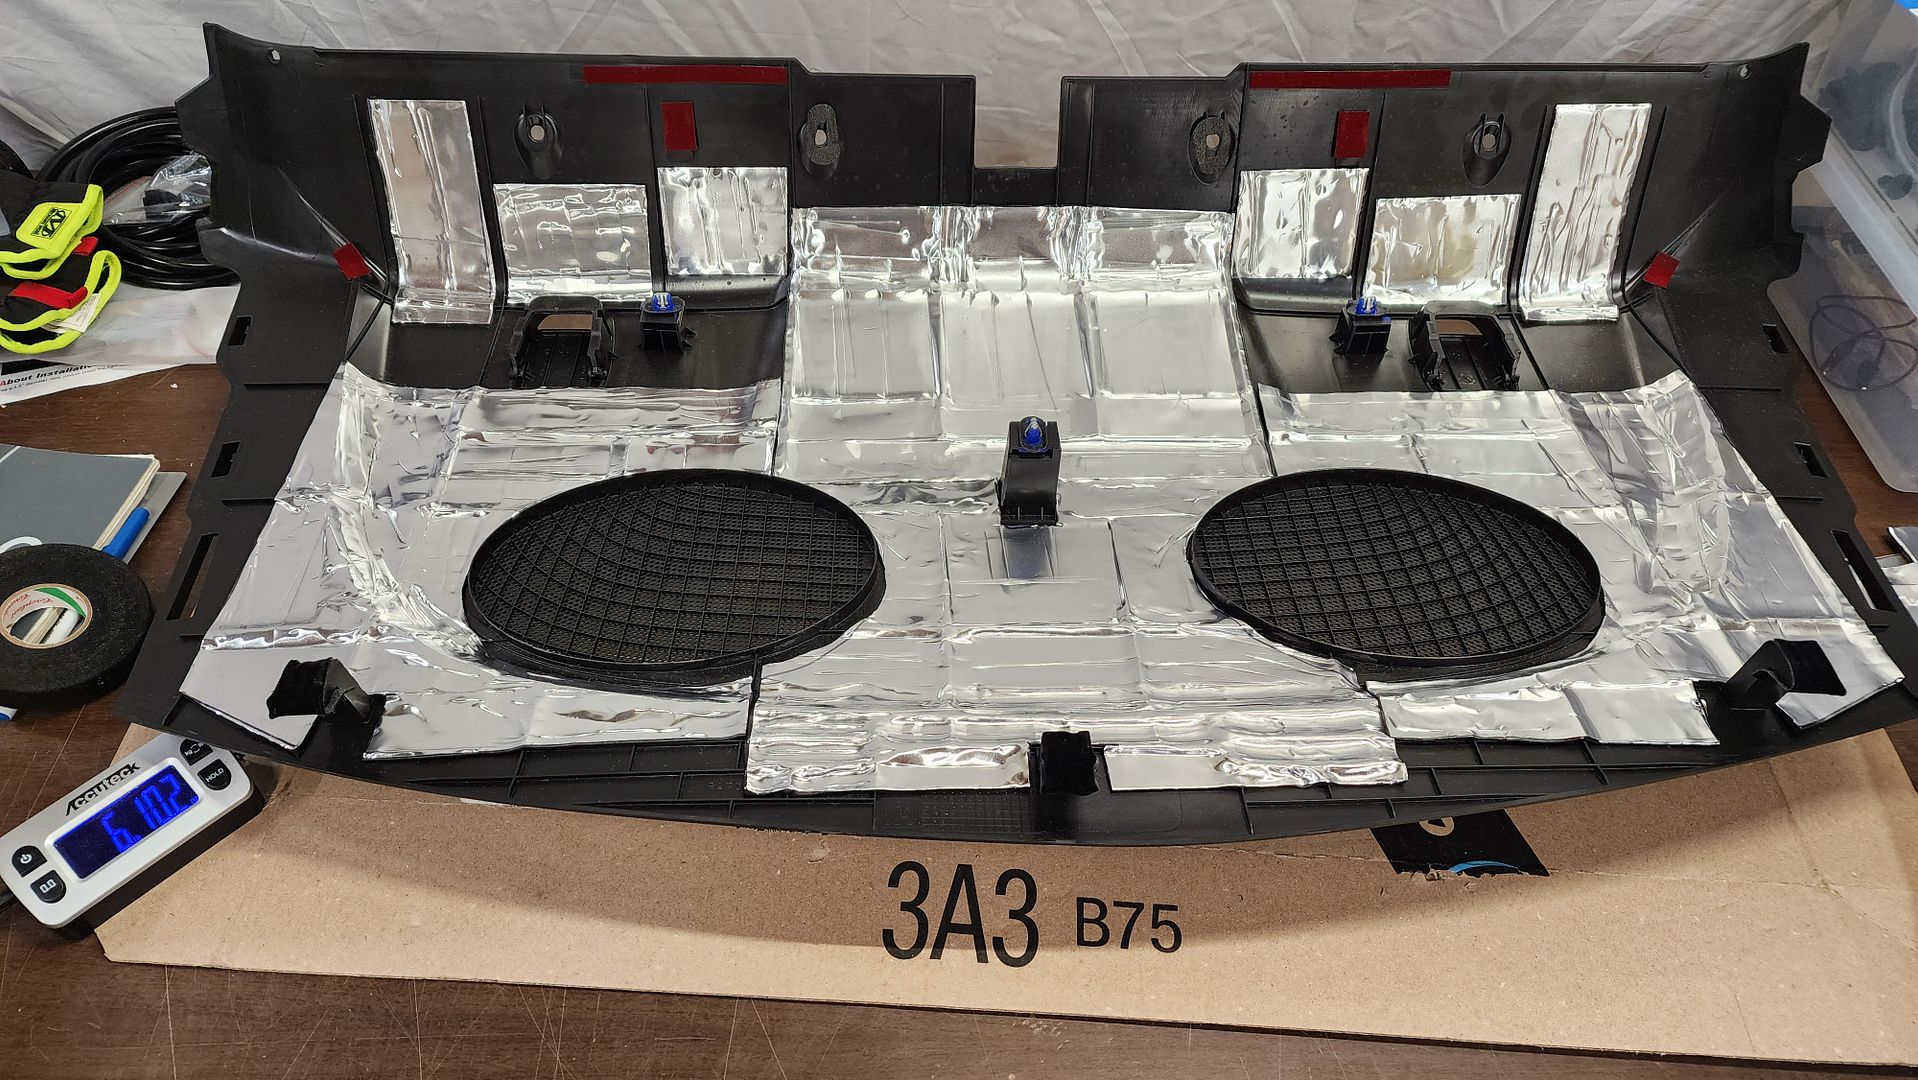 I used the factory jute sound absorption as a template, then cut the Fibermat45 accordingly. 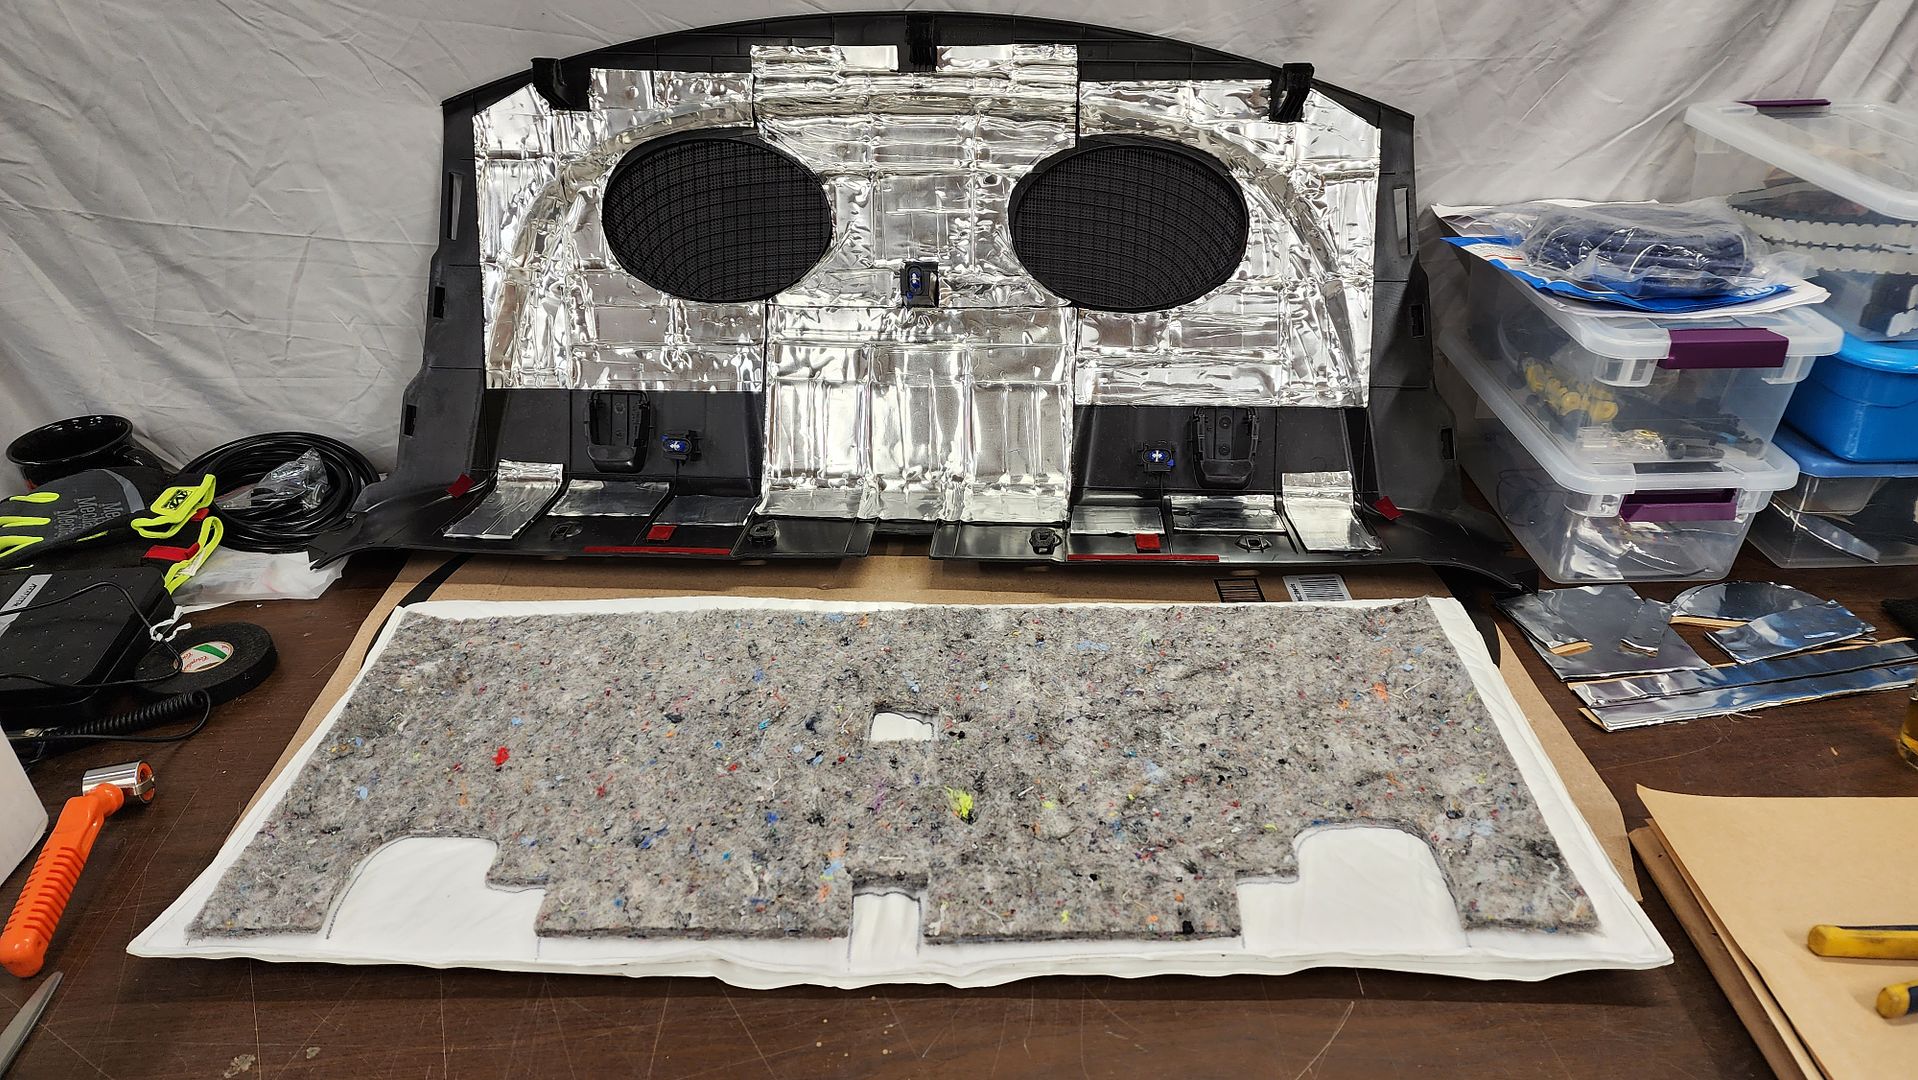 You have to consider the visible effects of products behind a speaker grill, here you can see white fibermat, before I added black CCF 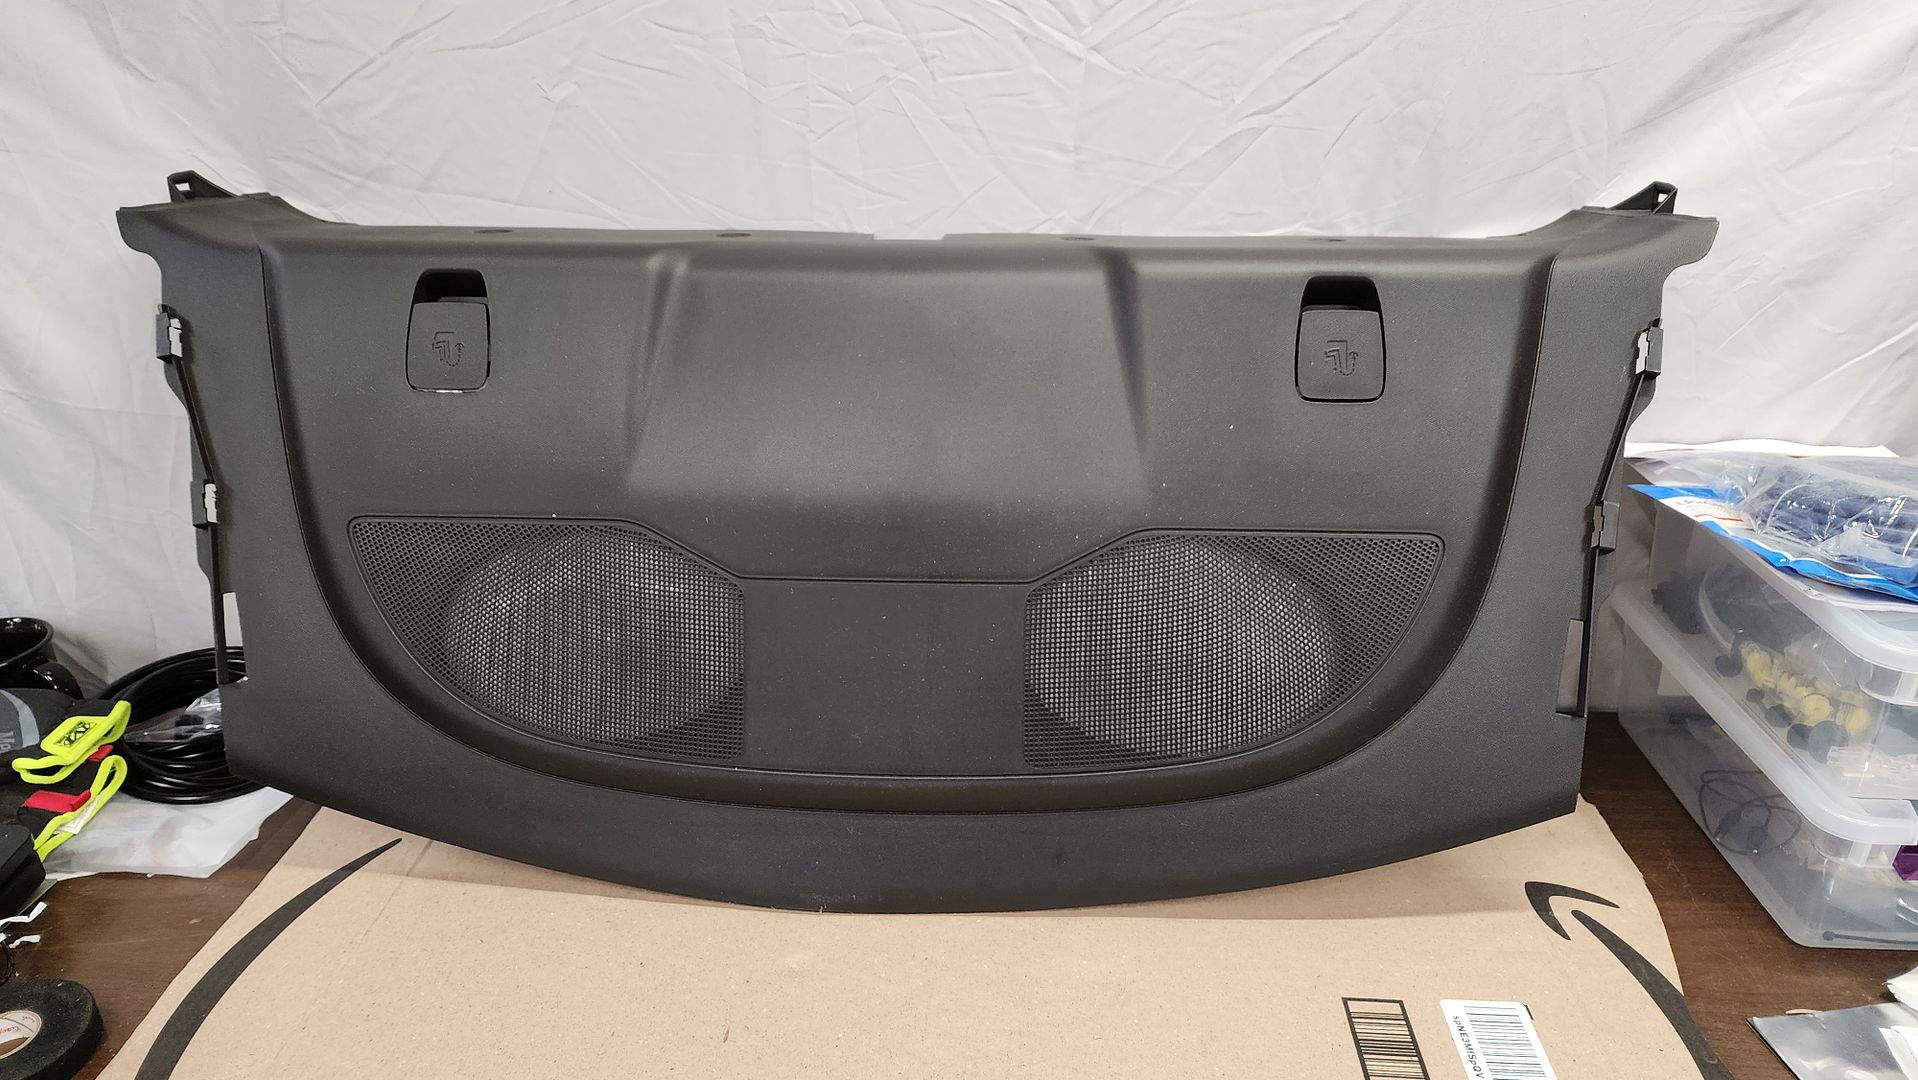  With the black CCF, the exterior view will be clean: 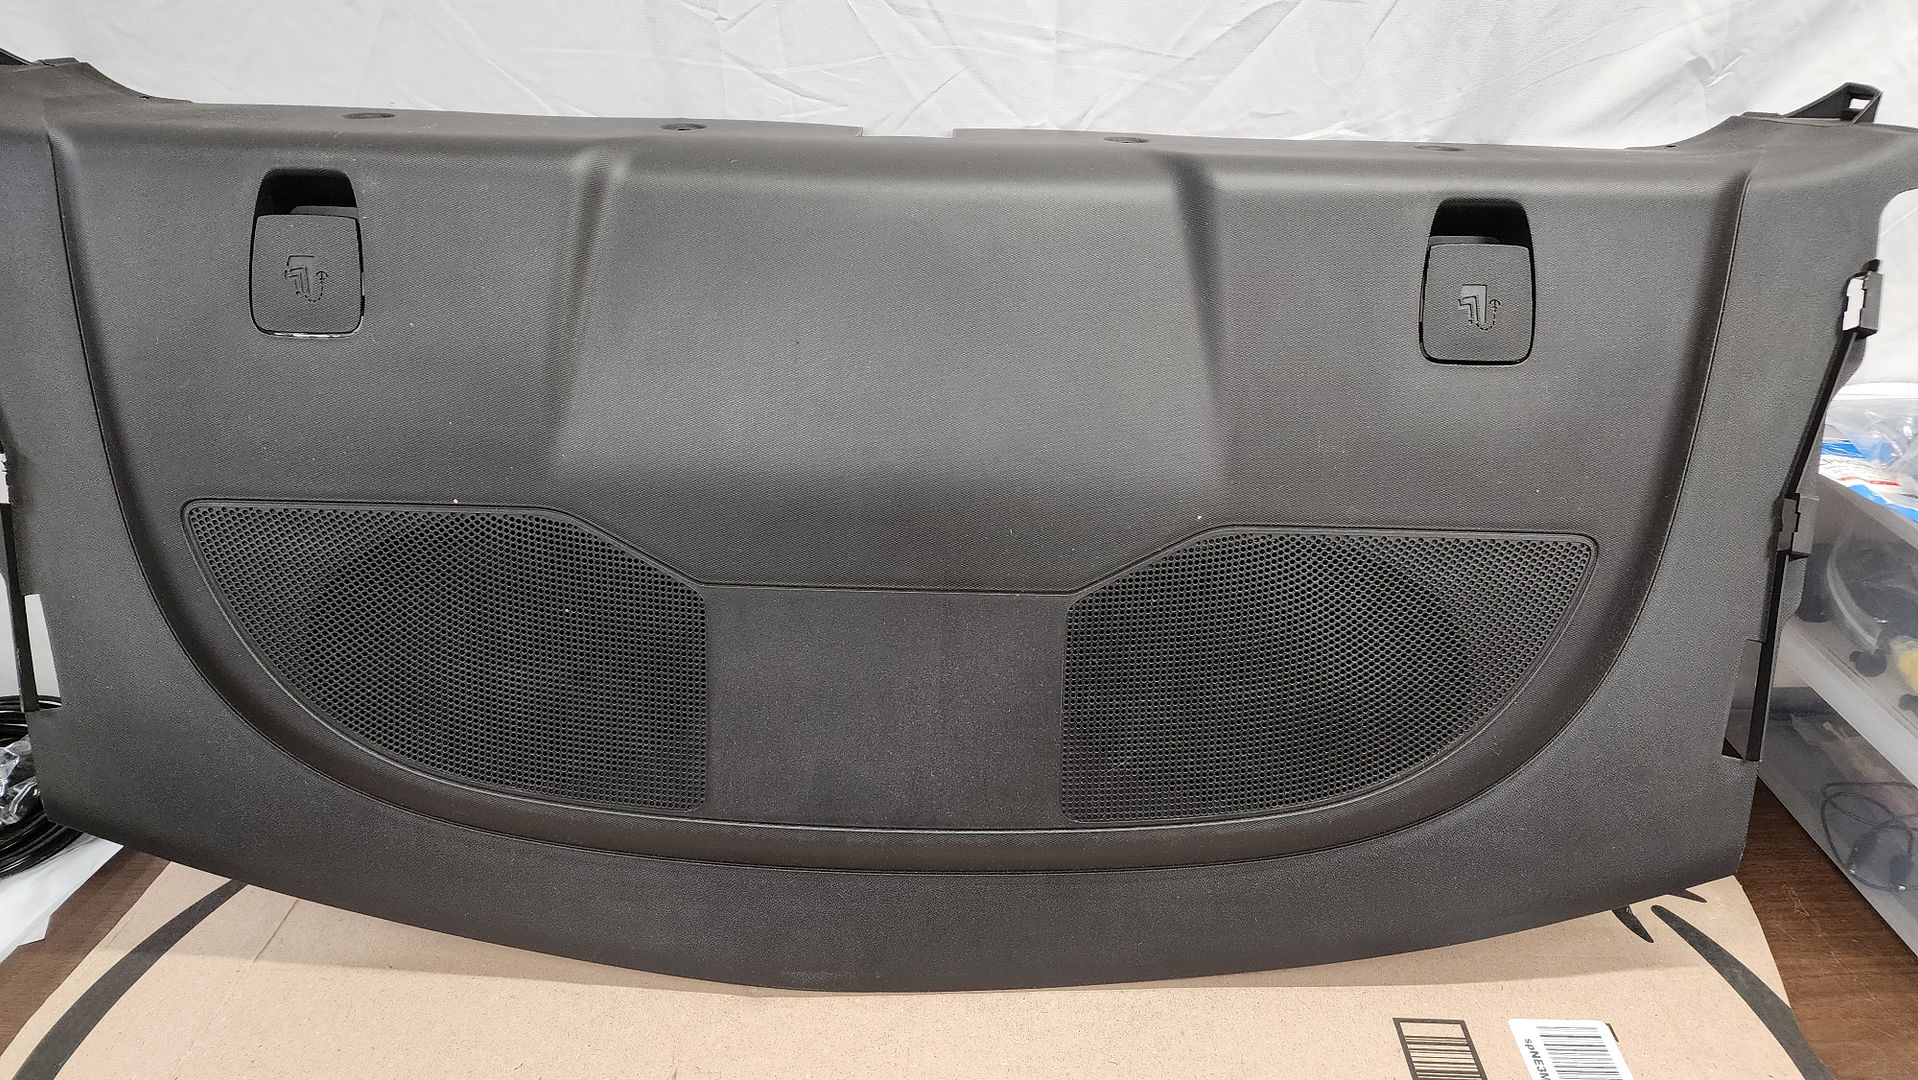 After the fibermat45, I added the thin CCF from Resonix to create a soft surface to isolate any possible buzzes or rattles against the metal framing. 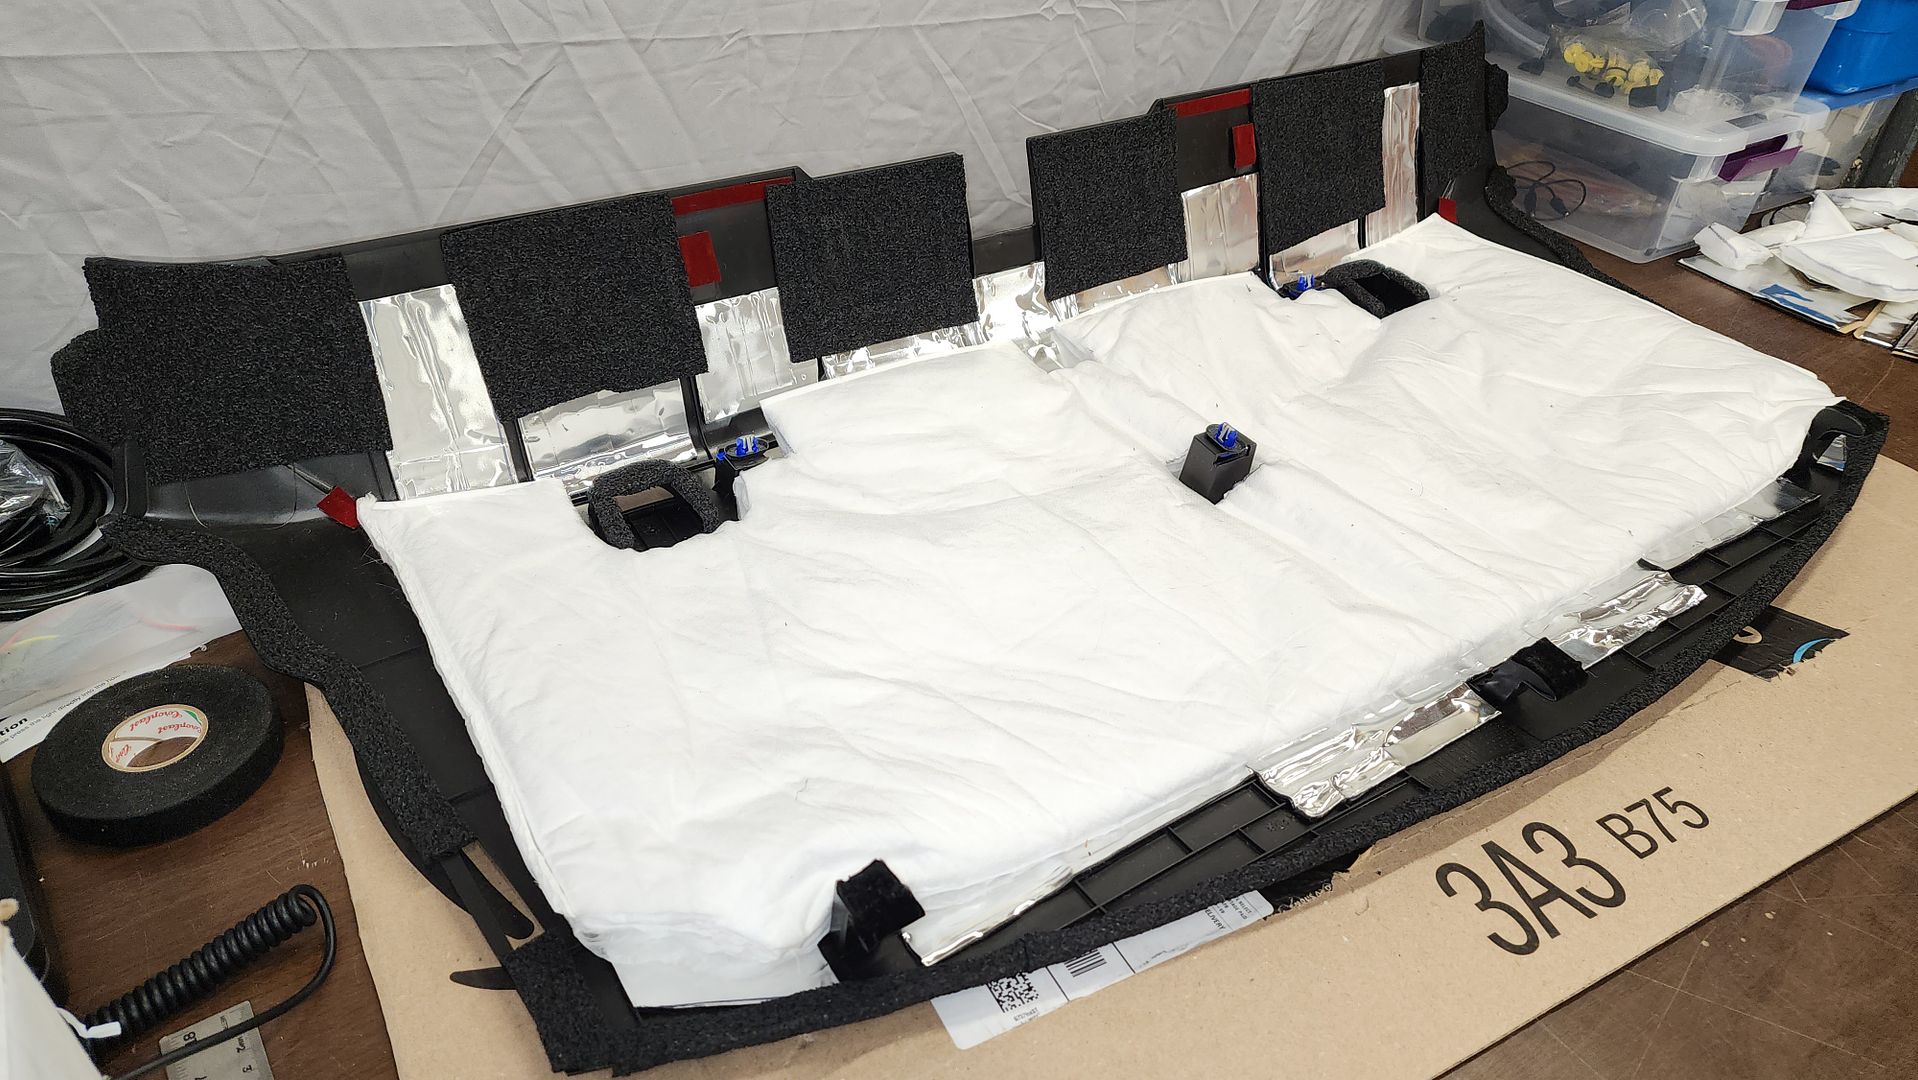 Lastly, we also need to close up the rear speaker holes, and Resonix Barrier is perfect for this application. So I cut CLD strips to adhere the edges of the Barrier to the metal, which is also held down by the Fibermat45. 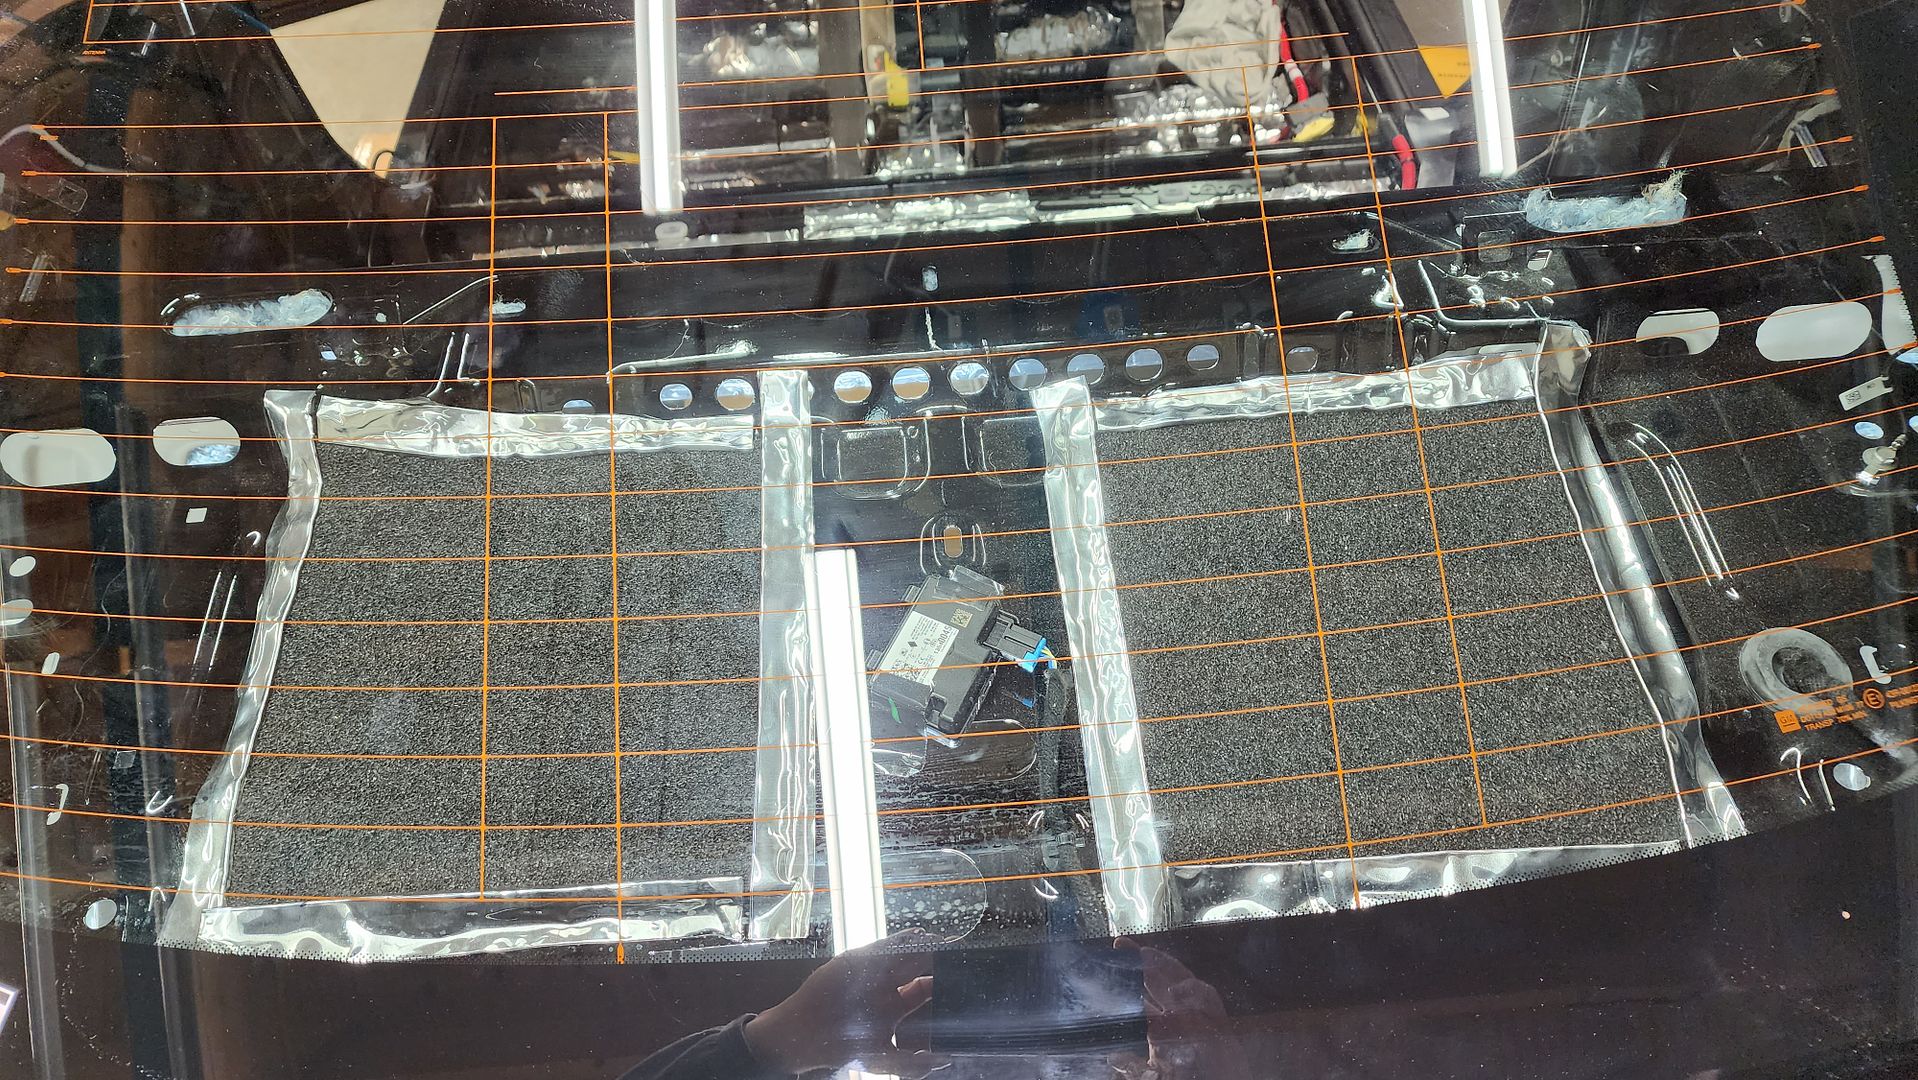
__________________
2023 1SS A10 Black NPP/C2U/H72 - Daily Driver
Historically an Accord and Camry owner with self-performed maintenance/repair. 1100: 5/3/22 . . . . . . . 2000: 6/25/22 . . . . . .4000: 8/17/22 . . . . . . . 6000: 9/10/22 Daily Driver mileage update: 22k mi. @ April 2024 New Engine @ 22,600 Build Log: https://www.camaro6.com/forums/showt...6#post11353116 |
|
|
|
|
10-28-2023, 02:16 AM
|
#35 |
|
Electrical Engineer
Drives: 2023 1SS A10 Black Join Date: Apr 2022
Location: Illinois
Posts: 779
|
The trunk floor is very resonant and in need of a lot of treatment.
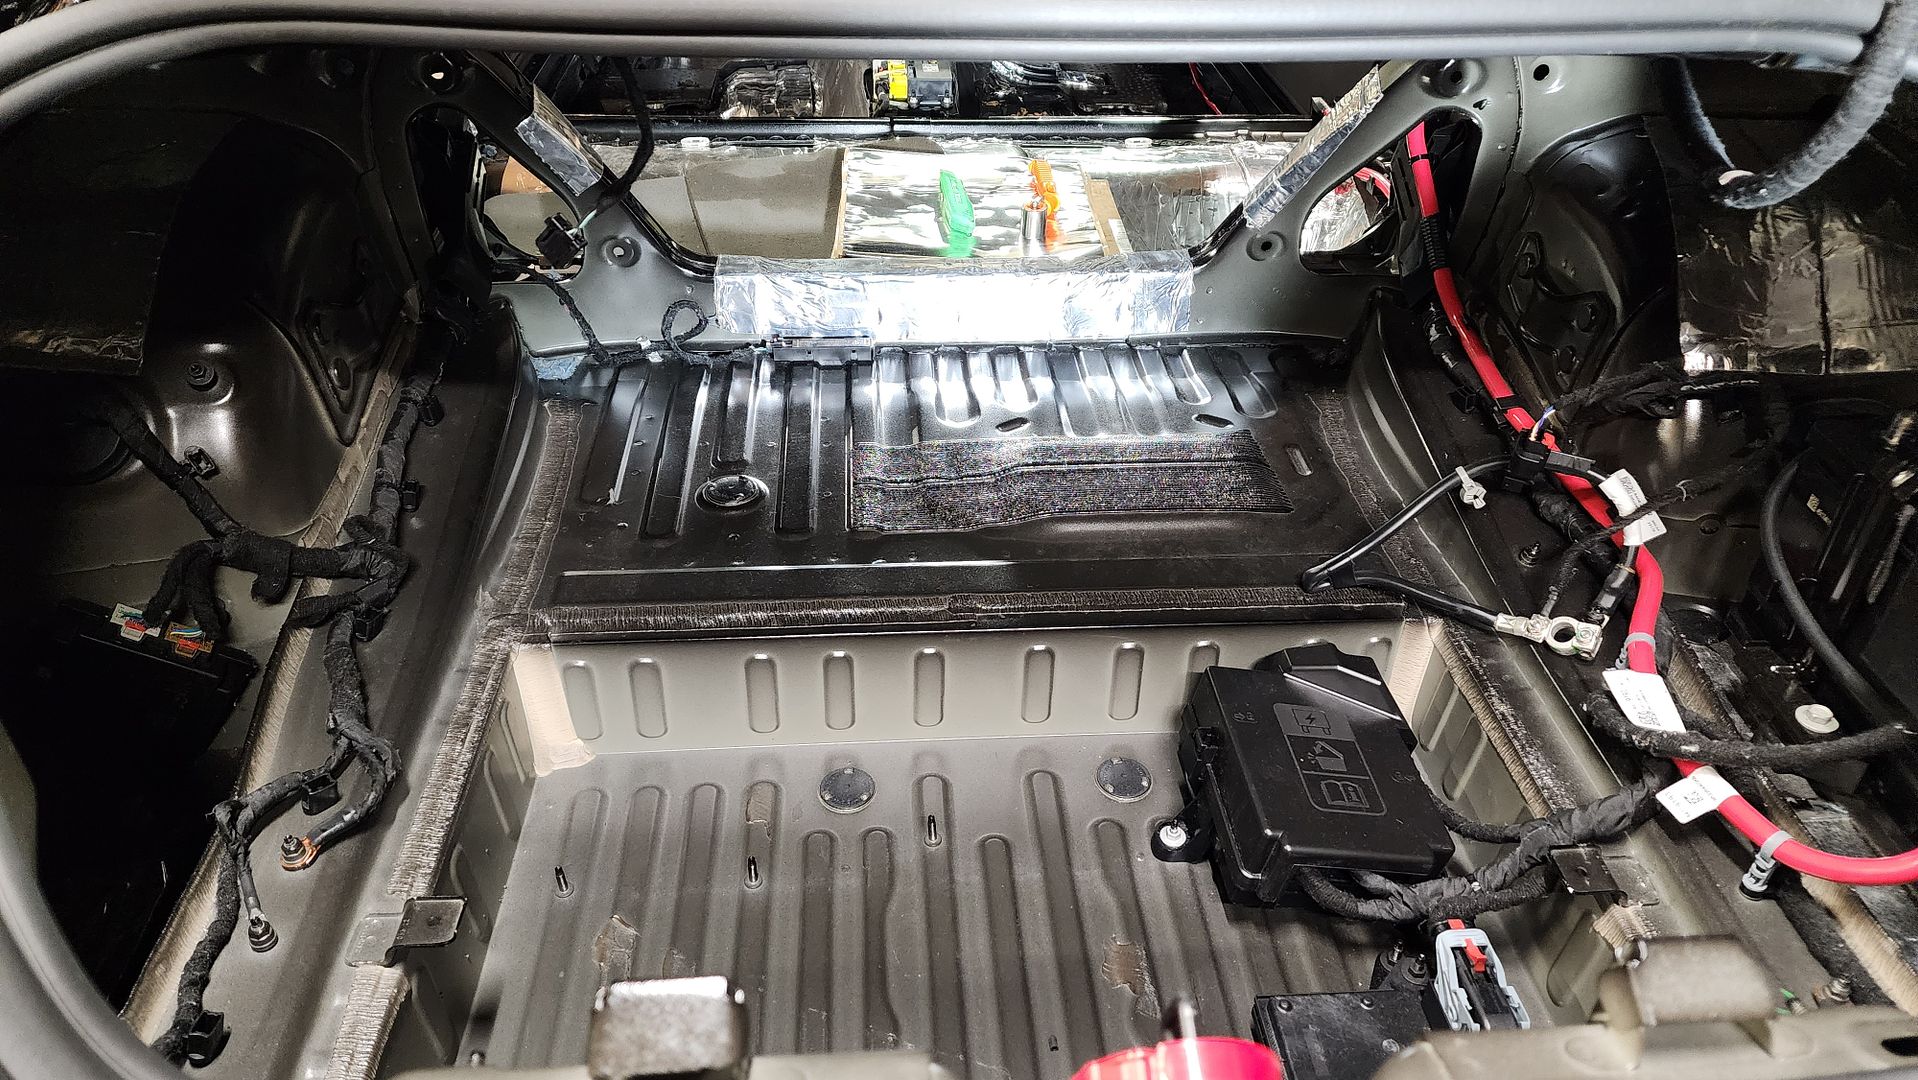 After full coverage of CLD, the floor is very dead.  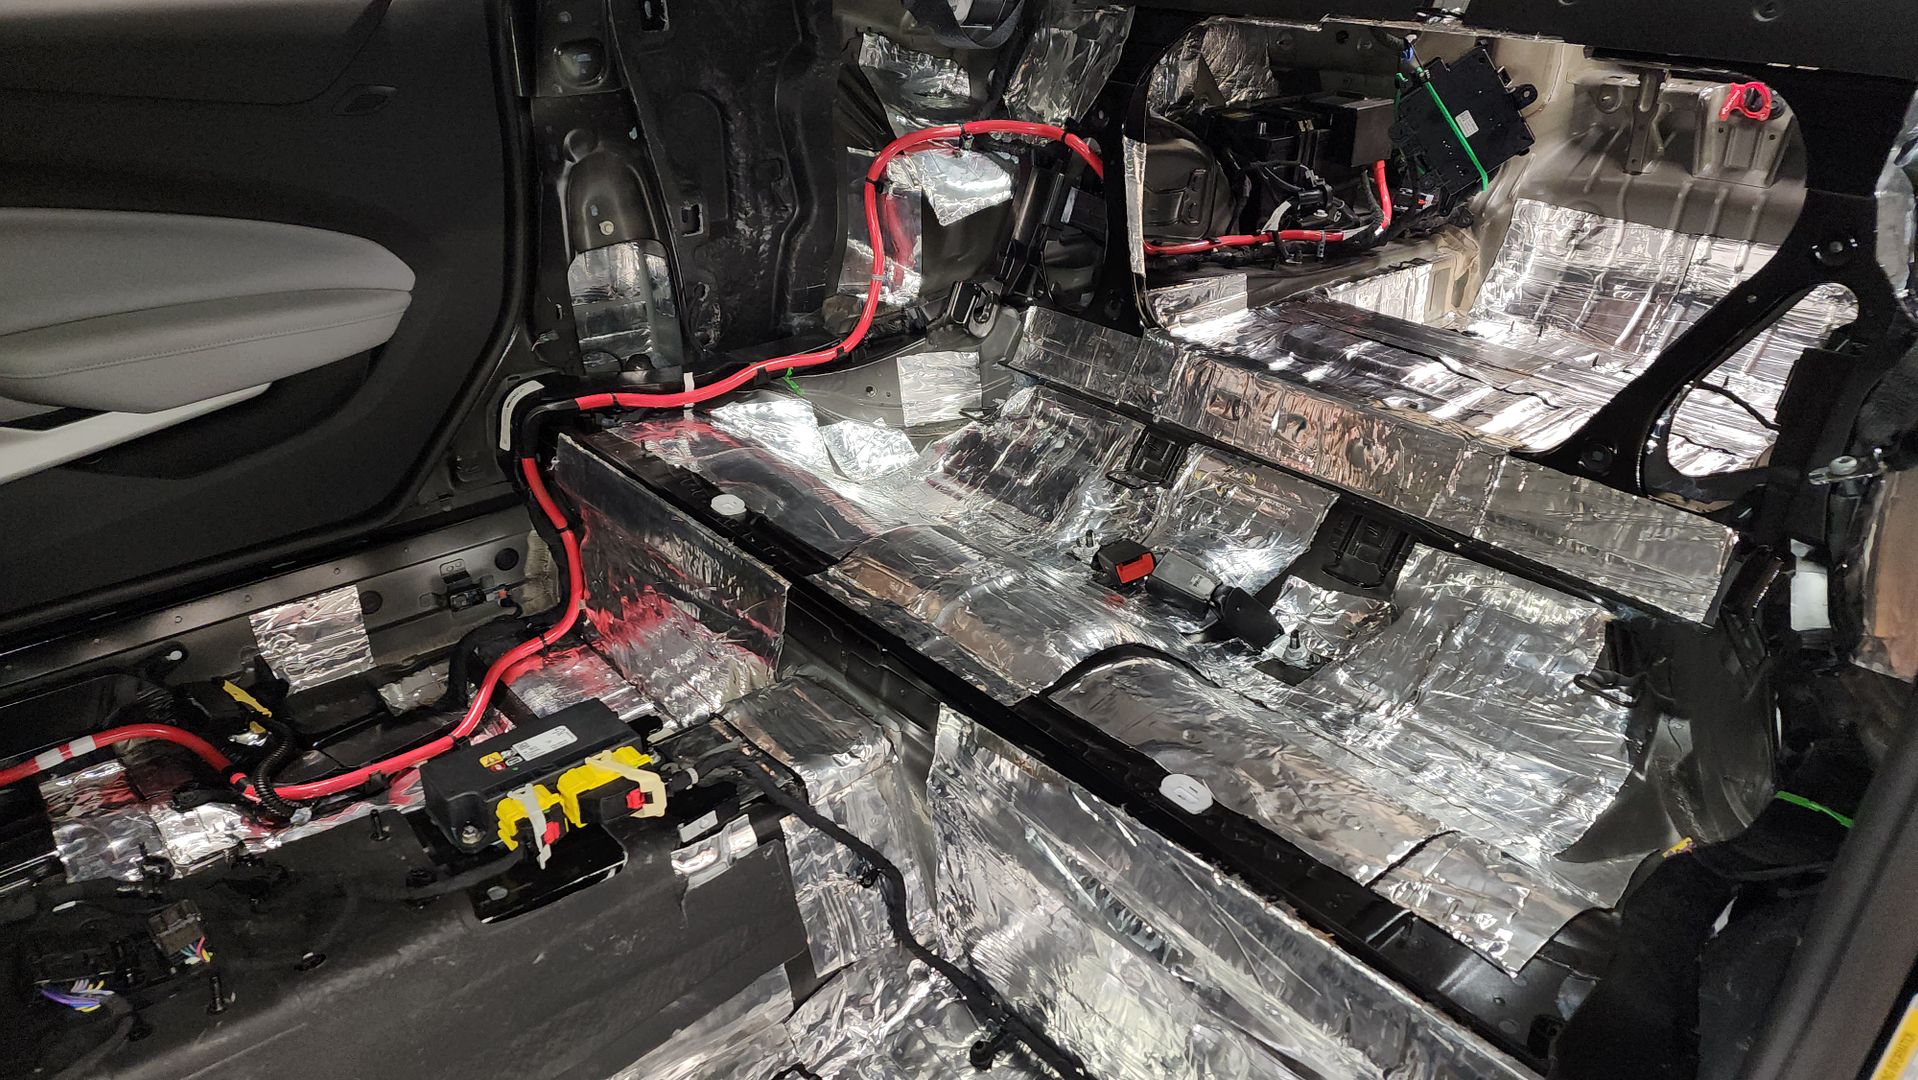 Then I covered the floor with CCF from my stock of Ensolite that I’ve had for a while. 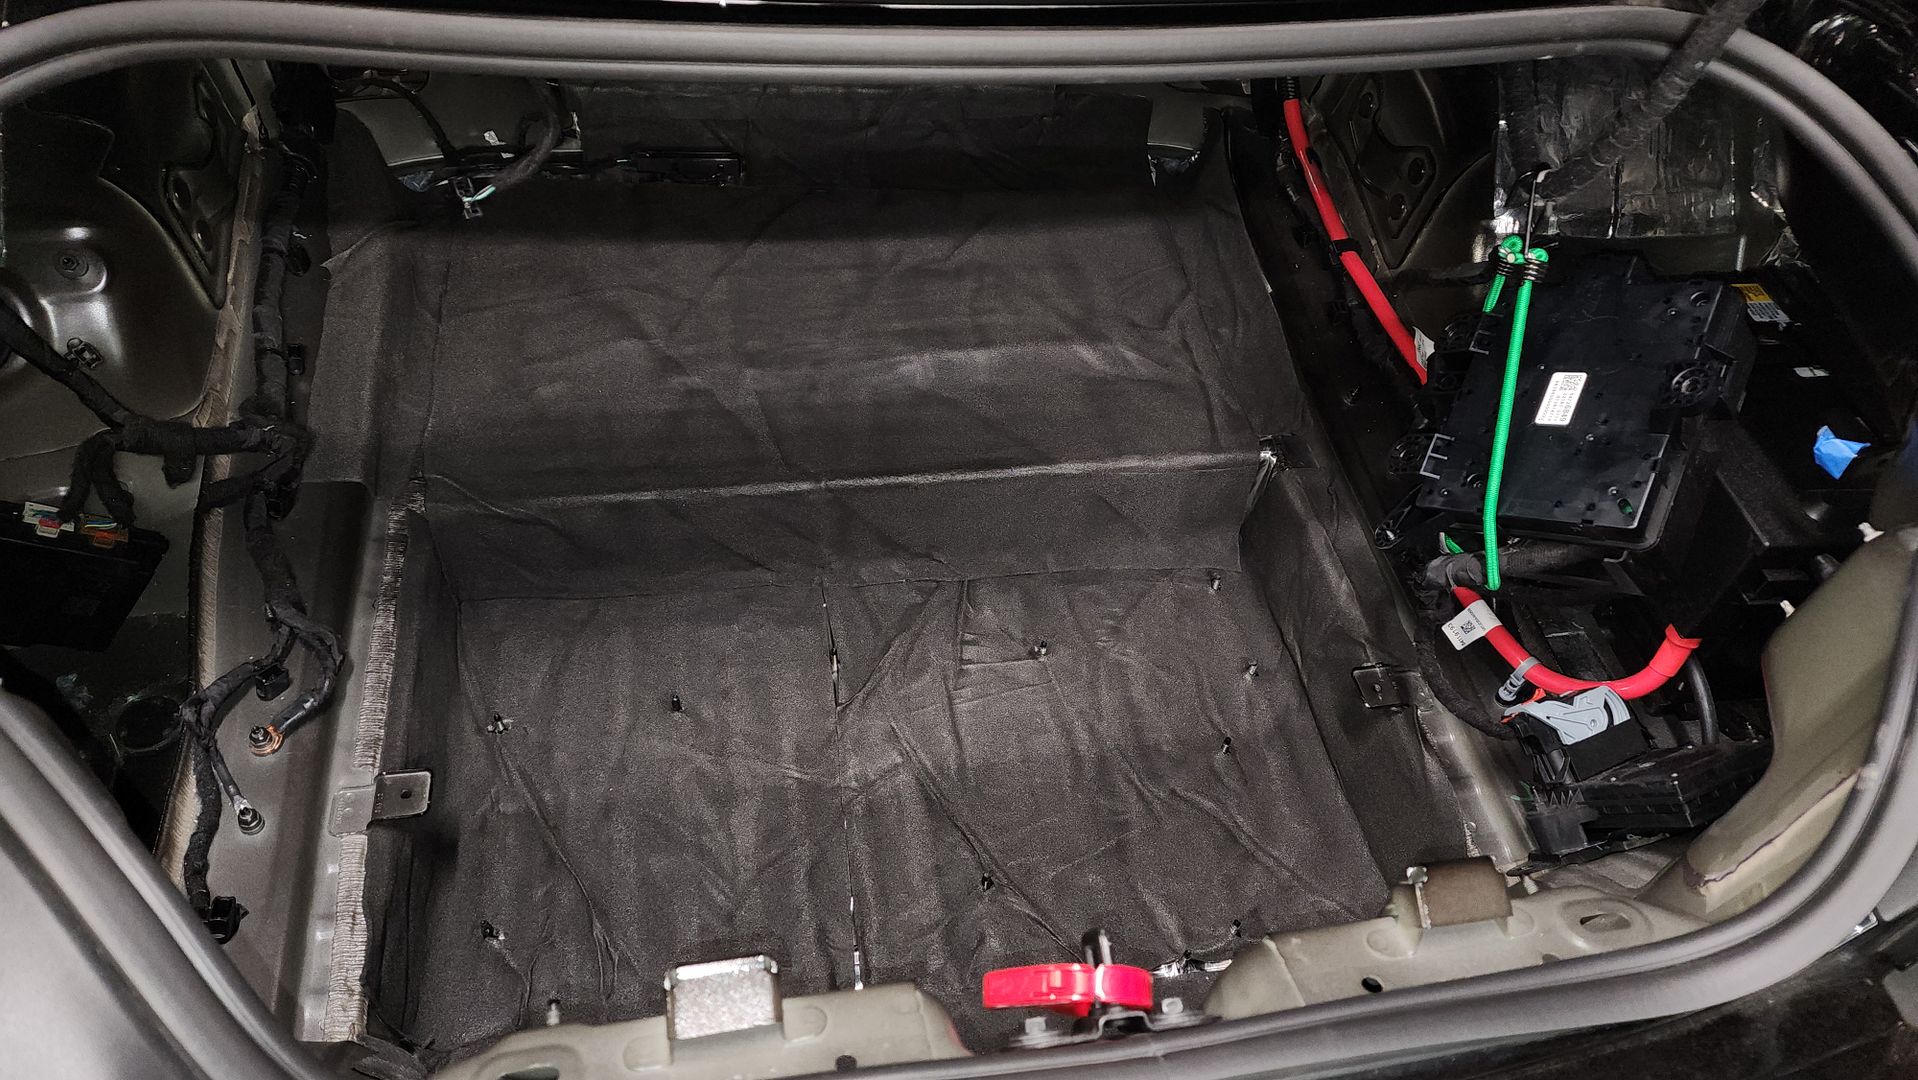 I also treated the bottom of the rear deck with CLD 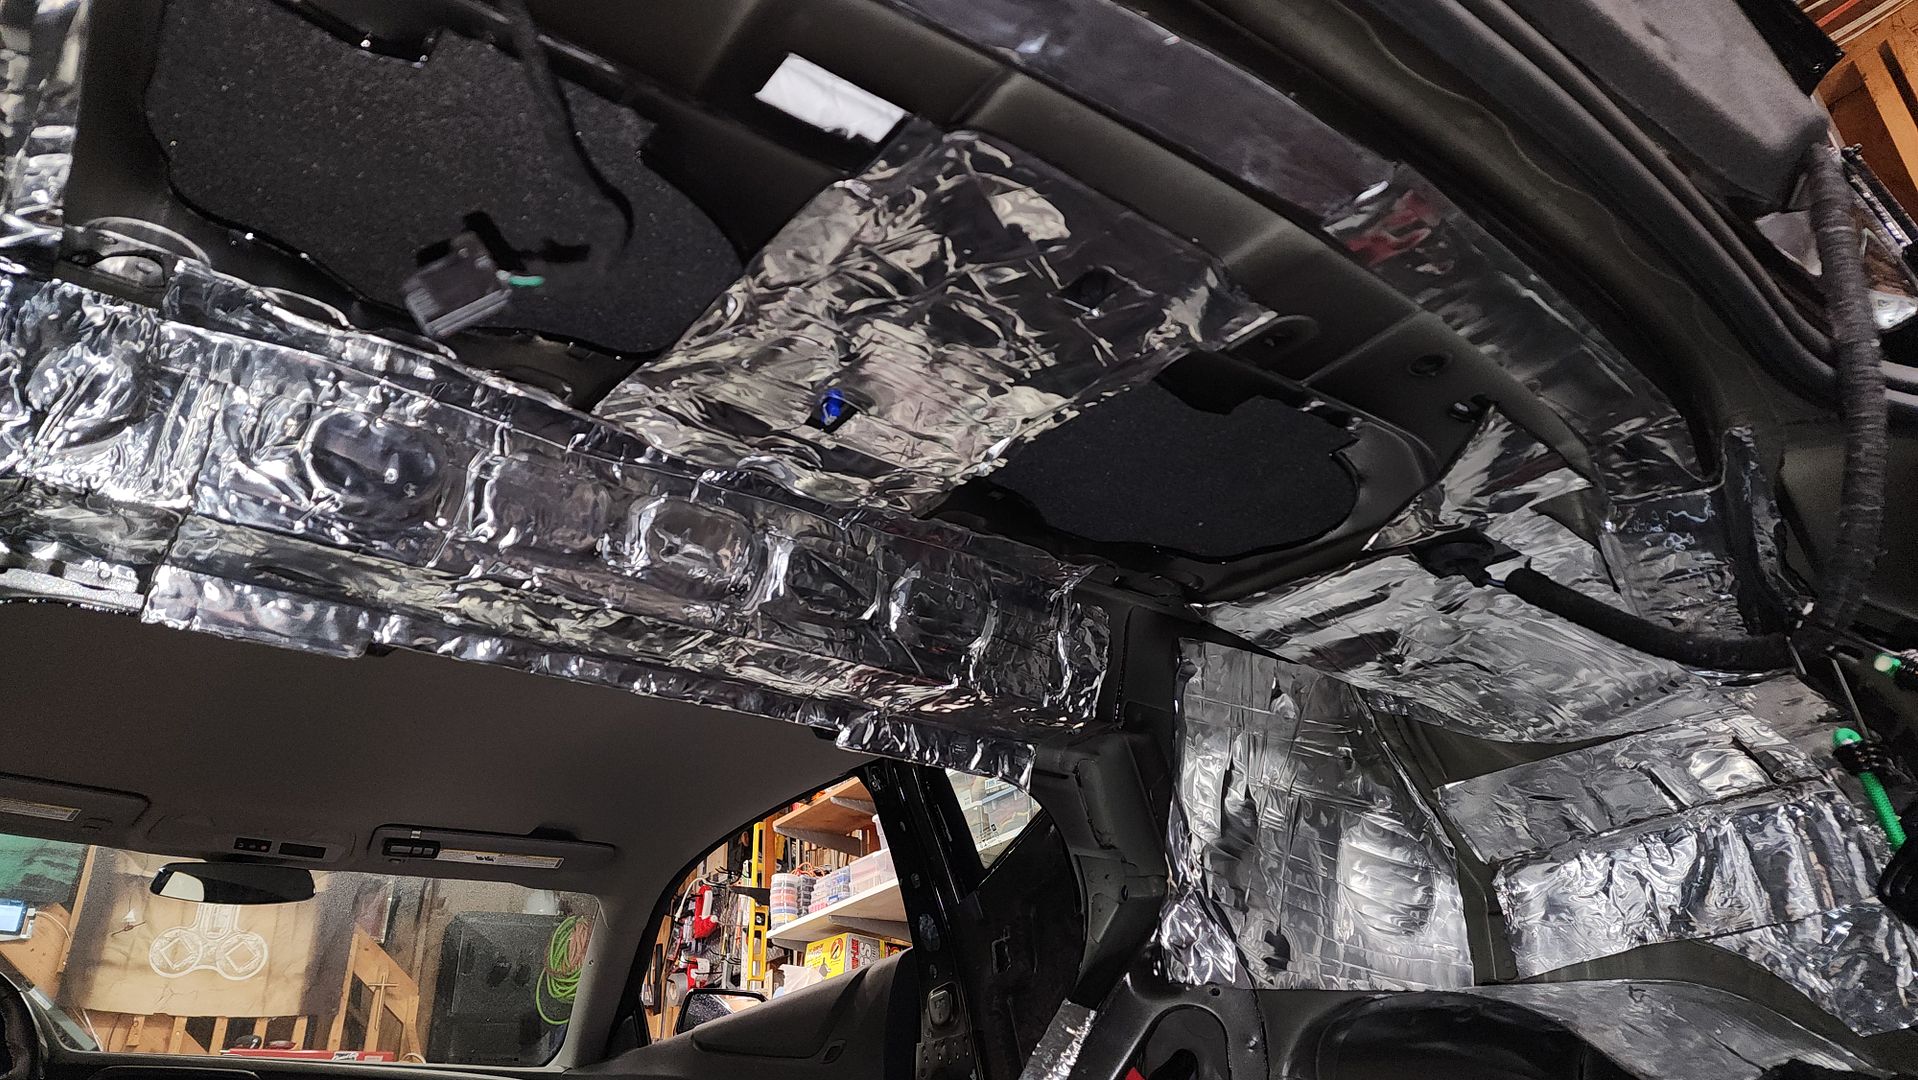 Then I covered it with CCF in order to hide the silver deadener since the rear deck is visible. 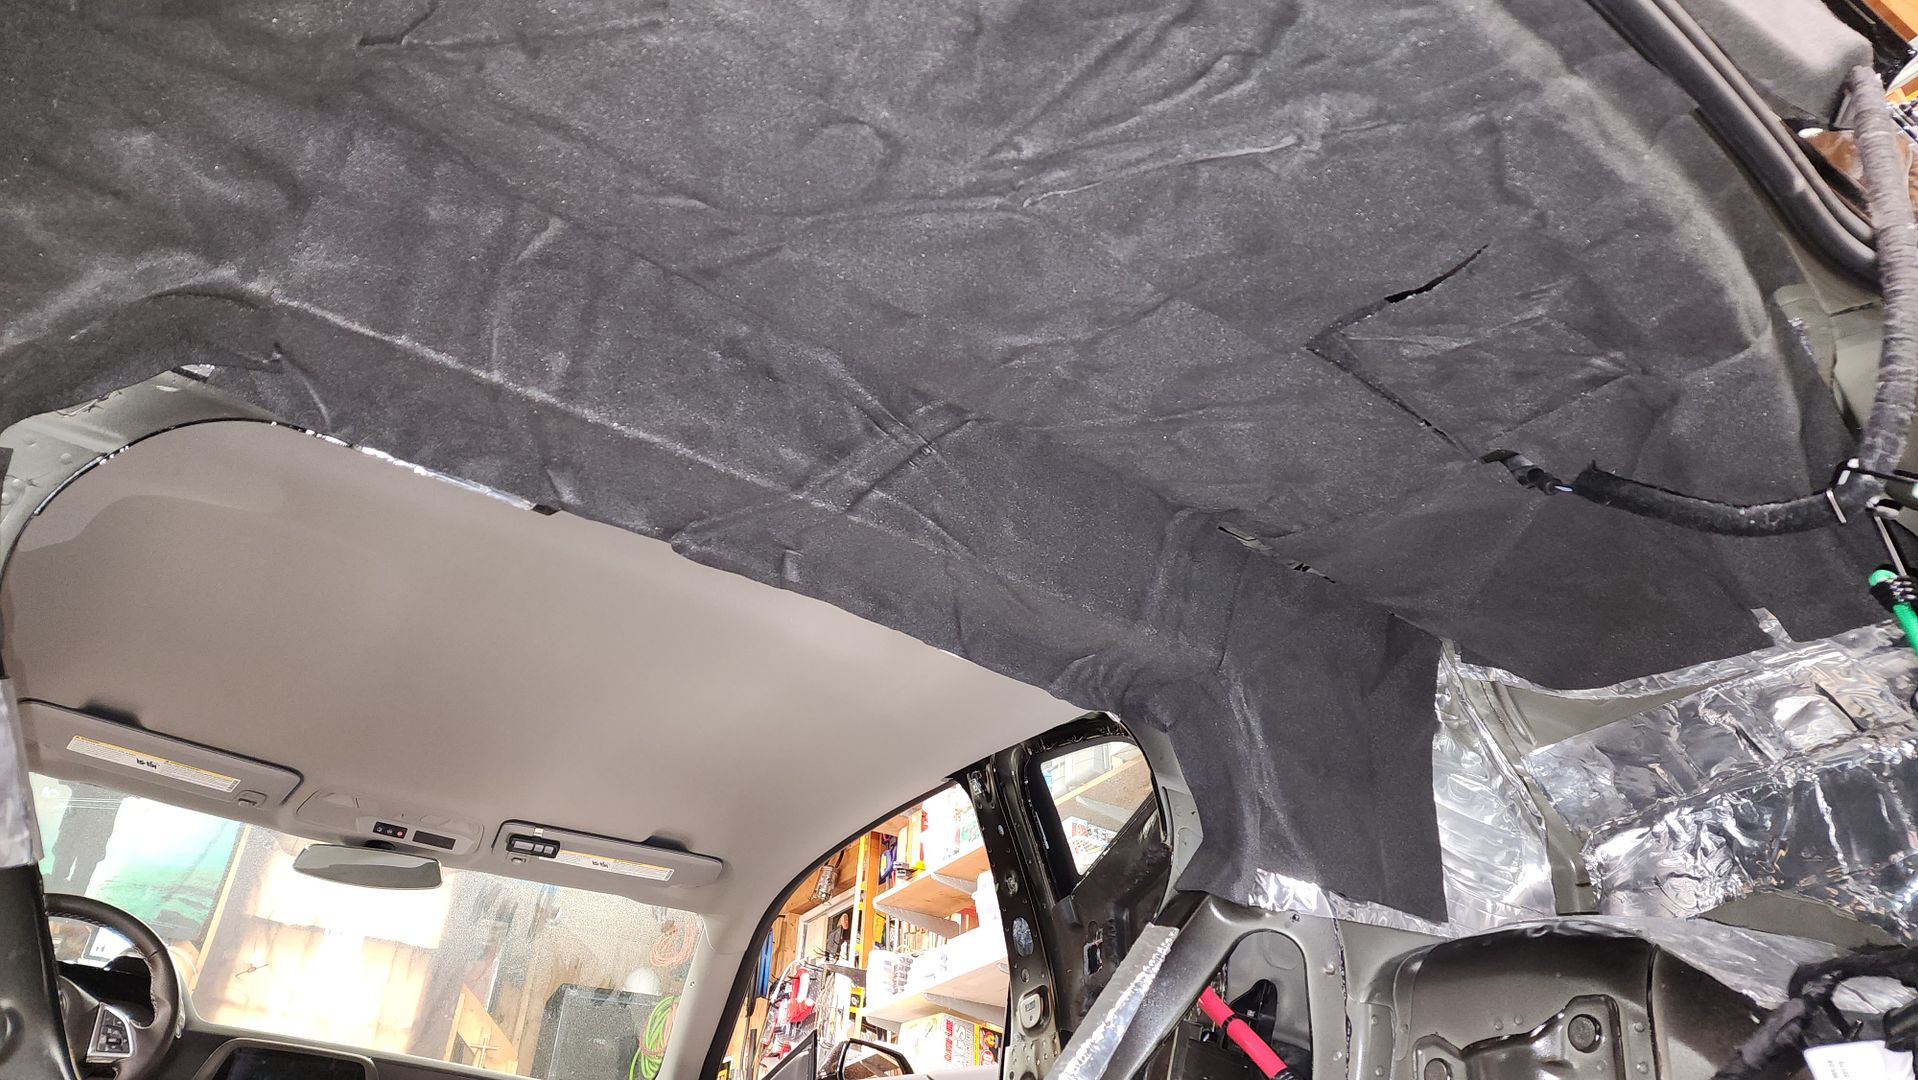 With the side panels fitted in place, the scope of CCF is sufficient, even though it’s not a perfect finish, it is hard to get a seamless install. 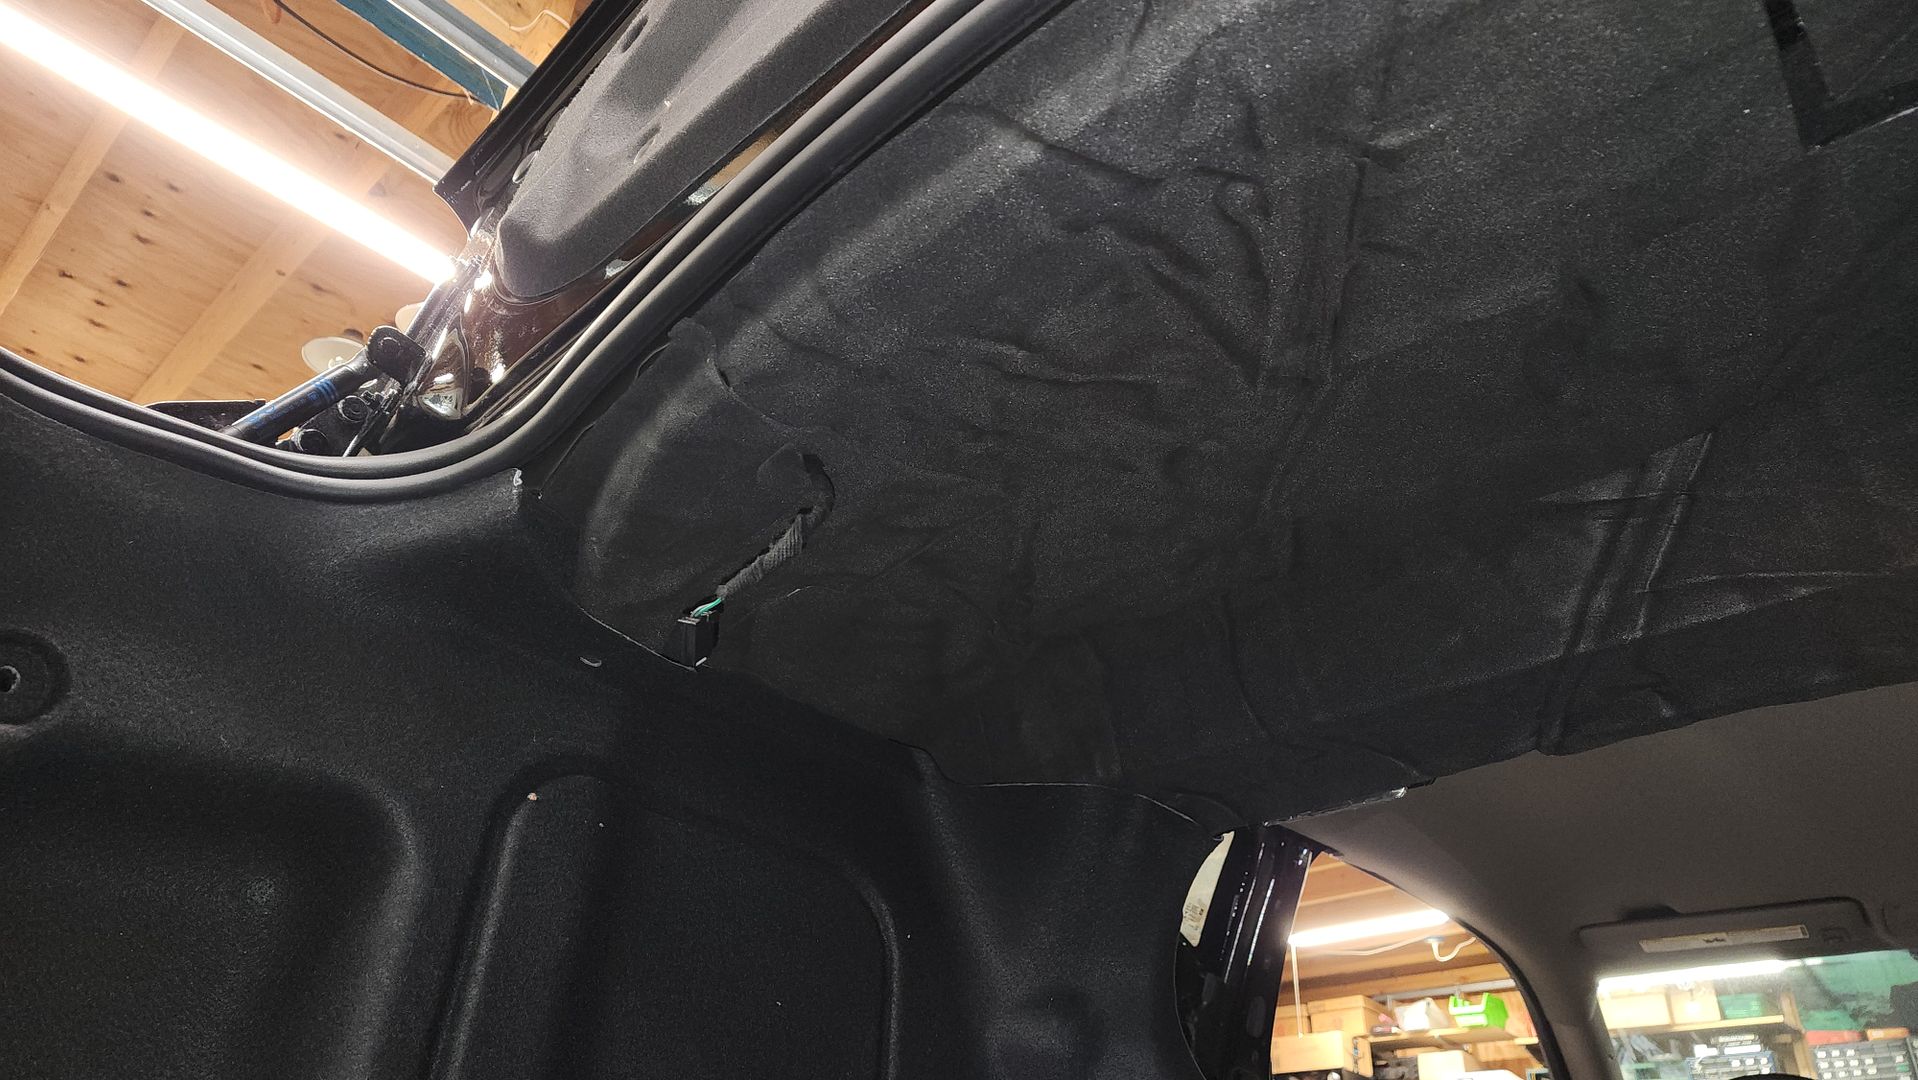 And here is a first look at where I plan on mounting the amps, a MV600/6i and a MV1000/1 with the MVi Hub. 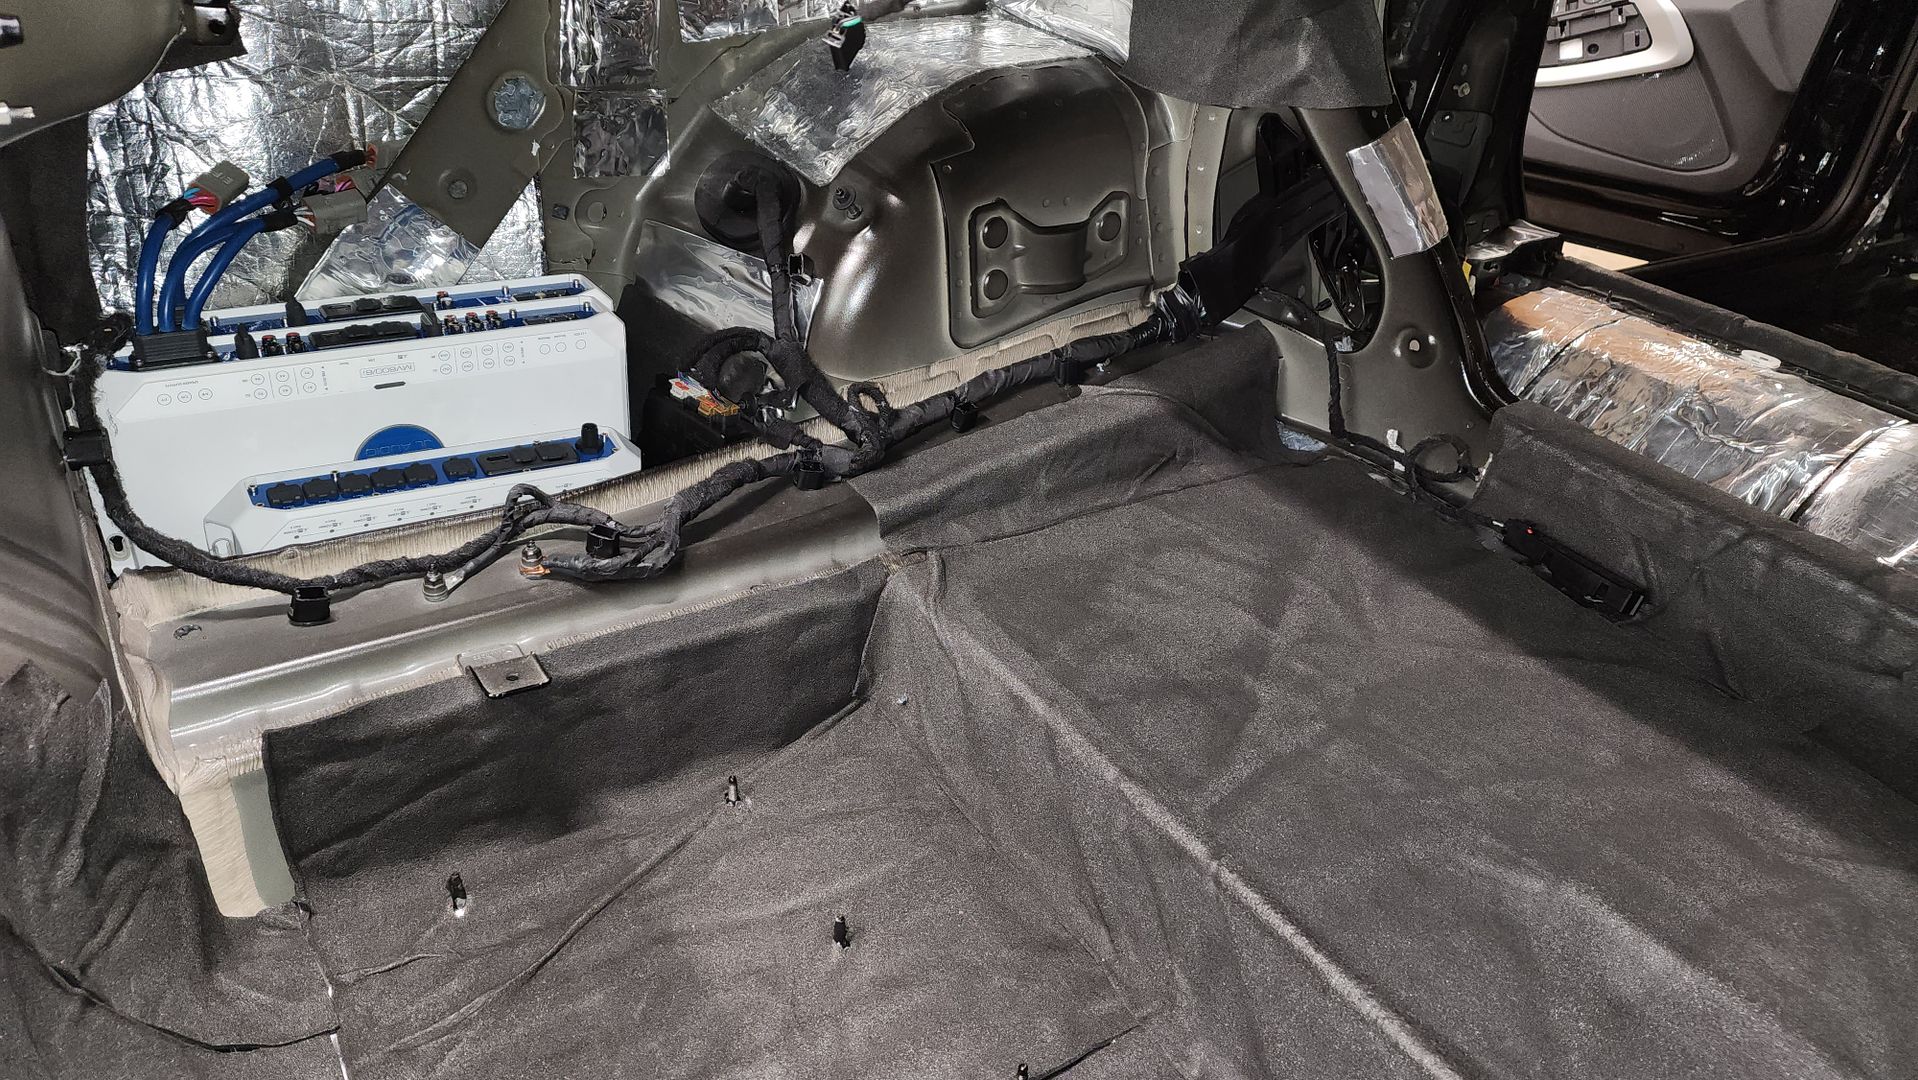
__________________
2023 1SS A10 Black NPP/C2U/H72 - Daily Driver
Historically an Accord and Camry owner with self-performed maintenance/repair. 1100: 5/3/22 . . . . . . . 2000: 6/25/22 . . . . . .4000: 8/17/22 . . . . . . . 6000: 9/10/22 Daily Driver mileage update: 22k mi. @ April 2024 New Engine @ 22,600 Build Log: https://www.camaro6.com/forums/showt...6#post11353116 |
|
|
|
|
10-28-2023, 12:15 PM
|
#36 |
 
|
Wow, this is very fascinating. It's all way beyond my understanding of how sound works, but looks awesome. I put a sub & amp in my car (& the same sub & amp in my 94 Camaro), but it's a very basic & simple install from someone who doesn't know a lot about what they're doing, lol. So this is impressive. I'd love to hear it when it's finished.
__________________
2020 Camaro 2SS - Riverside Blue, NPP, Magnetic Ride, Sunroof
RUXIFEY Smoked LED Side Marker Lights / Black SS emblem on rear bumper / Blue SS vinyl overlay on front bumper emblem / Wildhammer Rear Dark Reflectors / Trim Illusion Gloss Black Door Handle Covers / eBay Black Fuel Door / Screaming Chicken Fender Hash Marks / Color-Matched G2 Caliper Paint RE Audio RFX10D4 10" Sub / Hand-made sub enclosure / Hifonics Zeus ZRX1200.1D amp / JL Audio LoC-22 line output converter / Sub Thump Plug N Play T-Harness With ANC Defeat Harness Kit My Camaro Journal |
|
|
|
|
11-02-2023, 12:31 AM
|
#37 |
|
Electrical Engineer
Drives: 2023 1SS A10 Black Join Date: Apr 2022
Location: Illinois
Posts: 779
|
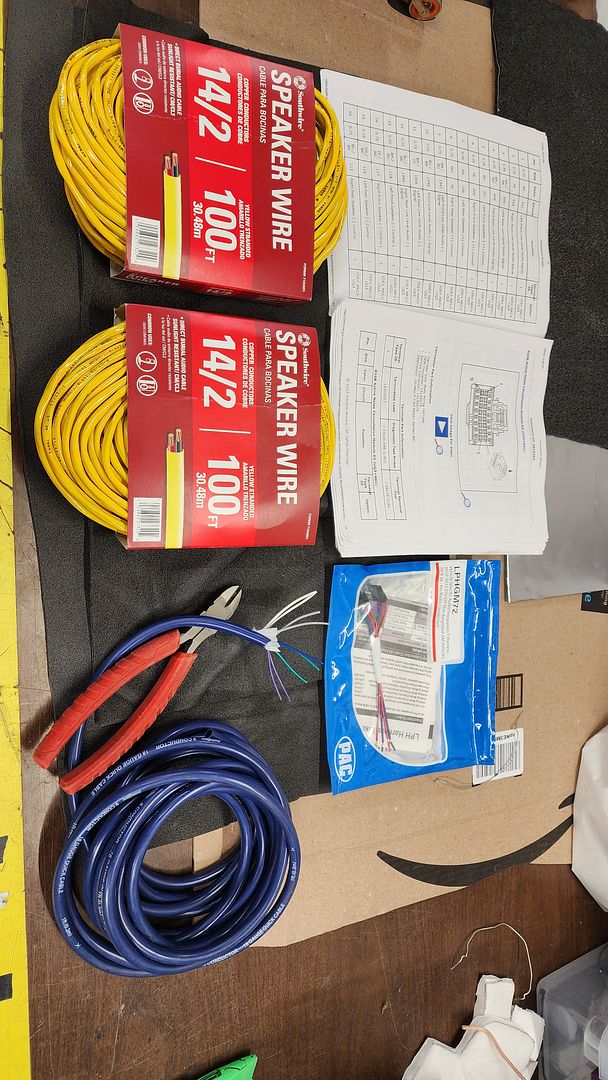
Using 14/2 CL3 rated speaker wire, I ran two pairs of 14/2 and 9-wire from the amps in the rear driver’s side trunk corner to the factory head unit module. I also ran two pairs of 14/2 to each dash corner. This jacketed cable has protection but is stiff enough that it can rattle against the aluminum CLD layer. So I laid down CCF to keep it isolated then secured the wiring with CCF strips to keep it flat. I used Tessa Tape where the wiring is routed without CCF isolation.
 I started by measuring the necessary lengths then laying the bundles out. I determined lengths by routing them from the trunk to the front, using velco wire ties to keep them tidy. 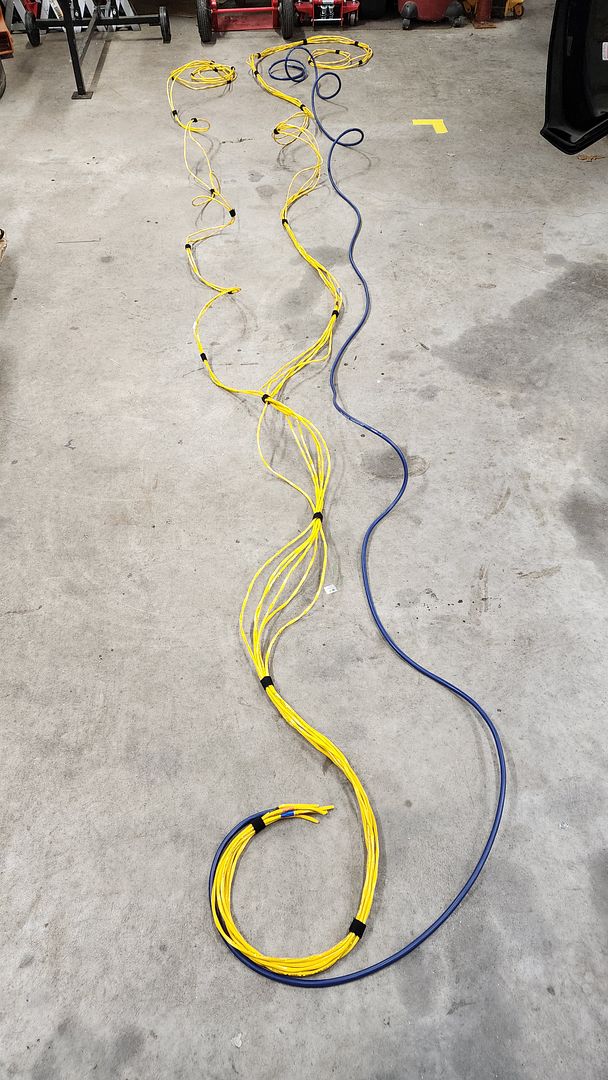  I laid down CCF strips where the wiring would route, then used CCF strips to keep the wire flat and organized with no crossings that would thicken the path. 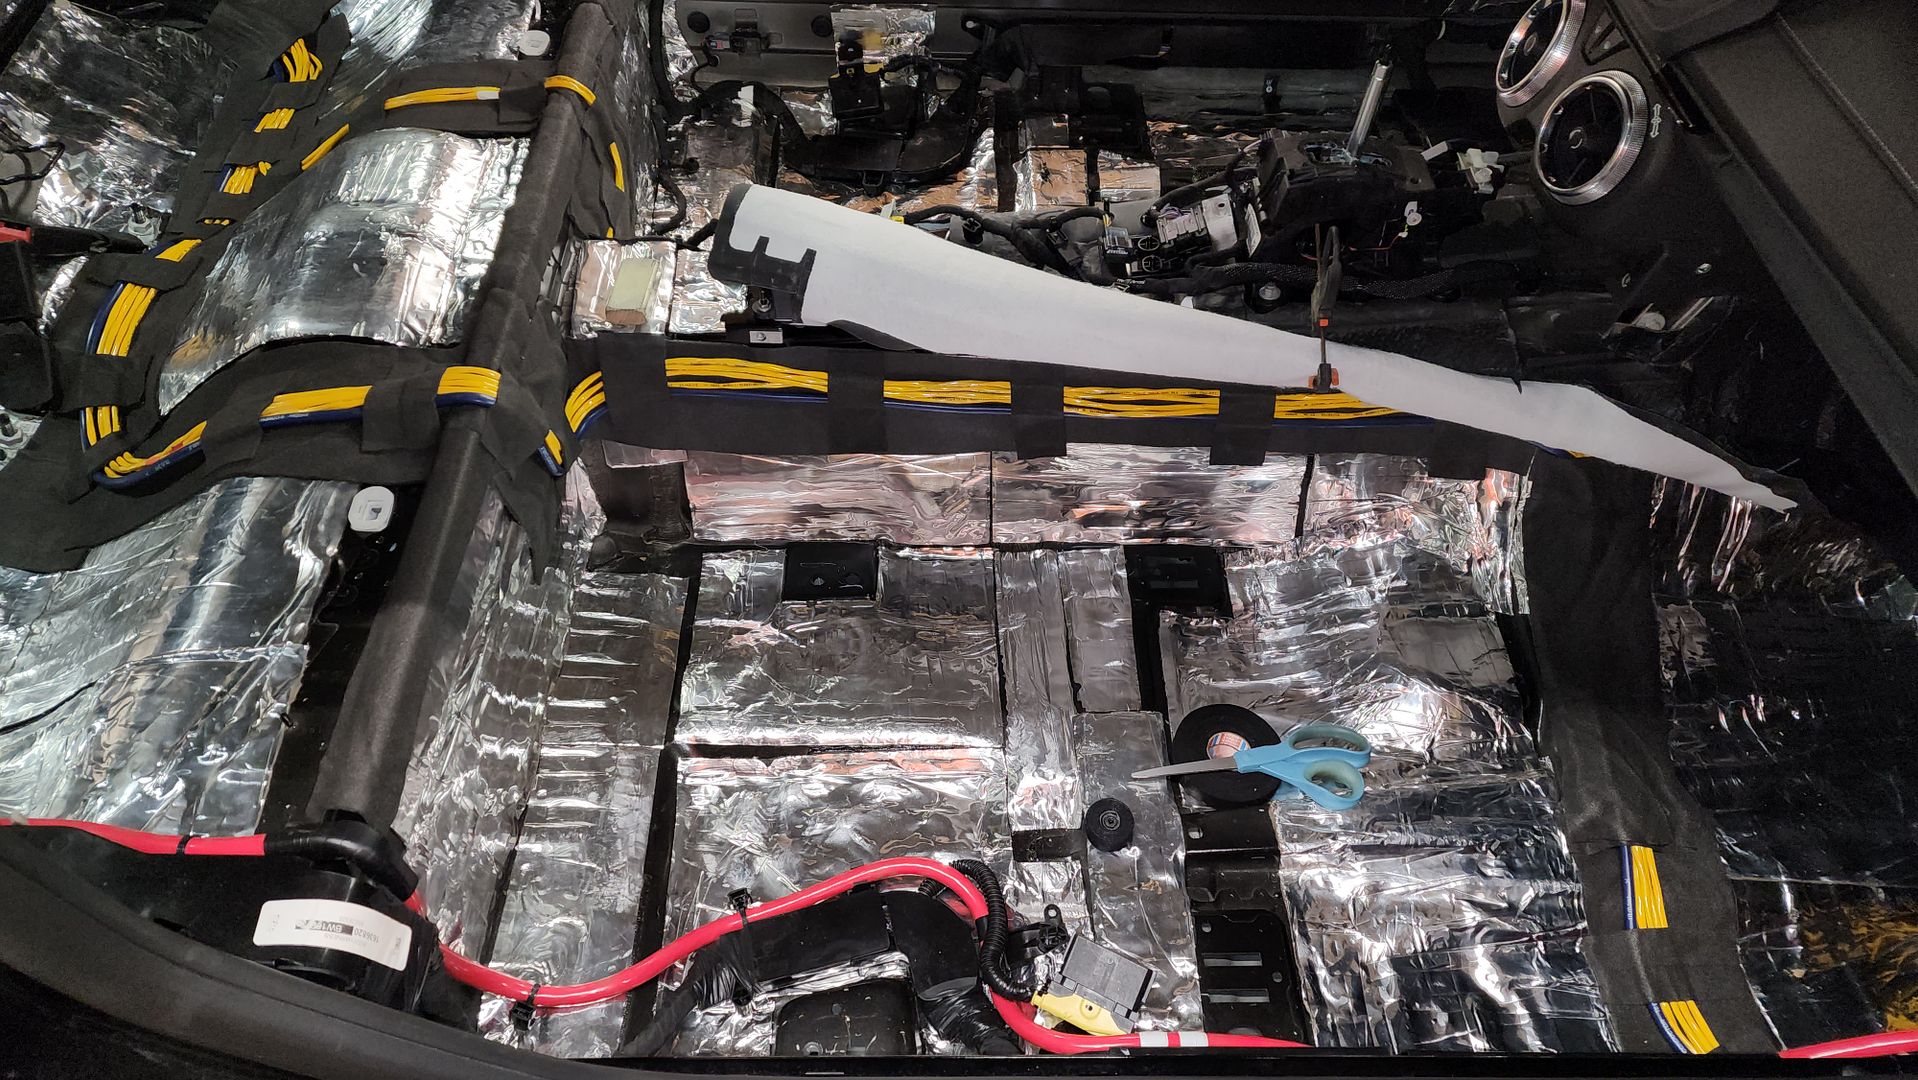   Routing down the sides of the transmission tunnel keeps the wiring away from stock bundles while also managing wire lengths.  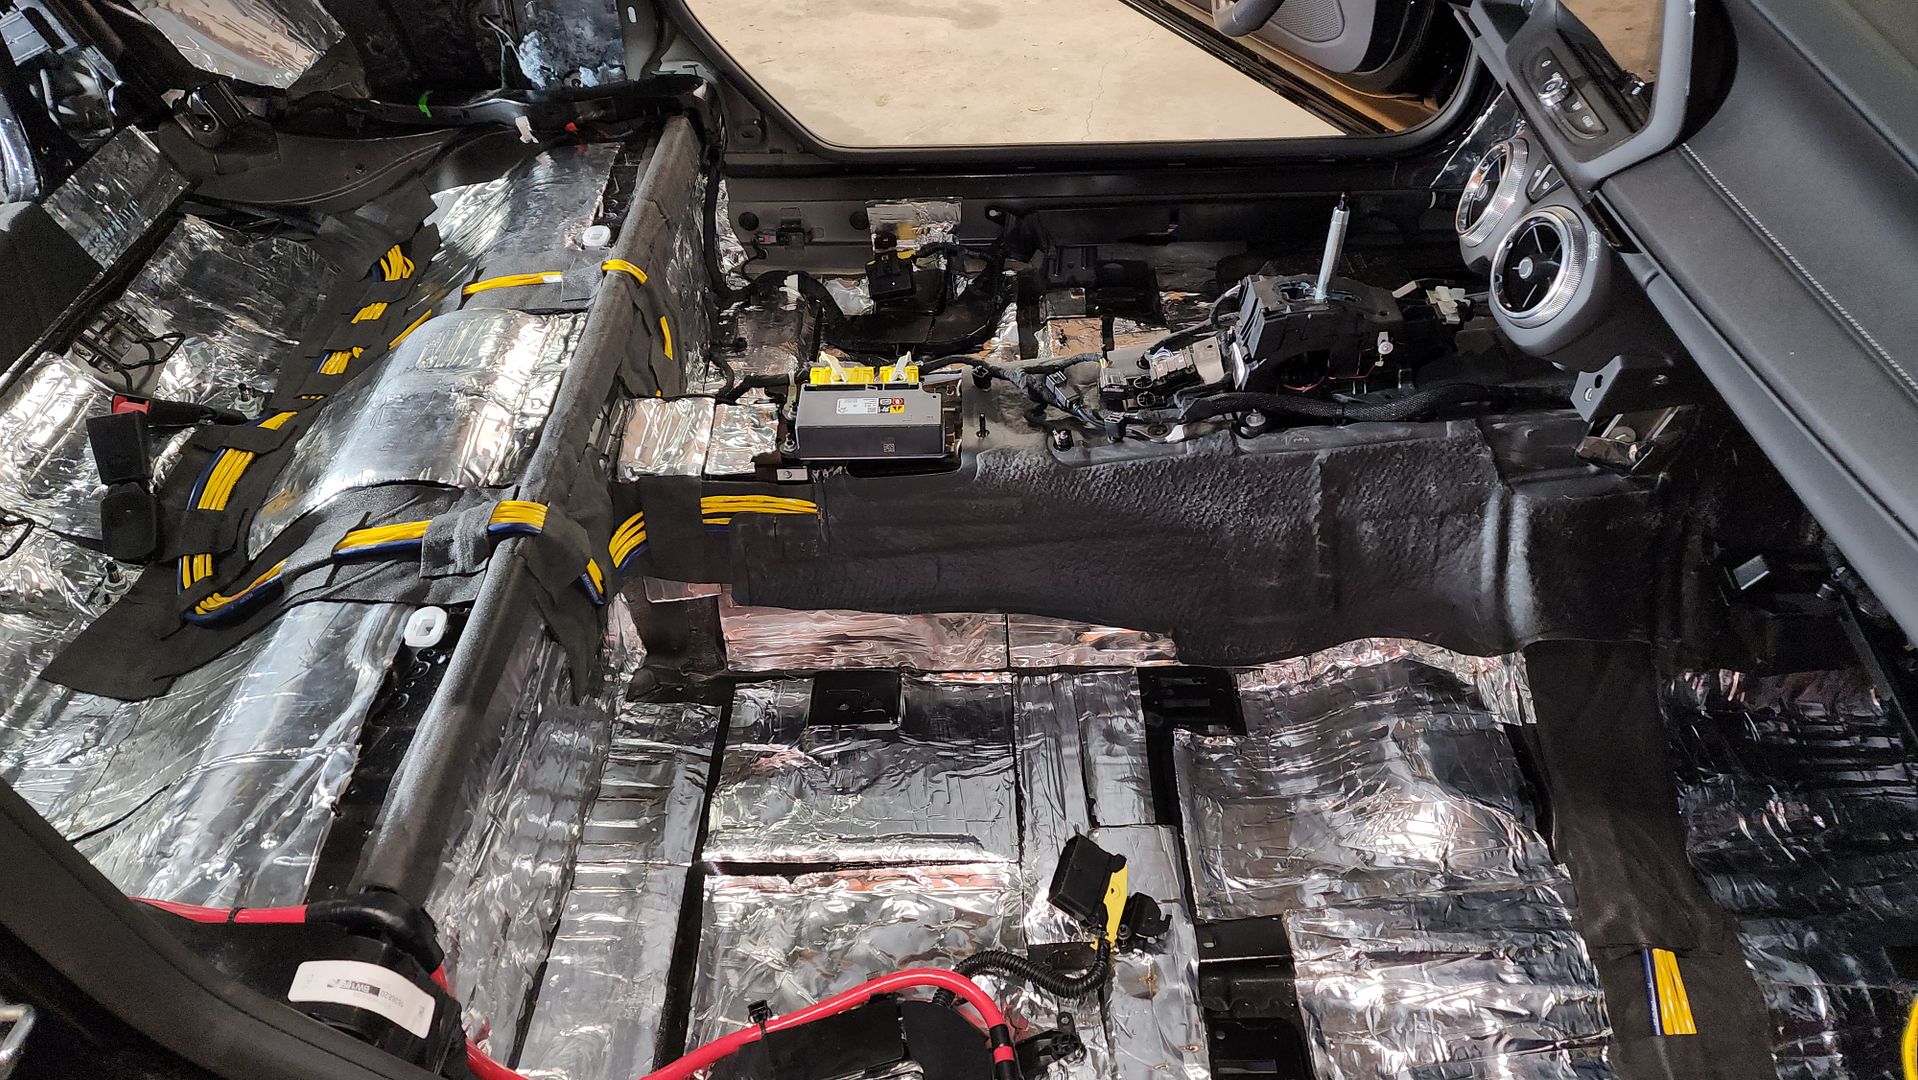 I also covered the kick panel area in Resonix Barrier after adding CLD and Fibermat 45 inside the cavity. This was definitely a source of road noise. 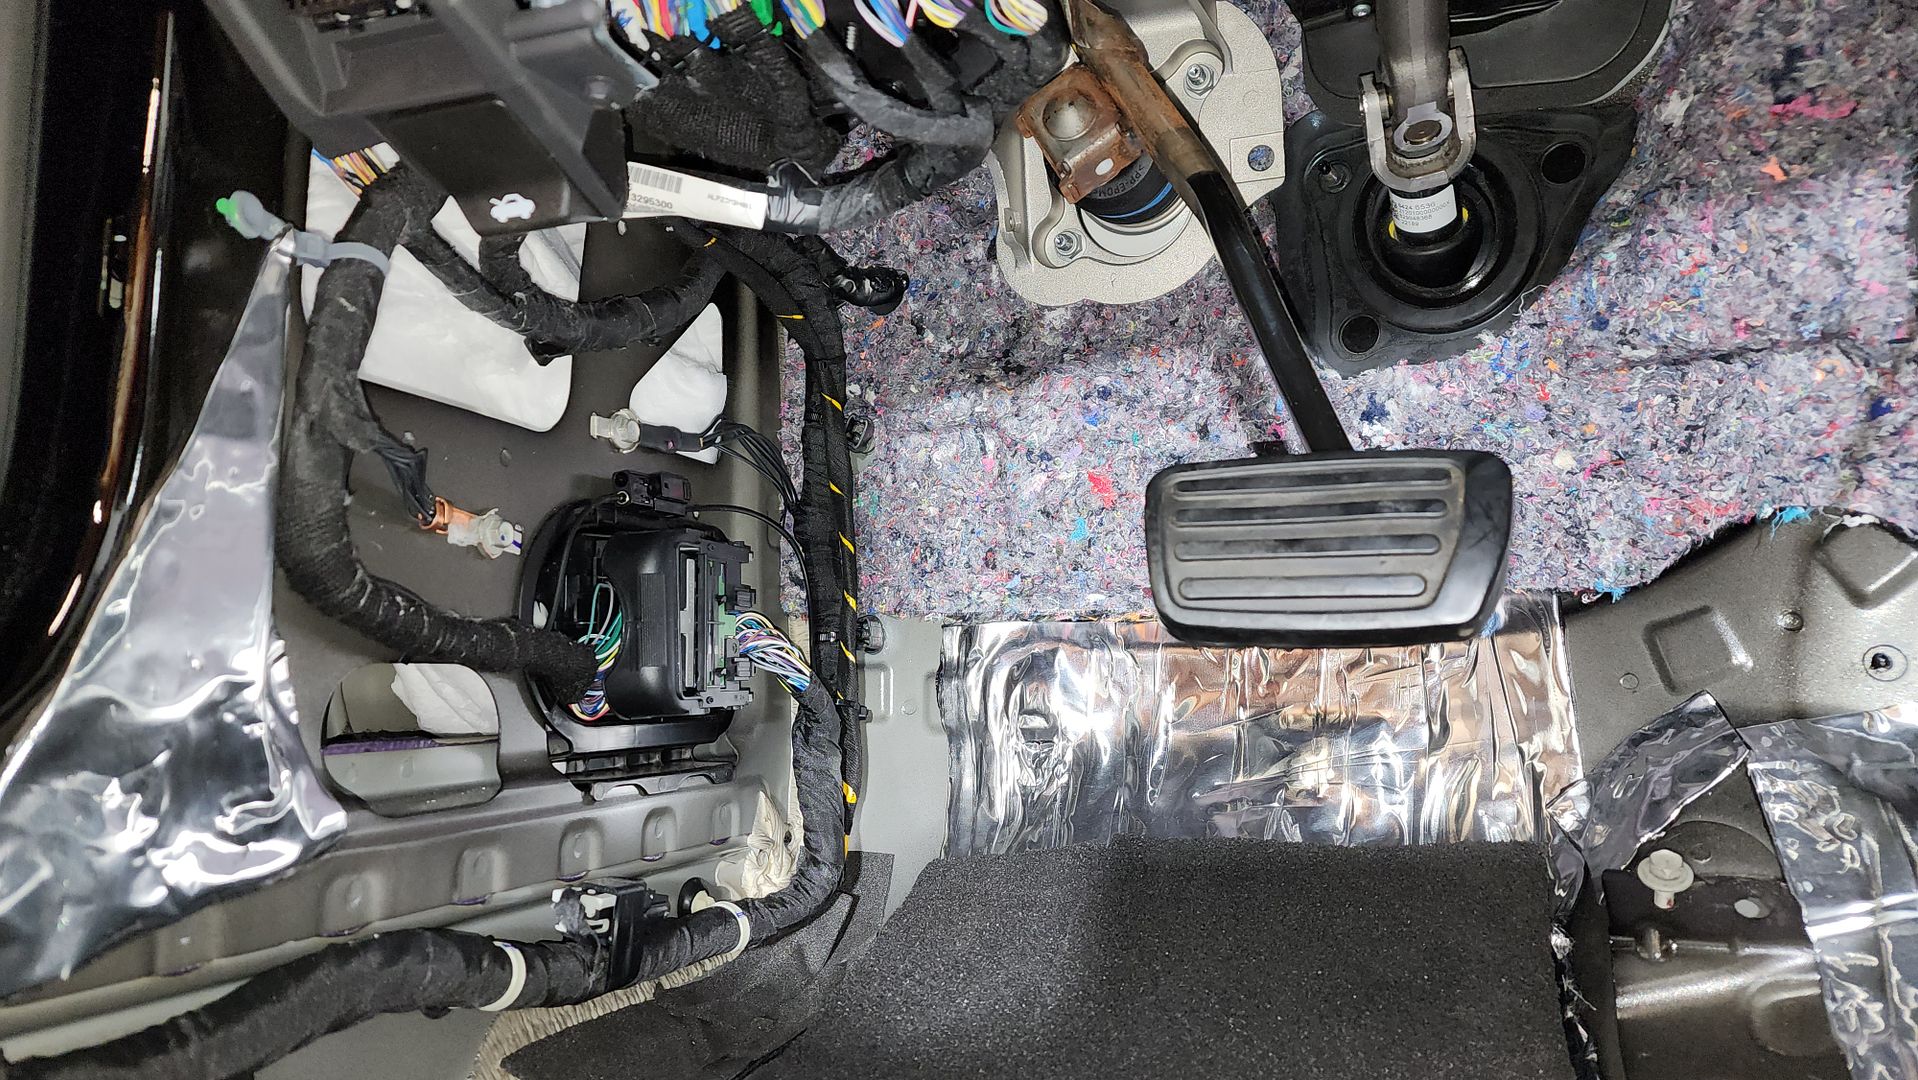 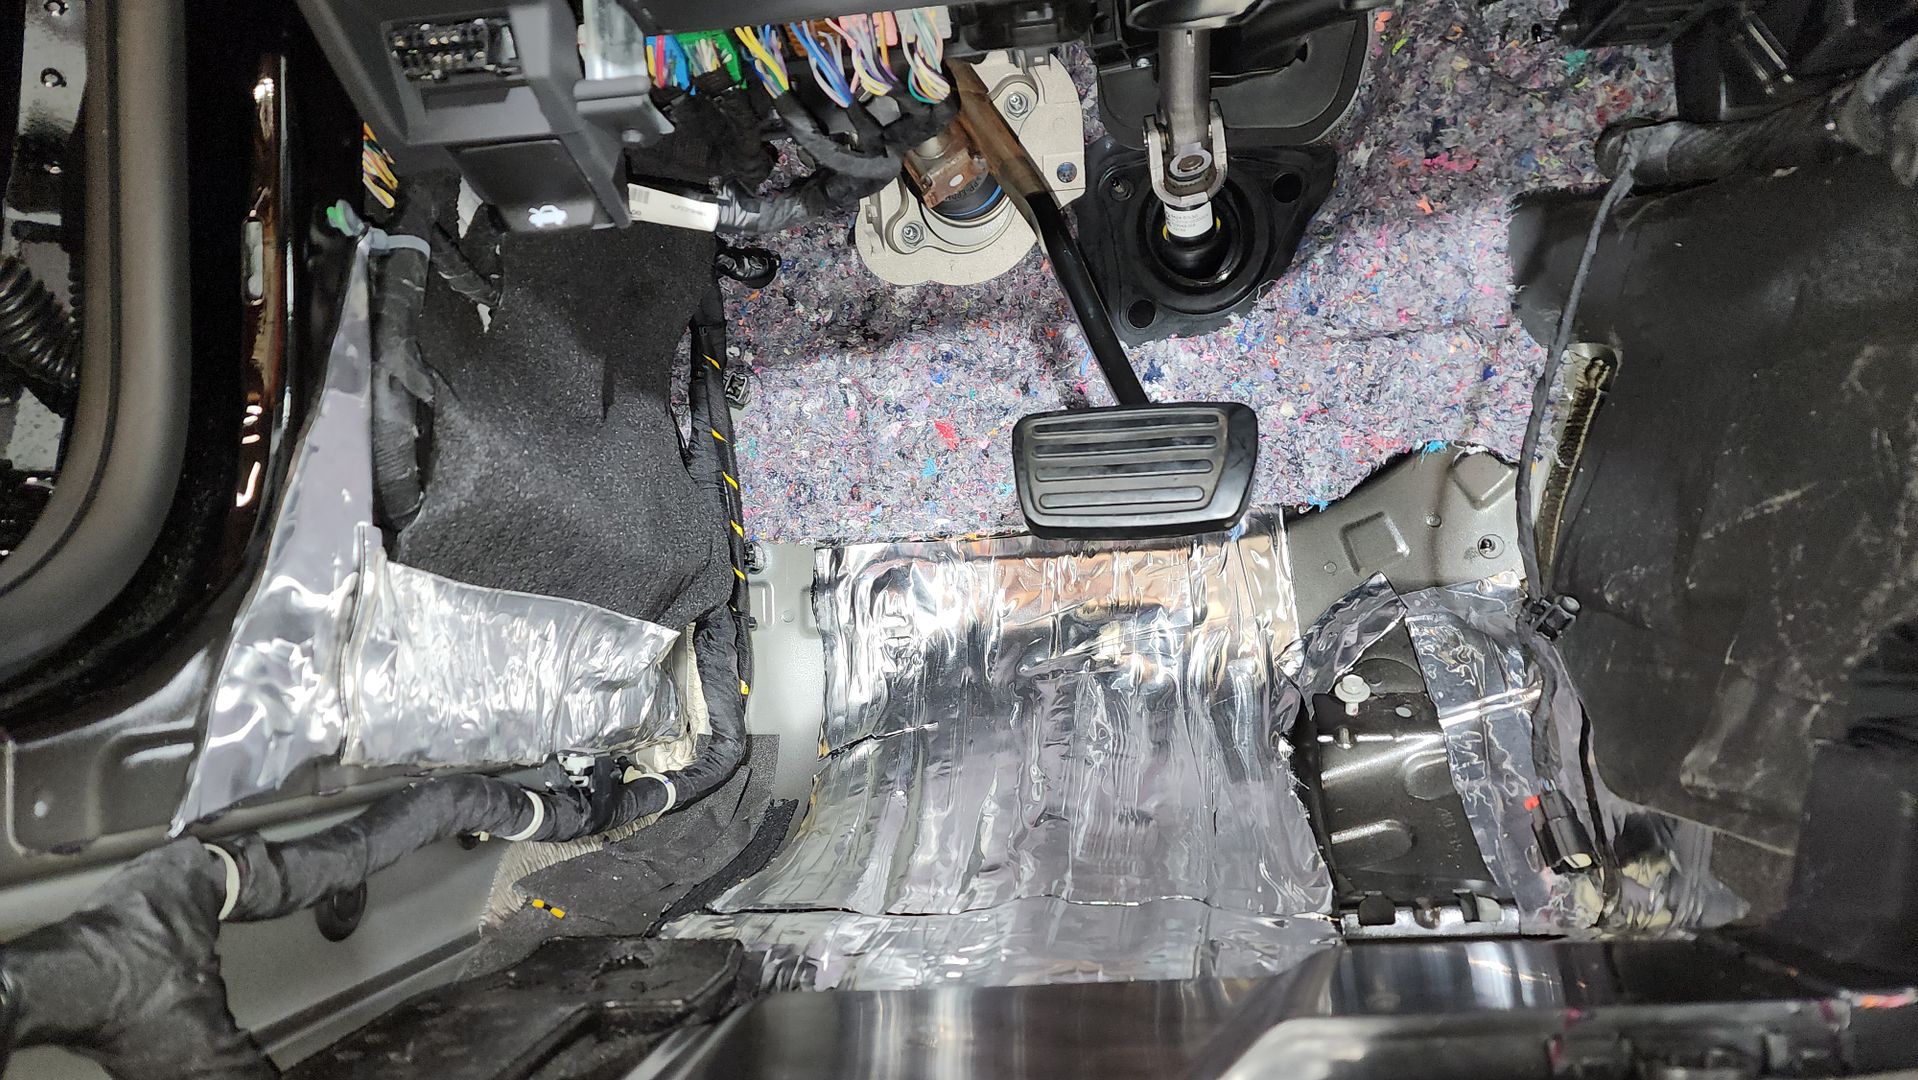 Now I can start to reinstall the interior!
__________________
2023 1SS A10 Black NPP/C2U/H72 - Daily Driver
Historically an Accord and Camry owner with self-performed maintenance/repair. 1100: 5/3/22 . . . . . . . 2000: 6/25/22 . . . . . .4000: 8/17/22 . . . . . . . 6000: 9/10/22 Daily Driver mileage update: 22k mi. @ April 2024 New Engine @ 22,600 Build Log: https://www.camaro6.com/forums/showt...6#post11353116 |
|
|
|
|
11-04-2023, 05:11 PM
|
#38 |
|
Electrical Engineer
Drives: 2023 1SS A10 Black Join Date: Apr 2022
Location: Illinois
Posts: 779
|
Made a big push on Friday afternoon and worked till 3:30am on Saturday to have a completed Phase 1, ready to drive again!
Treated the rear panels with CLD, closed up the speaker hole, and then covered them in Fibermat 45 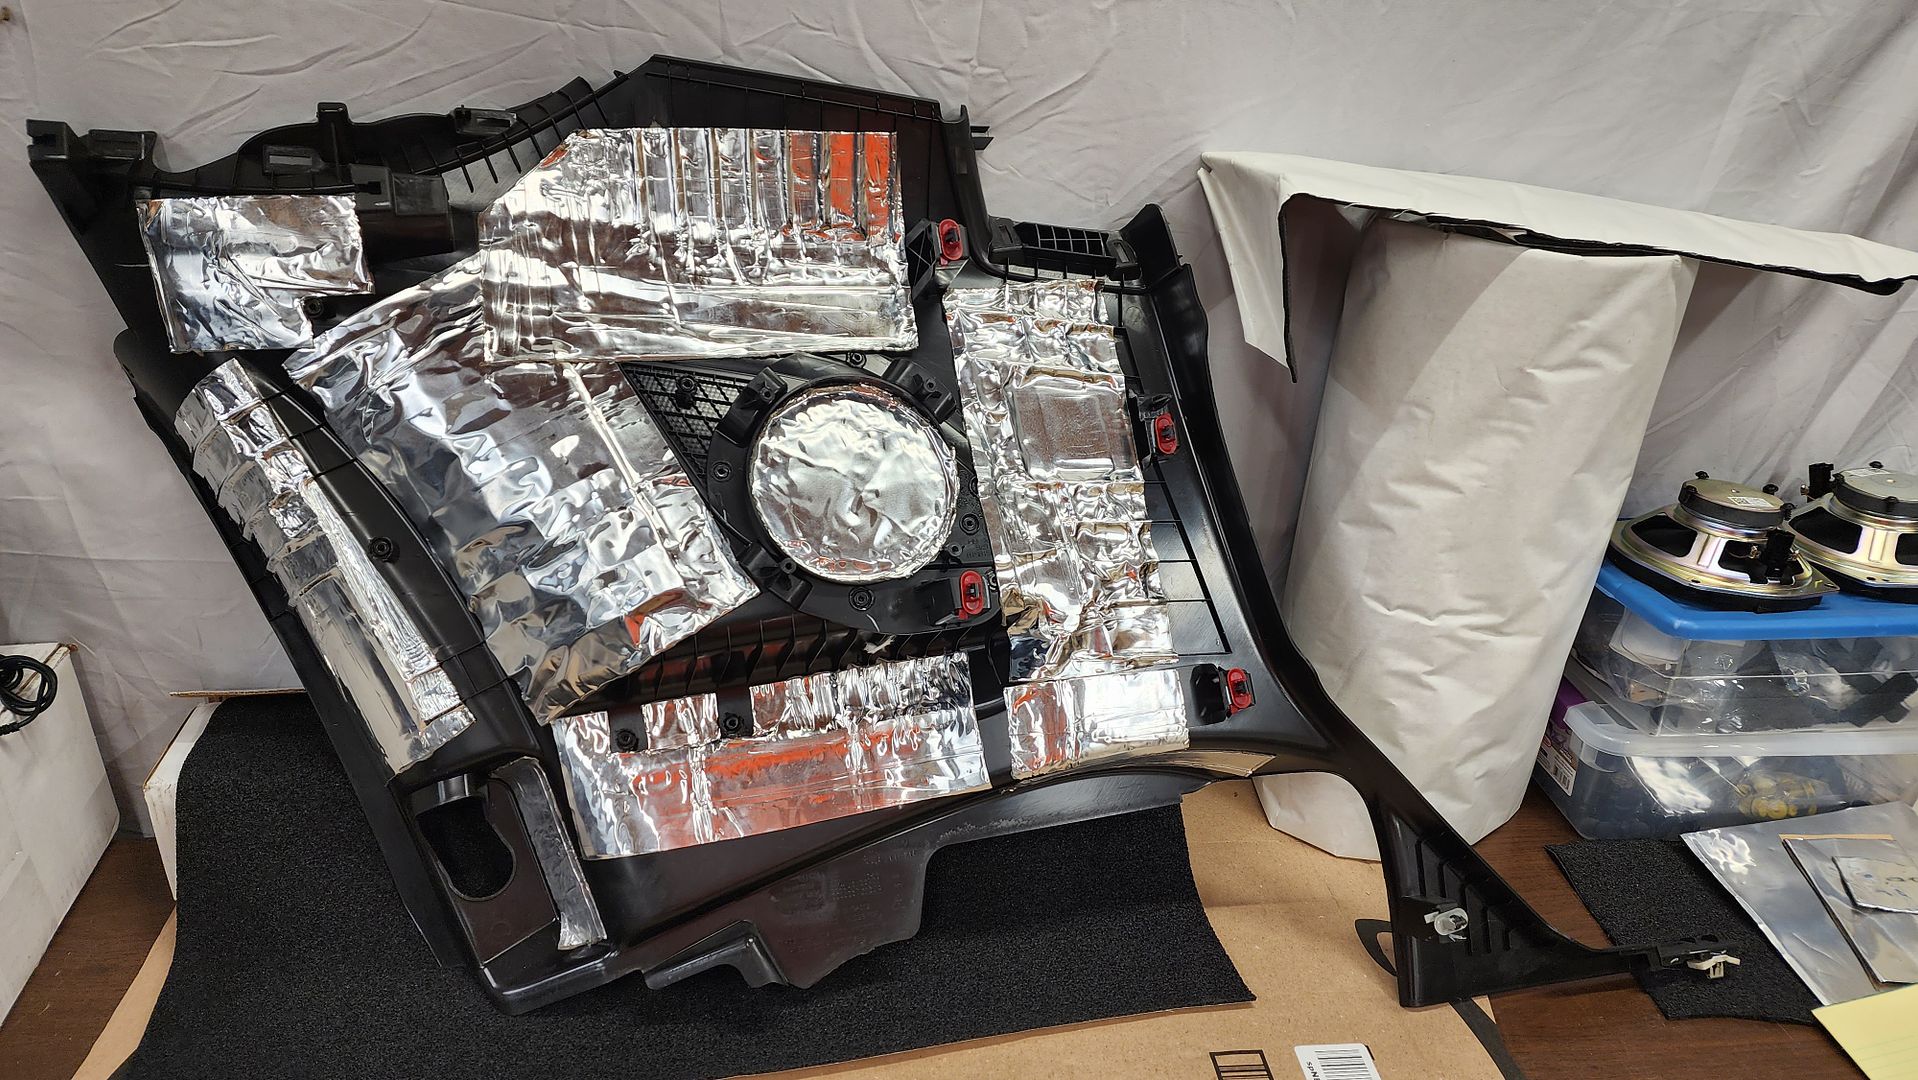 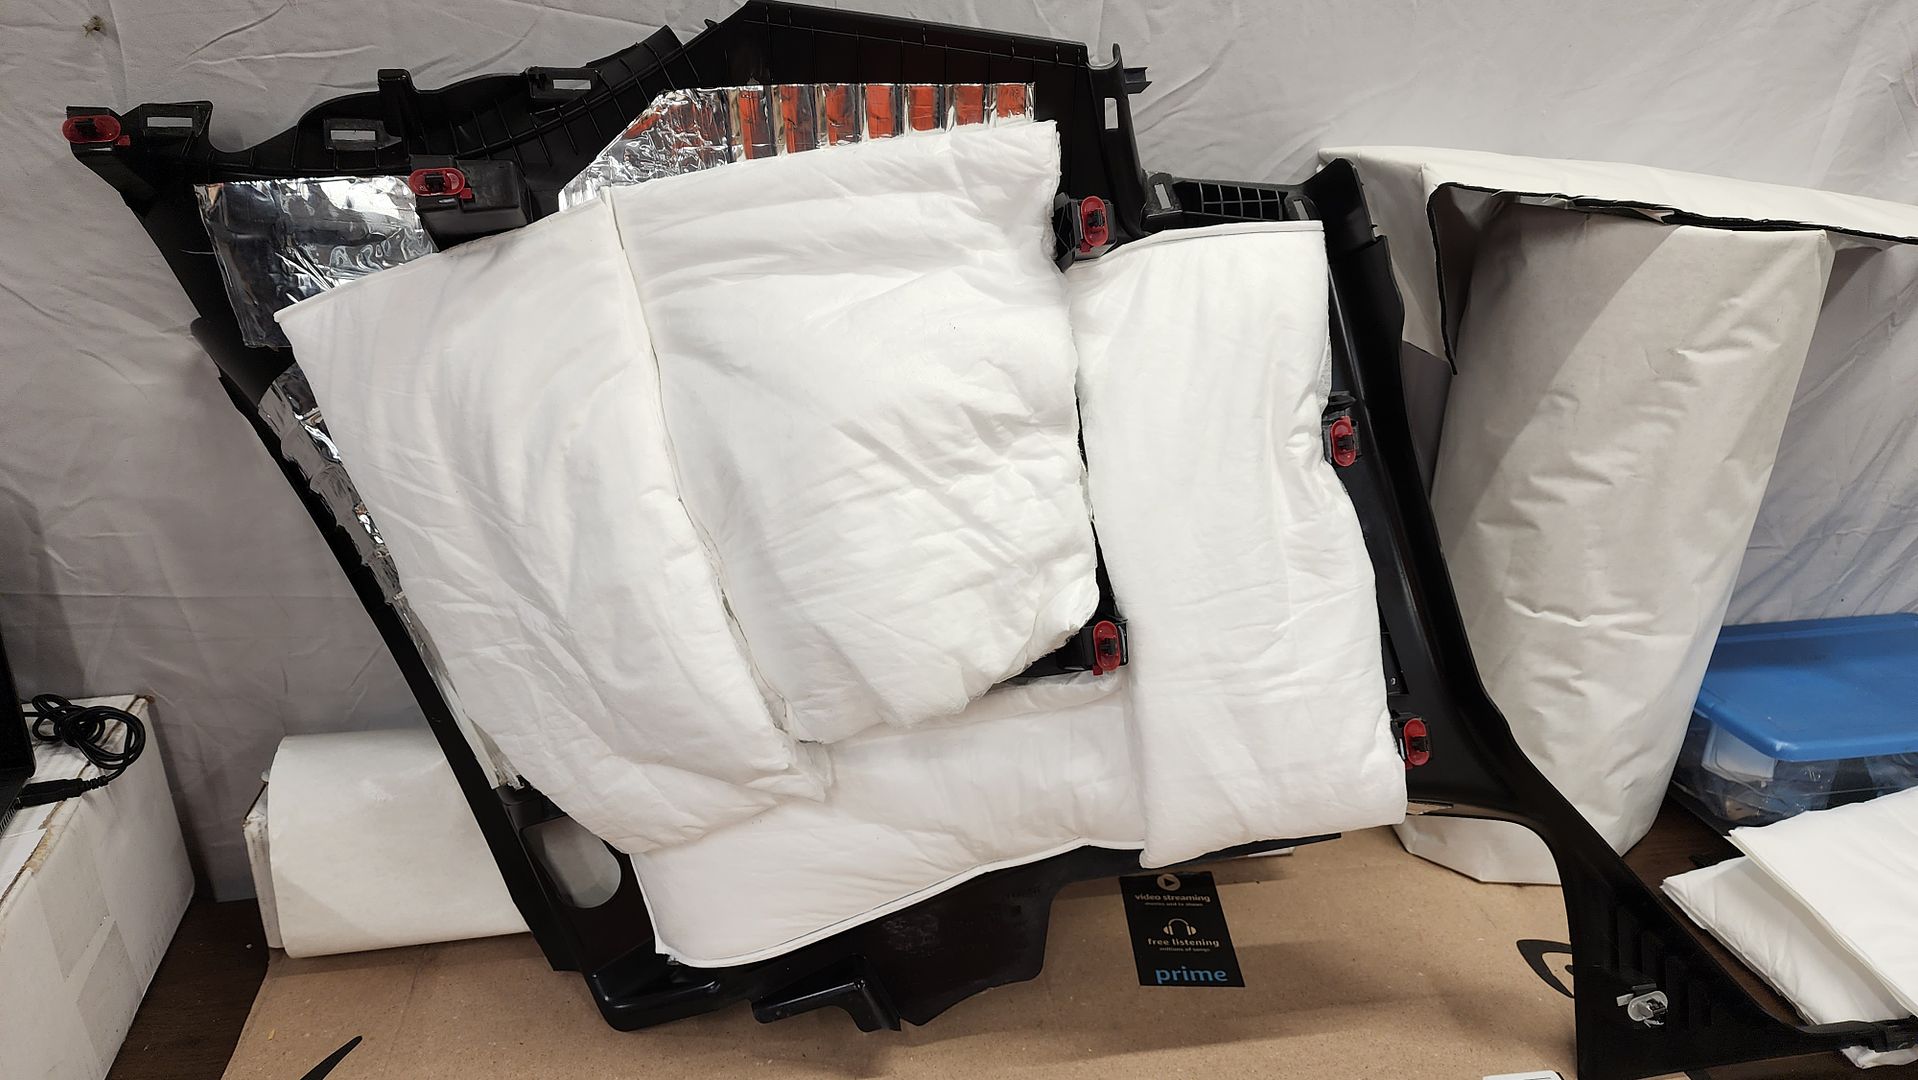 I reinstalled all of the interior. No reason to show pics since it looks stock. No evidence of what I've done. I finally got to drive it for the first time since August 28th. Around town with some music on at a reasonable volume there is no exterior noise to distract you, it's really nice. I did a 55mph highway noise measurement that was a repeat of the "before" measurement, and I'll share those results when I have time to process the data. I have been taking videos in 4K throughout the process so I'll have a series of videos on the efforts and results. Subjectively (bias, I know), driving around town between 30-40mph is serene, and with a bit of music the outside world is drowned out. The engine is always able to be noticed, but the baffling in the stock exhaust makes it pretty quiet while cruising. The exhaust has cutouts that bypass the "suitcase" muffler, so you get loud cold starts and an awesome tone when you mash the gas, but you don't have any drone while cruising. 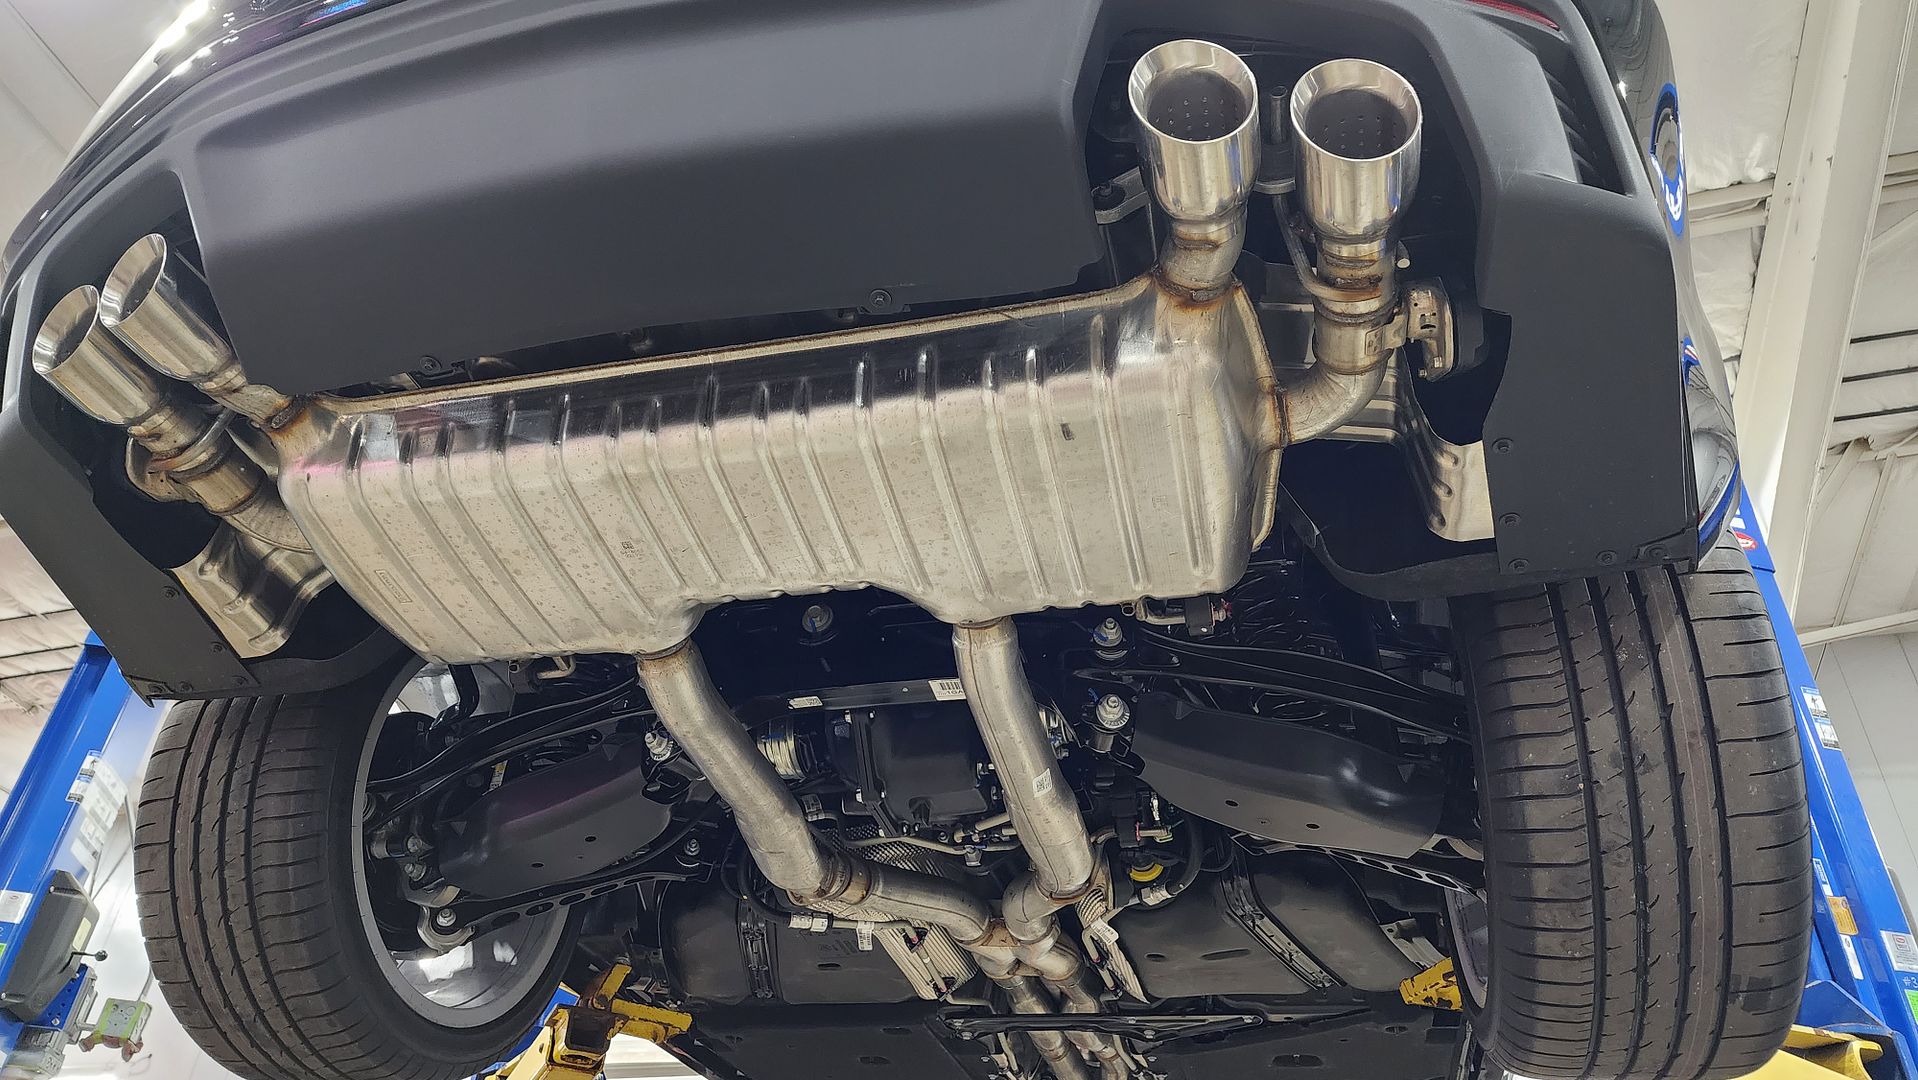 I also needed to install some tweeters in the dash so I had some interim tunes while I build the amp rack. So I mounted the Hertz ML28 tweeters using the speaker mount adapters that came in the kit. I terminated the wiring with some plugs so install/removal is “easier”. I put that in quotes because it took a lot of time to get the plugs made since I terminated all four pairs in the dash so the mids would be ready to go when the time comes. These connectors have a multi-step process requiring a specific crimper. 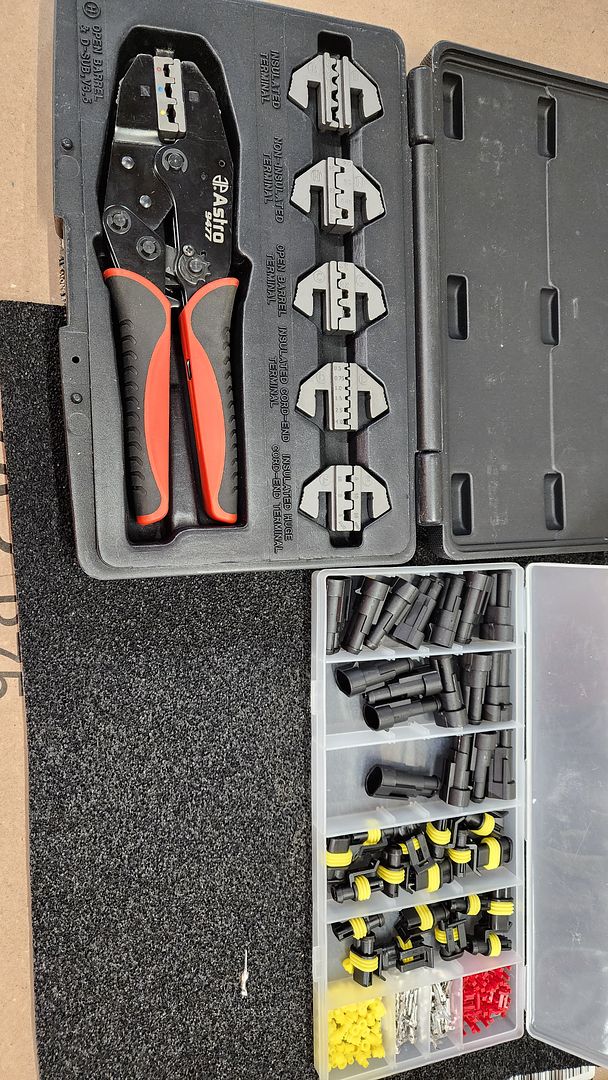 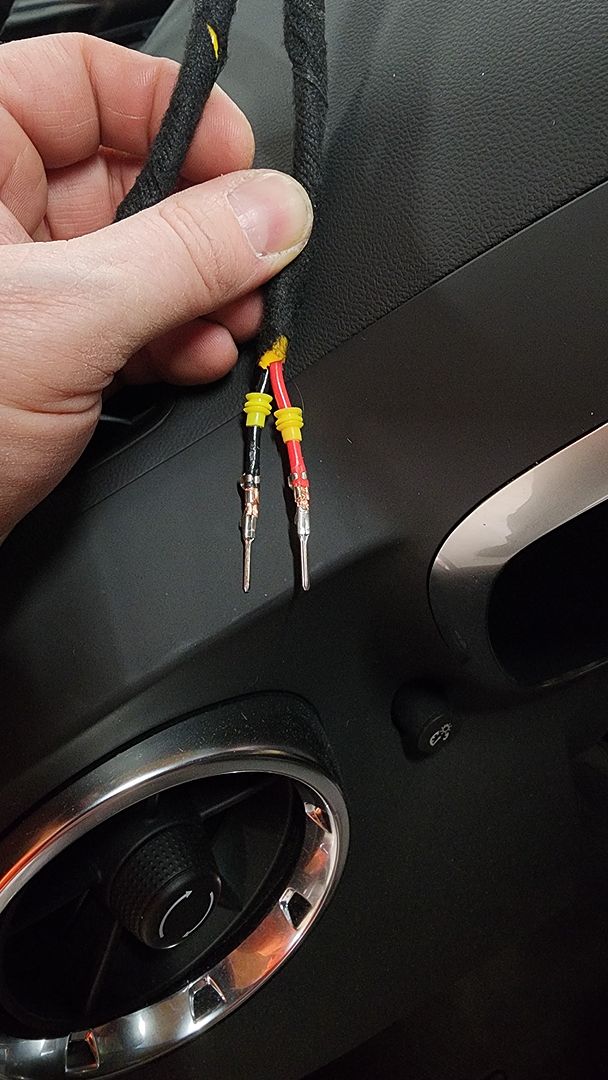 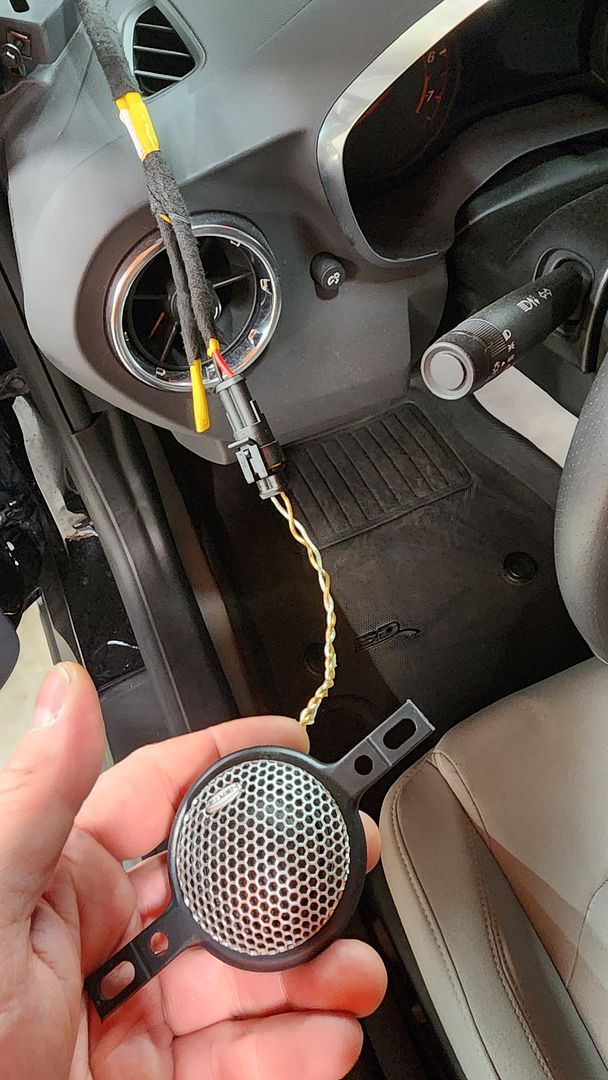 I mounted the tweeters using the Hertz adapters (because I still have the original boxes and all original hardware), and I added come CCF around the gap to close it off, not an aesthetic application but you only have the width of your finger to work in that corner. 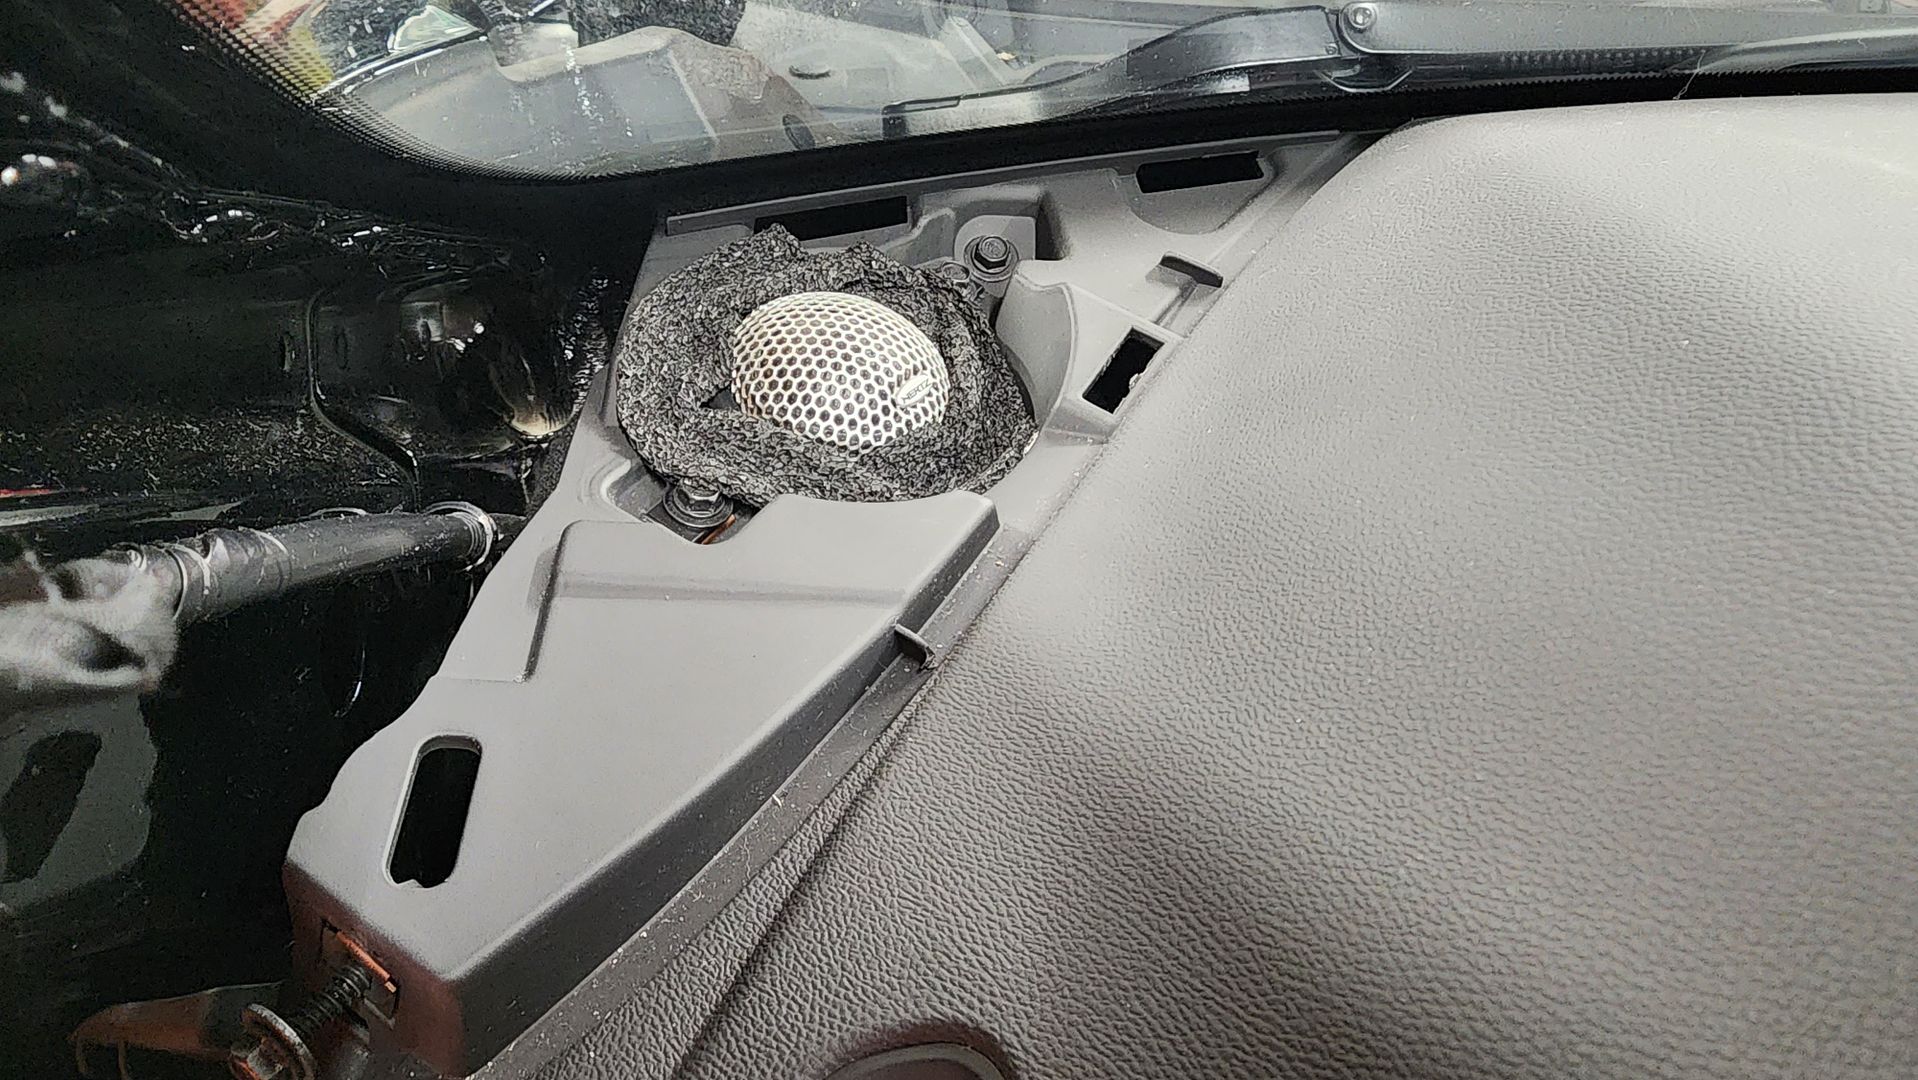 Of course, the component set needs passive crossovers for now, since it’s powered by the stock radio. I located these in the truck well as an interim step since I want to keep the amp area clear until I make the switch-over. 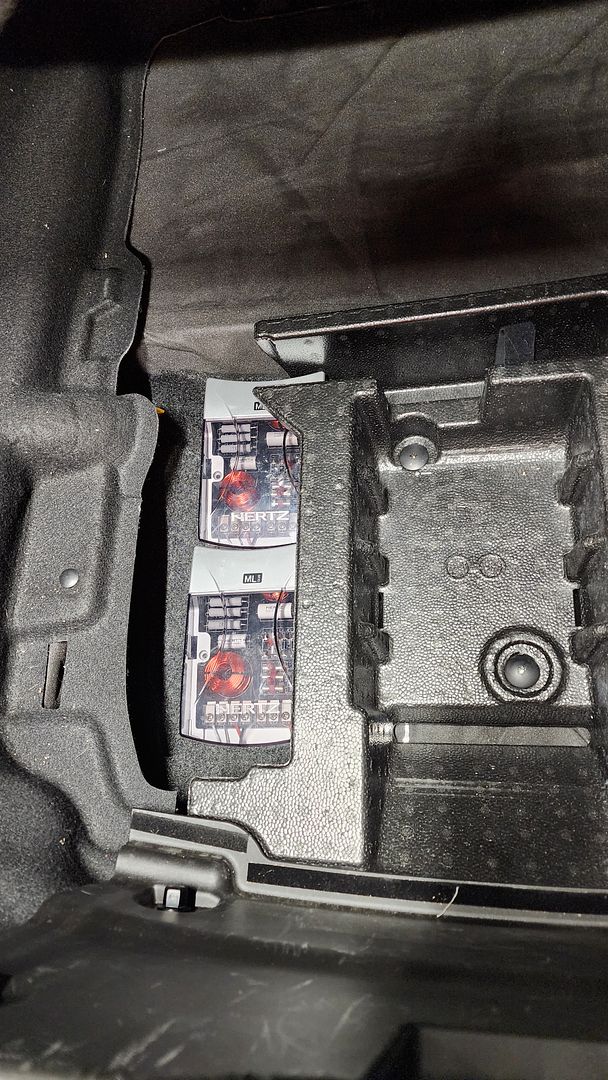 While the stock head unit and stock amplifier are being used, the difference is staggering. Granted, it should for the quality of speakers and the amount of work I've done, but I'm still surprised. Bass out of the doors is effortless, clean, and you'd think I had a sub hidden up front. The Hertz Mille passive crossovers aren't cheesy and really complement the speakers well. The tweeter attenuation and HF contour for the woofer really helped build the sound stage using the stock radio. It stages well and images decent. Everything is above the dash, but not a "clinical" feel, just musical. IYKYK.
__________________
2023 1SS A10 Black NPP/C2U/H72 - Daily Driver
Historically an Accord and Camry owner with self-performed maintenance/repair. 1100: 5/3/22 . . . . . . . 2000: 6/25/22 . . . . . .4000: 8/17/22 . . . . . . . 6000: 9/10/22 Daily Driver mileage update: 22k mi. @ April 2024 New Engine @ 22,600 Build Log: https://www.camaro6.com/forums/showt...6#post11353116 Last edited by keep_hope_alive; 11-04-2023 at 05:26 PM. |
|
|
|
|
11-04-2023, 05:23 PM
|
#39 |
|
Electrical Engineer
Drives: 2023 1SS A10 Black Join Date: Apr 2022
Location: Illinois
Posts: 779
|
I also took the opportunity to recover the knee bolsters since they are just hard plastic on the SS. I used Resonix Fibermat 25 for padding since it has an adhesive layer to stay put, then wrapped them in fleece fabric and secured with 3M Super 77. Not a pro job, and the drivers side was first so the passenger side looks better, but Its much more comfortable.
      The cut shape is weird, but thats just how I wrap corners with a stretchable fleece. 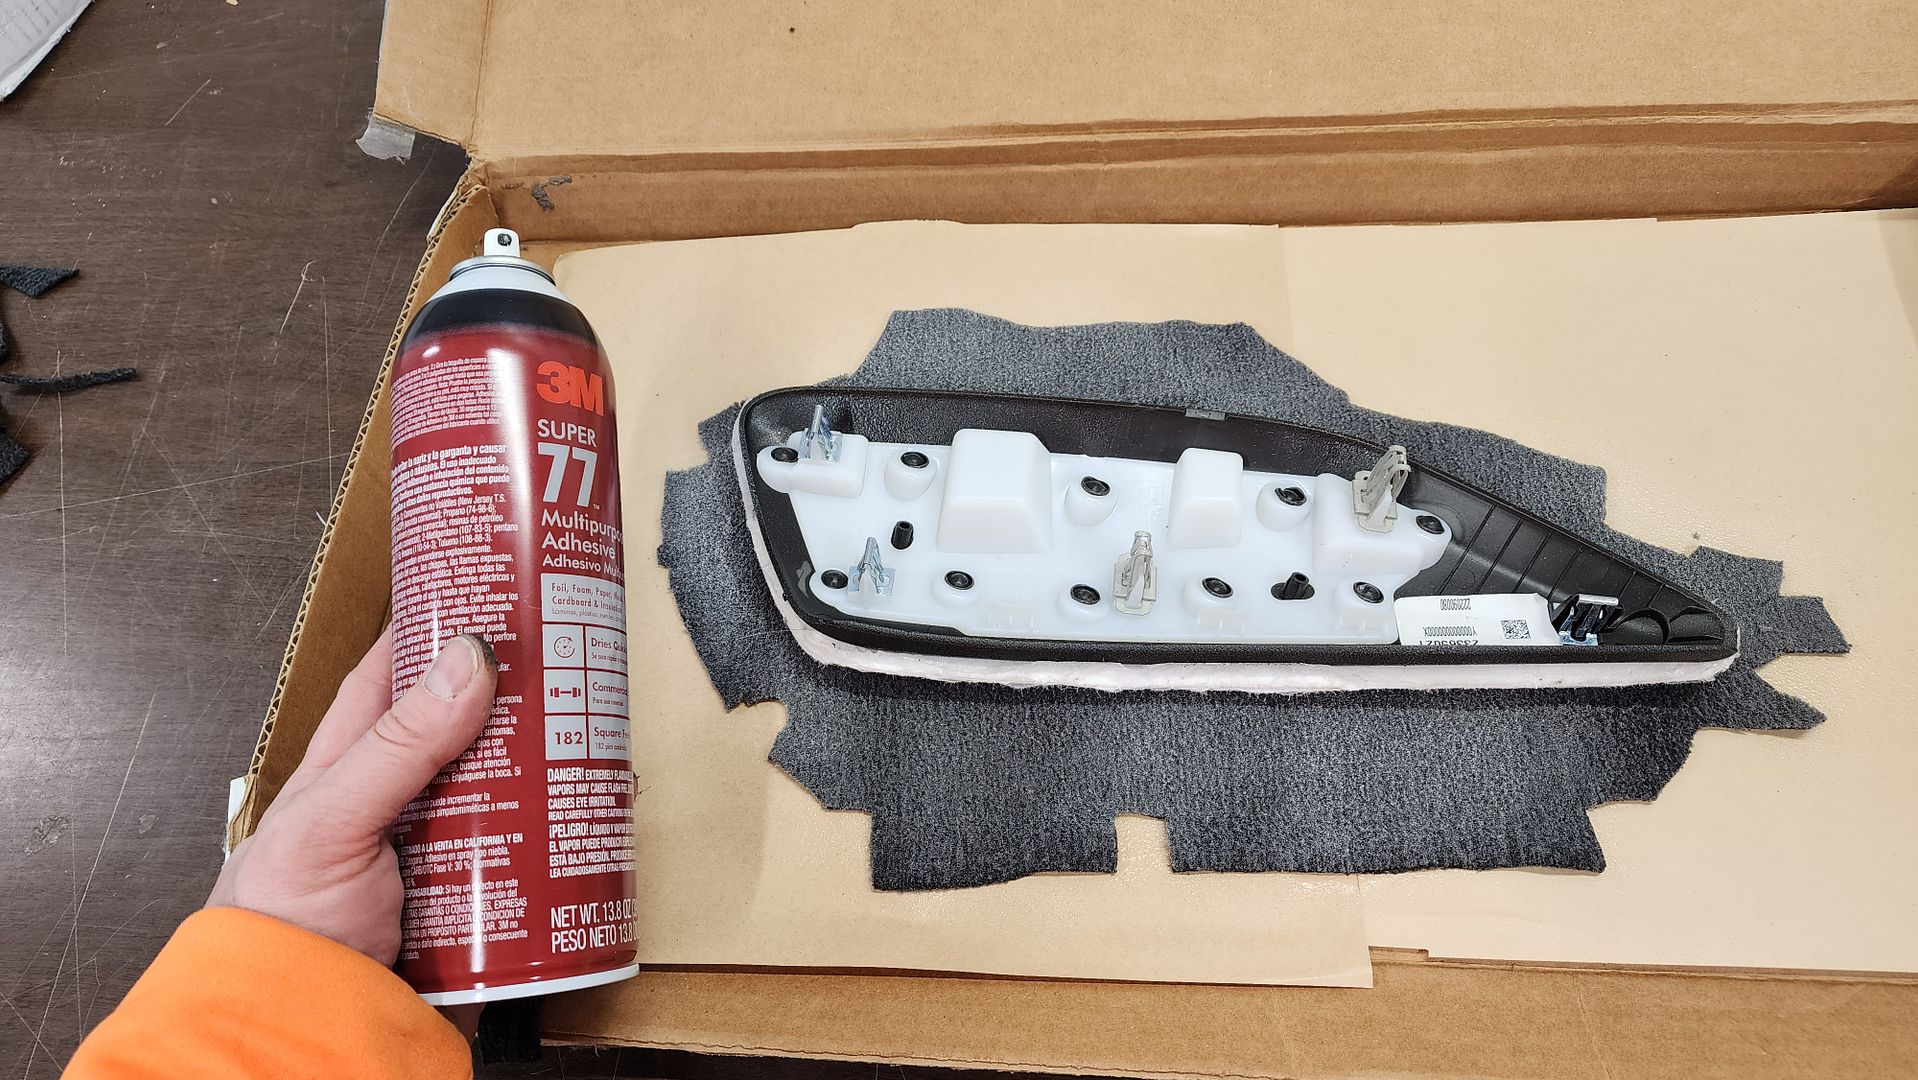 This is the worst one I did, which is why Im sharing this and not my best. 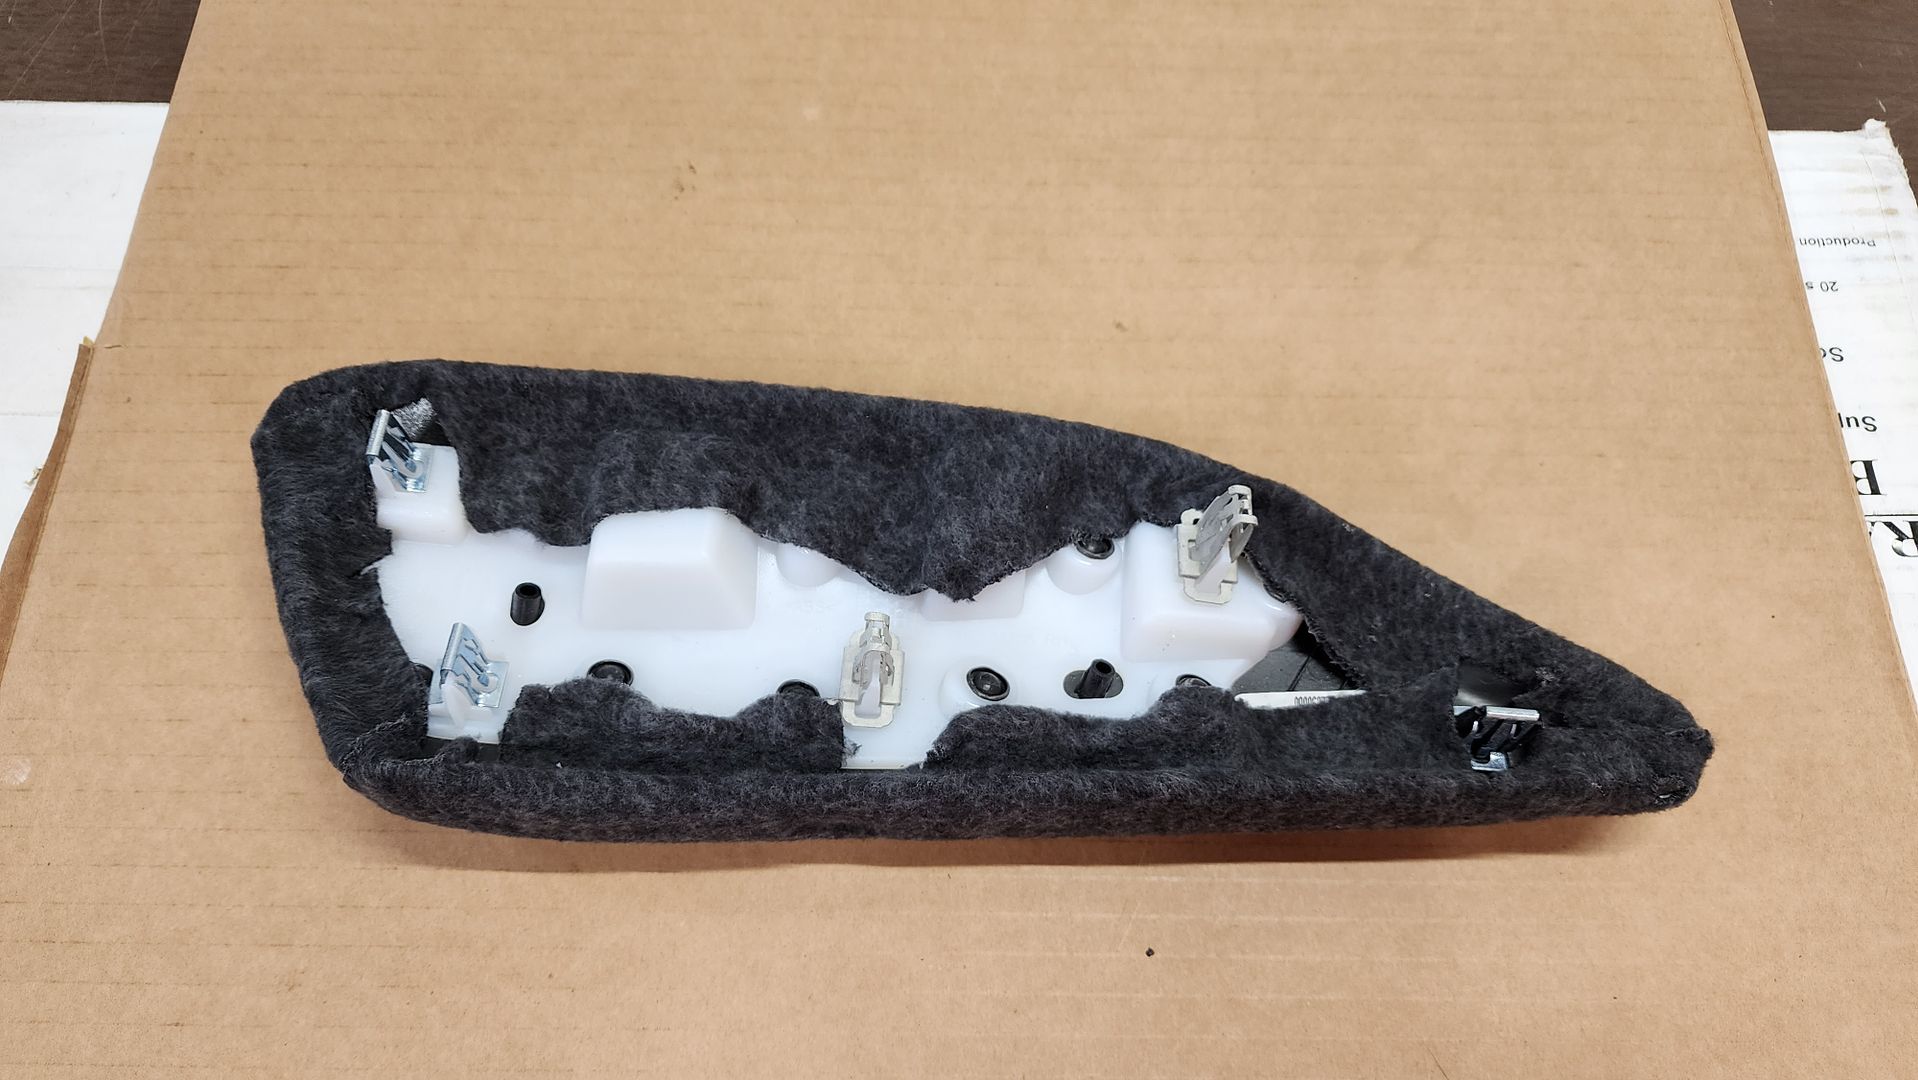 End result of both knee bolsters on each side: 
__________________
2023 1SS A10 Black NPP/C2U/H72 - Daily Driver
Historically an Accord and Camry owner with self-performed maintenance/repair. 1100: 5/3/22 . . . . . . . 2000: 6/25/22 . . . . . .4000: 8/17/22 . . . . . . . 6000: 9/10/22 Daily Driver mileage update: 22k mi. @ April 2024 New Engine @ 22,600 Build Log: https://www.camaro6.com/forums/showt...6#post11353116 |
|
|
|
|
11-21-2023, 03:53 PM
|
#40 |
|
Electrical Engineer
Drives: 2023 1SS A10 Black Join Date: Apr 2022
Location: Illinois
Posts: 779
|
Since I had to change the tires from summer to winter, I took advantage of the effort to acoustically treat the wheel wells, kick panels, and quarter panels.
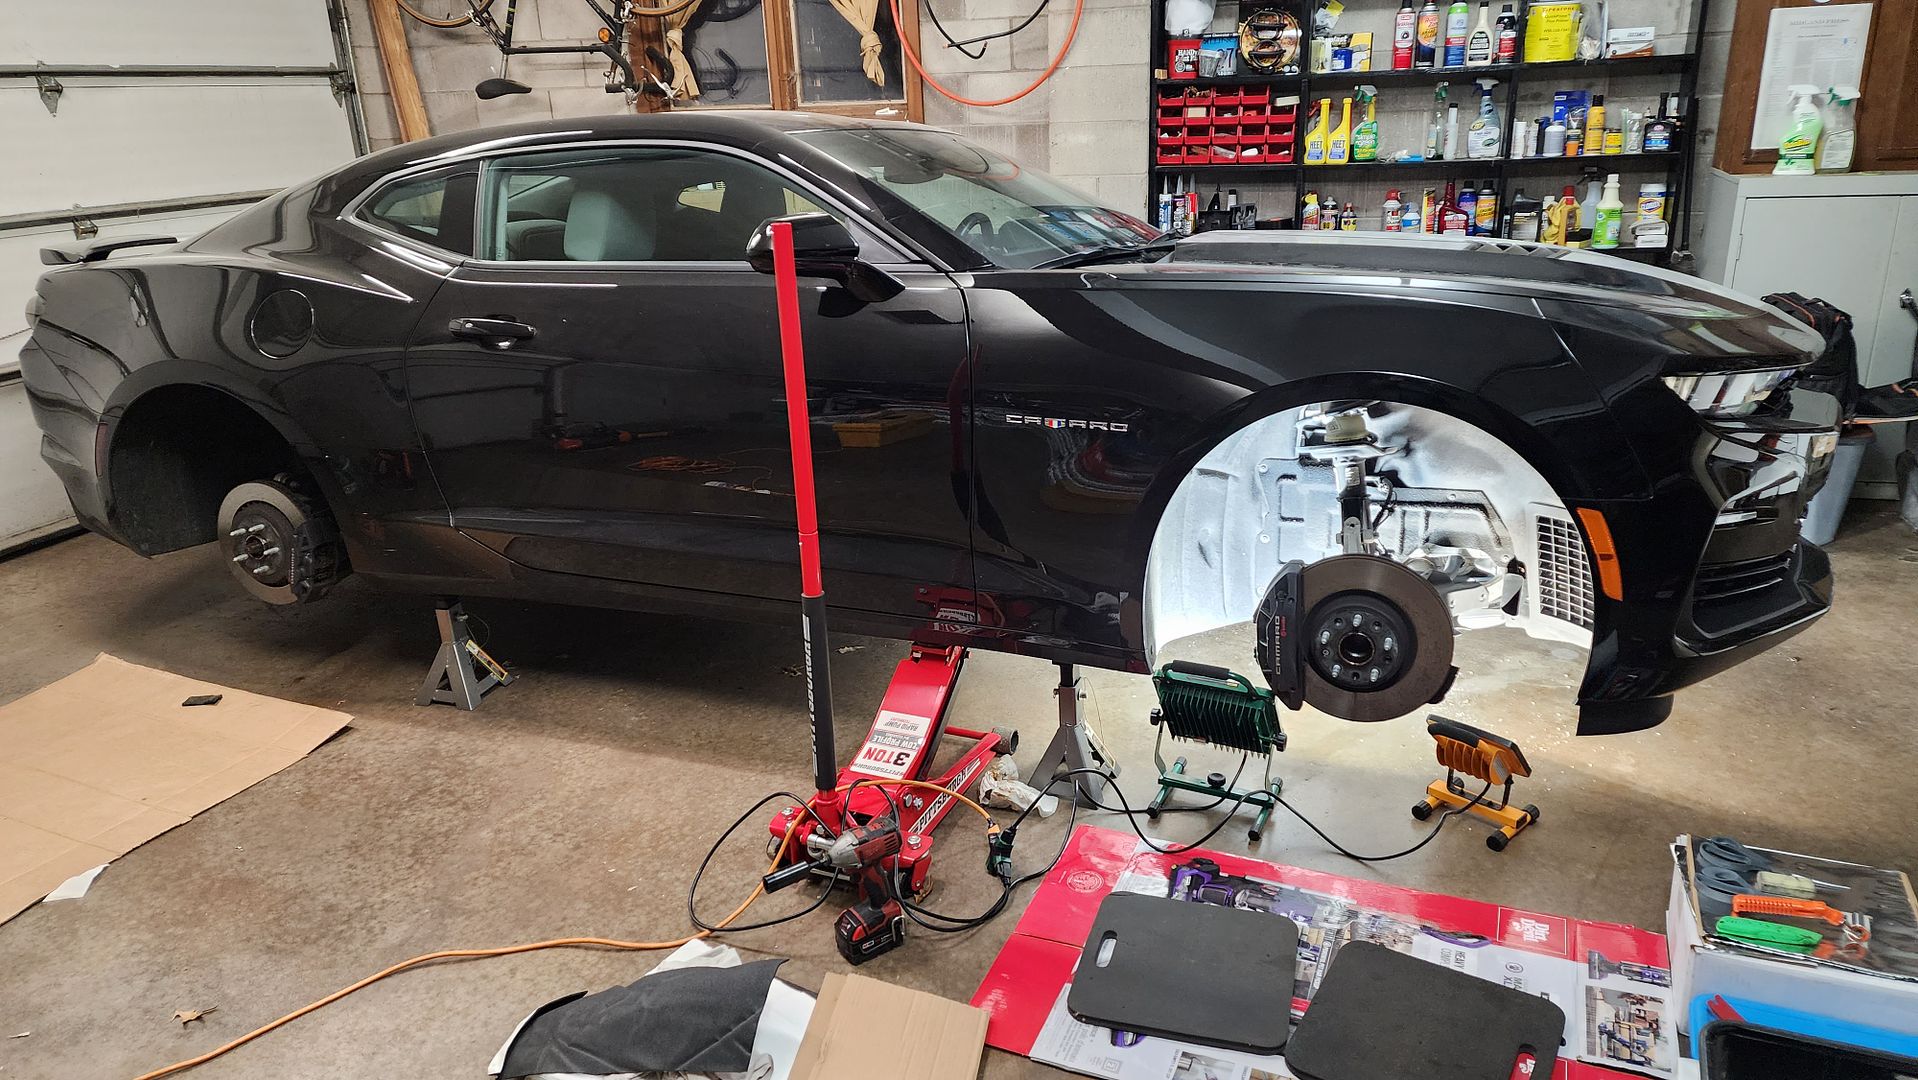 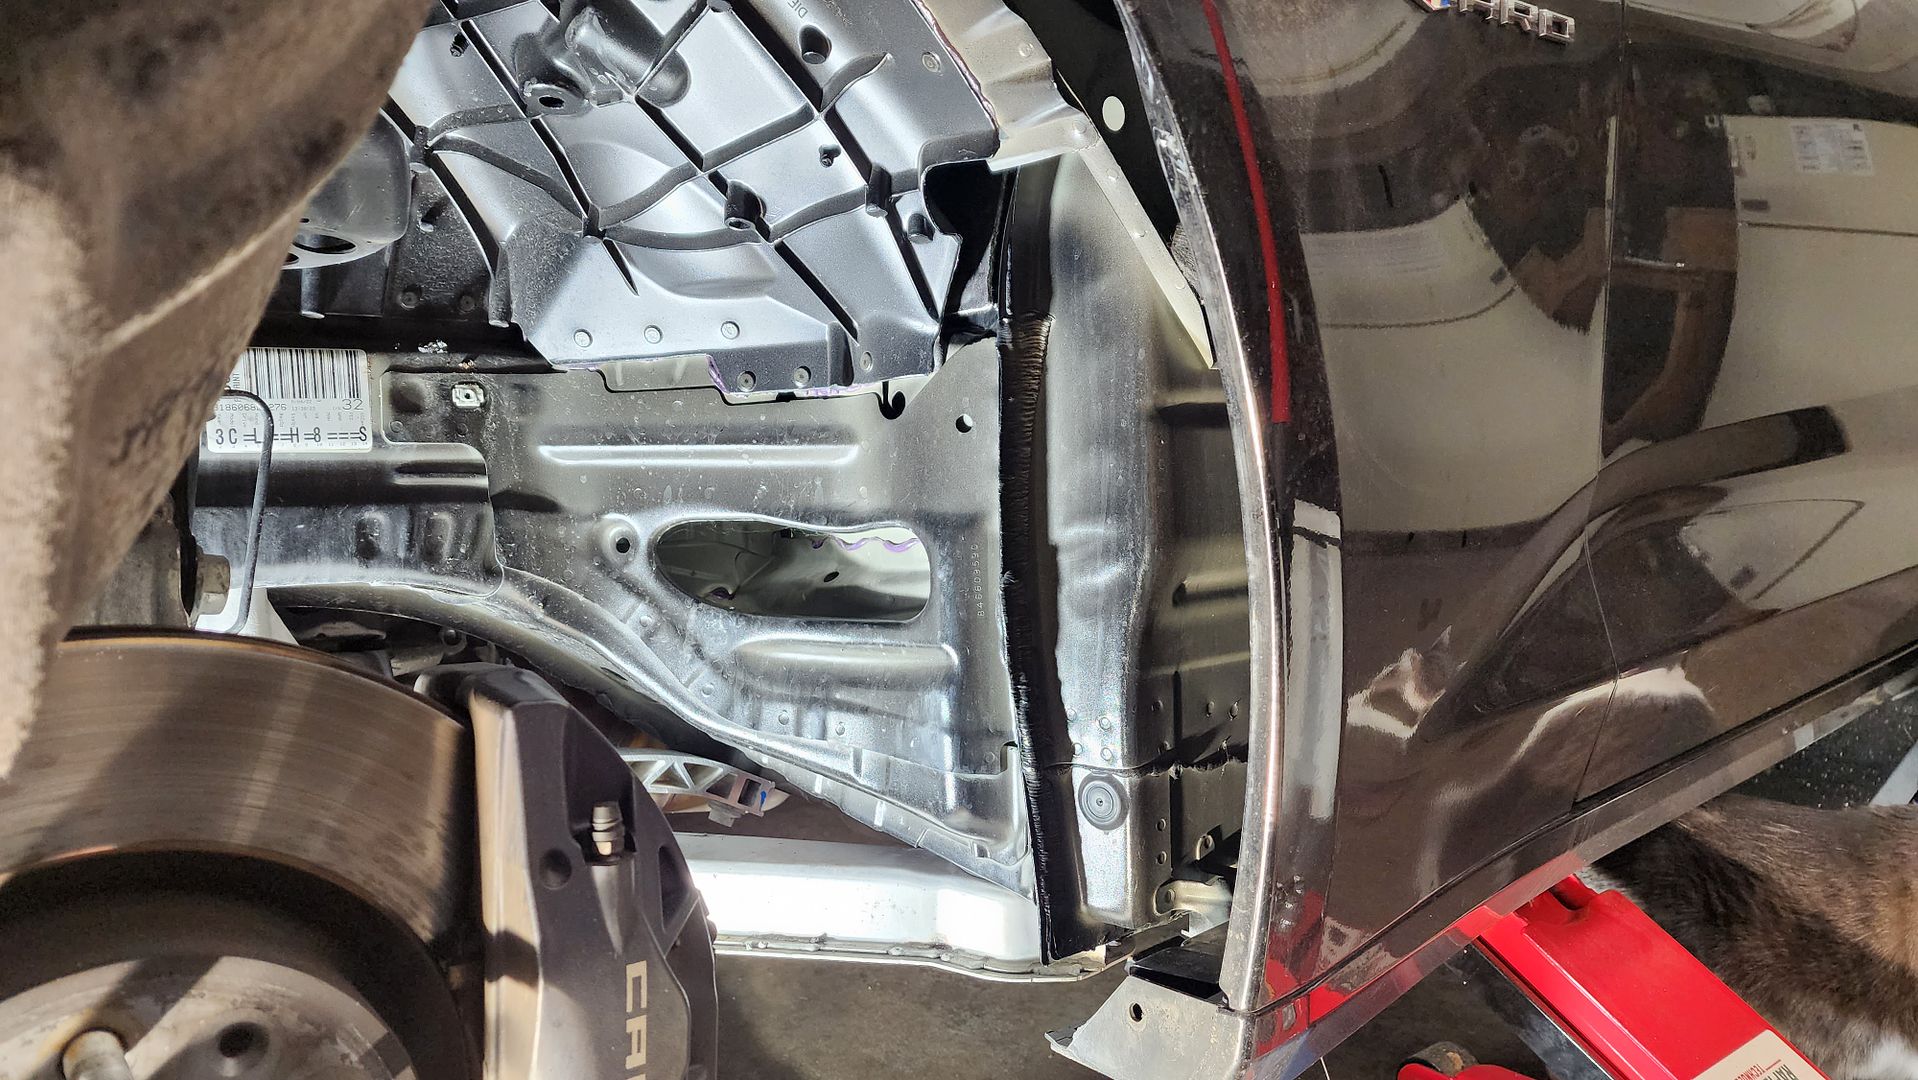 There is a small amount of sound absorption in the space between the quarter panel and kick panel. 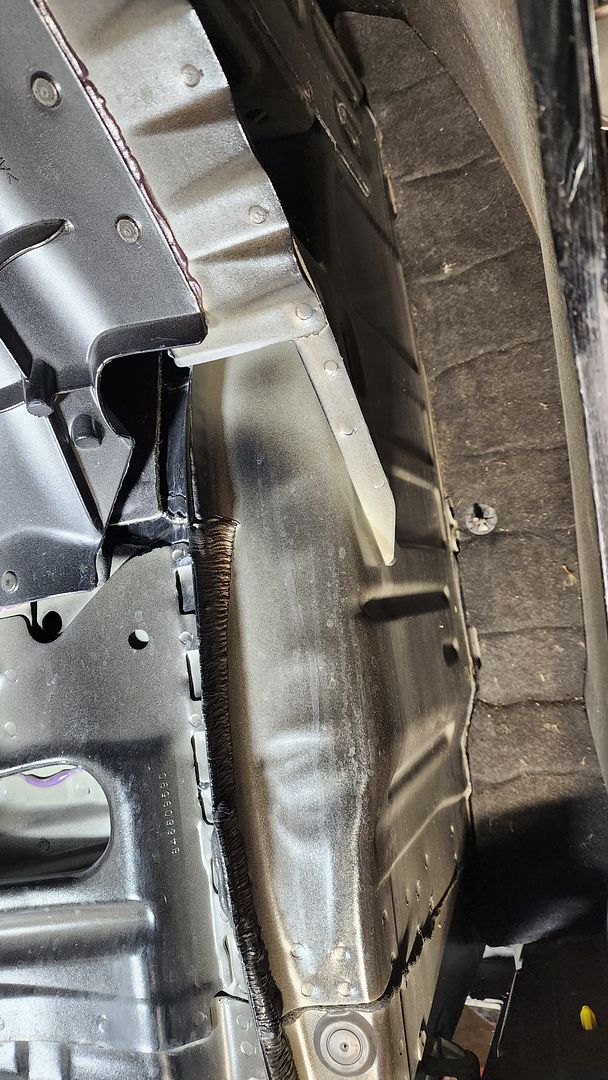 The passenger side has the added challenge of the windshield fluid reservoir. 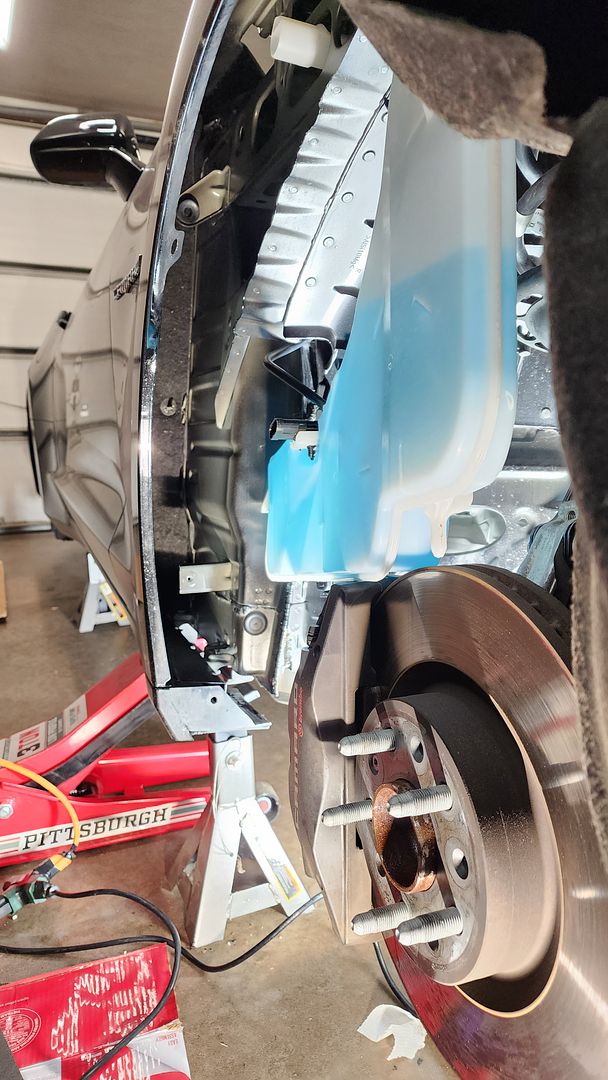 I used some Resonix CLD on the quarter panel and then Fibermat 45 in the cavities and on the flat areas. 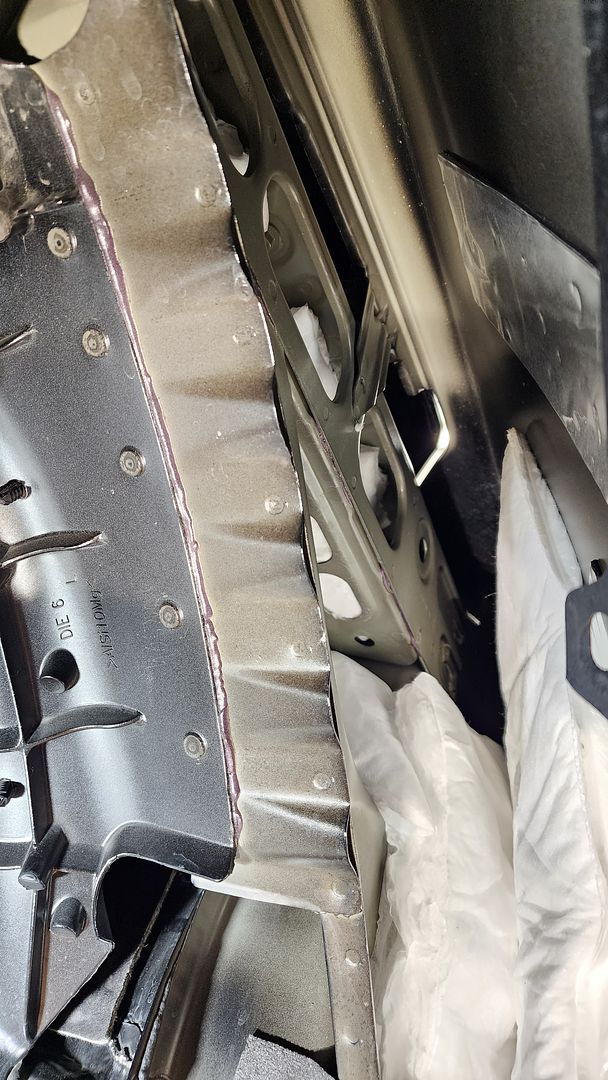 Next, I covered a lot of the areas with Raamaudio Ensolite CCF, including along seams for cut edges of Fibermat due to the amount of water that that area is subject to. 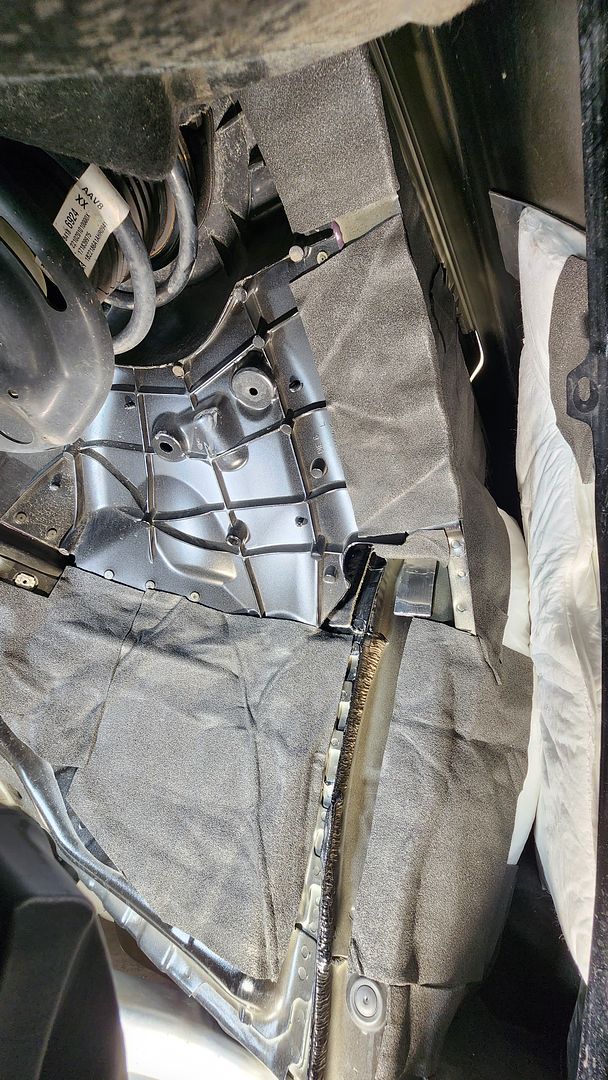 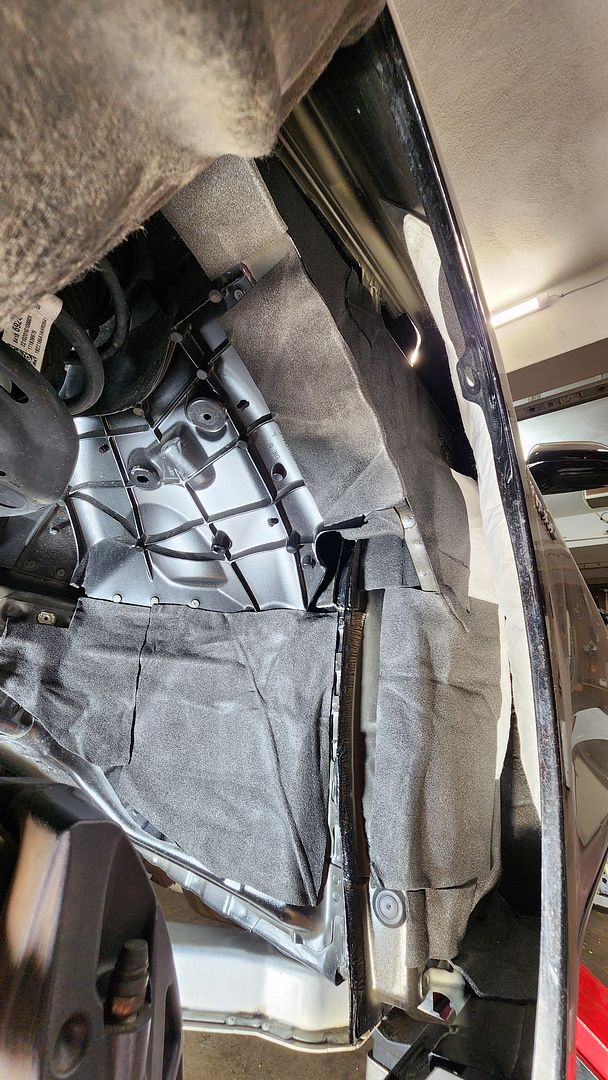 I switch to winter tires for an obvious reason. The all-season summer tires aren’t rated for use below 40 deg. F. Here you can see the front/rear stock tires with 20,000 miles. The Blizzak tires are used (left) and new (right) with the new tires going on front (steering and braking). 
__________________
2023 1SS A10 Black NPP/C2U/H72 - Daily Driver
Historically an Accord and Camry owner with self-performed maintenance/repair. 1100: 5/3/22 . . . . . . . 2000: 6/25/22 . . . . . .4000: 8/17/22 . . . . . . . 6000: 9/10/22 Daily Driver mileage update: 22k mi. @ April 2024 New Engine @ 22,600 Build Log: https://www.camaro6.com/forums/showt...6#post11353116 Last edited by keep_hope_alive; 11-22-2023 at 01:08 PM. |
|
|
|
|
11-21-2023, 05:30 PM
|
#41 |
|
Drives: 2016 Camaro 2SS "Convertibobble" Join Date: Mar 2022
Location: Peoria, IL
Posts: 280
|
Incredible...
So now when you tell people that it's "tomb-like" inside, it'll be because of the (lack of) sound, not the outward visibility!
__________________
'16 2SS Garnet Red ~24K
"Mods": GM wind deflector, home-made rear seat delete & platform, not-quite garnet red key fob cover (+10rwhp) '99 4Runner 367K '94 ST1100 146K |
|
|
|
|
11-21-2023, 06:12 PM
|
#42 |
 
Drives: 2SS 1LE Join Date: Jul 2023
Location: Massachusetts
Posts: 320
|
Amazing attention to detail. I can't wait to hear your review of how it sounds. Also curious to how much weight has been added when all said and done.
__________________
2024 2SS 1LE | 6MT | Riverside Blue
1100 - Order submitted - 7/12/23 2000 - Order accepted - 8/22/23 Vehicle Built (per chevy chat bot) - 10/10/23 Window sticker available online - 11/4/23 Arrived at dealership - 11/10/23 |
|
|
|
|
|
|
|
|
Post Reply
|
| Tags |
| acoustic, audio, speakers, stereo, subwoofer |
|
|


