You are browsing camaro5 
|
|
 03-14-2022, 03:52 AM
|
#29 |
   
Drives: Camaro Convertible 2014 1LT Join Date: May 2019
Location: New Jersey
Posts: 1,013
|
Tremendous job!!

__________________
 |

|

|
|
03-14-2022, 05:47 AM
|
#30 |
|
Anthony S
Drives: 2011 chevrolet camaro 2ss/rs Join Date: Apr 2021
Location: Chiefland, FL
Posts: 842
|
Well done
I applaud you for having nerves of steel and the balls to cut into your car like that. I have been wanting to do the 4teen or ZL1 hood insert but I don't think that I could mentally handle cutting into my car like that. Everything came out REALLY nice though. Good work!
__________________
Follow me on instagram @The_bald_eagle_machine
https://www.camaro5.com/forums/showthread.php?t=600181 Mods: Texas Speed 2 inch headers, high flow cats, and X-pipe. Custom mid-pipe, Borla Xr1 mufflers. Torqstorm Supercharger, 3.1" pulley, ZL1 fuel pump. MGW Shifter, Mcleod RST clutch, Tick master cylinder and Tick Billet bushing reinforced slave cylinder. DSS One-piece 3.5" Driveshaft, Metco Driveshaft safety loop, BCRacing Coilovers. BMR Poly Diff bushings, Poly Rear cradle bushings, Sub-frame connectors, Lower control arms, camber arms, and toe links. |
|
|
|
|
03-14-2022, 12:20 PM
|
#31 | ||

|
Quote:
 Quote:
|
||
|
|
|
|
03-14-2022, 09:04 PM
|
#32 |
|
|
After the lateral ports were installed, I began prepping the last round of parts to be painted while waiting for the previous round to be finished.
By the end of August 2021, the following parts were painted in Carbon Flash Metallic and over the next several weeks, I went to work on installing them from back to front. ACS Rear Bumper Extensions ACS Rear Splash Guards ACS T4 Side Rockers ACS Front Splash Guards ACS T4 Front Splitter and Deflectors ACS Side Rocker Winglets Everything except the splash guards/deflectors and splitter were pop riveted to the body. Since I didnt have an extra set of hands to install the Splitter, I took the front bumper back off and put some heavy duty folding tables together. I then clamped the Splitter to the bumper and stood it upright. I was then able to carefully position it to hang over the table in the spots and starting in the center, began drilling and bolting the Splitter to the bottom of the bumper. The winglets were probably the biggest pain to install. It would have been nice to have a second pair of hands (hence to the two filter boxes shown in the one picture). But I could not get the rivet to catch enough of the factory rocket to hold it in place. I couldn't find any access inside the factory rocker, so I had to get a few washers between the winglet and the T4 rocker to allow the rivet to expand. They were officially installed on November 10, 2021. |
|
|
|
|
03-14-2022, 09:35 PM
|
#33 |
|
|
My paint guy got tied up in another project so it took a lot longer before the last parts were ready. I wasnt in any rush, and the next two pieces were by far the easiest.
The ACS T3 and TL1 Ported Hood Liner was installed on November 19, 2021. Im not sure what I want to do with that tiny section of yellow along the top. If I install the rain guard that came with the TL1 insert, it would be completely hidden but I like having the ports left open. I may pull the hood liner out and hit that section of the hood with a few passes of flat black, or try to fabricate a small piece of aluminum and use the two bolts that attach the liner to the hood. And the ACS Trunk Liner was installed and wired up the next day. It uses the same Eagle T lights that are in the T4 bumper ports, and it is really like a pair of headlights shining down into the trunk. If you look really close, youll see the Upper Rear Quarter Ports peaking out of the shadow. That will be the last painted part to get install, but there are still sitting in the trunk at the moment. |
|
|
|
|
03-14-2022, 10:28 PM
|
#34 |
|
|
With this post, I will finally be up to date on my build. (If you made it this far, thank you!)
As I may have mentioned a few times in my previous posts, a long-time goal has been to get under the hood show worthy. In between updating the exterior, I was also collecting and preparing some more goodies and with this round of updates, I think I am about 95% there. At some point, I may get brave enough to redo some of the wire harnesses and paint the coil packs. But for now, I am happy with how everything looks. Billet Battery Terminal Cover (Painted Bright Red) Billet Fuse Box Cover Billet ABS Cover (modified) Billet Idler Pulley Cover Billet ECM Cover Billet Radiator Cap Cover Camaros of Michigan Master Cylinder Cover (modified to resemble Showstopper Accessories design) For the yellow covers, I still had a can of Krylon Fusion Sunbeam back from when I attempted to paint the factory engine cover. The color is almost a perfect match to Rally Yellow, and thankfully I had just enough to paint both covers. I then went with Satin Black for the panels, which were cut from sheet aluminum I picked up at Lowe's. Without further ado, here is how it all comes together! |
|
|
|
|
03-14-2022, 11:33 PM
|
#35 |
Drives: 2010 2SS/RS A6 Join Date: May 2019
Location: Hki.Finland
Posts: 952
|

|
|
|
|
|
03-15-2022, 10:04 AM
|
#36 |
|
1000hp is NEVER Enough!

|
Very nice mods and upgrades!

|
|
|
|
|
03-15-2022, 06:45 PM
|
#37 |
|
|
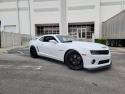
Last June, I ordered a new set of wheels. I remembered to snap a quick picture of one while I was inspecting the wheels for damage, but then they went back into the box for safe keeping. I had hoped to get new tires in the fall, but the season was practically over by the time I was finished with the ground kit.
FR 41 ZL1 Replica Wheels in Satin Black Front: 20x9 +27mm offset Rear: 20x10 +35mm offset I also got a set of flat black center caps: Today, the new tires arrived!  Mickey Thompson Comp Street Tires Front: 275/40-20 Rear: 305/35-20 Since the TPMS sensors are still the originals, I figured it would be a good idea to throw a new set in as well. I went with ACDelco (Part# 13540601) I cant wait to get them mounted and balanced. |
|
|
|
|
03-17-2022, 09:08 AM
|
#38 |
Drives: 2010victoryred2lt Join Date: Mar 2011
Location: royersford
Posts: 580
|
wow lotta work shes a beauty
|
|
|
|
|
03-17-2022, 12:49 PM
|
#39 | |
|
|
Quote:
|
|
|
|
|
|
03-20-2022, 09:28 AM
|
#40 |
|
|
So I never thought it would be so challenging to find a place to mount and balance new wheels and tires. I have been reaching out to shops that emphasize on tires, thinking they would have a greater investment in their tire changing equipment. A few have been upfront and honest saying they wouldnt want to scratch my wheels (which I greatly appreciate). But I have also been told a flat out, no, I cant do that by other shops that promote custom wheel/tire packages.
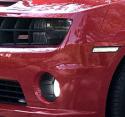
While my search continues, I thought it was time to finally swap out the Emblem Pros Onyx Camaro fender script. I did one letter at a time so I could keep everything lined up like it came from the factory. I started out with just a hair dryer and dental floss to pop the old letters off, but all the double sided tape stayed on the car. I then used a plastic trim removal tool as a scraper to get the bulk of the tape removed, followed by Adams Bug Remover and rubbing alcohol. The first couple letters took forever, so I did some searching on the forum and found a few recommendations for 3M Adhesive Remover. Let me just say, that stuff worked amazing! I would spray a tiny bit on a rag and gently rub over the residue and it would instantly start to dissolve. I then followed up with the Bug Remover and alcohol before putting the new letter on the fender, using a wooden ruler as both a straight edge and to equally space each letter 10mm apart. Im not sure why, but the factory C and A were a little closer than the rest of the letters. But since a few of the Emblem Pros letters were slightly narrower than the factory lettering, it happened to work out by covering the same overall space. |
|
|
|
|
03-26-2022, 03:40 PM
|
#41 |
|
|
I was finally able to find a place to mount and balance the new wheels/tires. They did a great job but I did end up going with their own TPMS sensors since they have the equipment to program them to the car.
As a belated 13th birthday gift for Bee, I swapped everything out last night Im loving how the tires fill out the wheel wells. |
|
|
|
|
05-16-2022, 08:16 PM
|
#42 |
|
|
Since it wouldnt be a good build thread without posting some lessons learned, I spent the last few weekends correcting a couple things that werent installed correctly the first time around.
First up was my demon eyes. In the first pic, you can see the heat sink protruding down into the headlight. It was something I dont remember seeing at first, but then once I noticed it I couldnt un-see it. It really was pronounced whenever I would take pictures (especially with the flash on). I went back through all the pictures I took during the installation, and found one key step was missed. Unfortunately, to correct it meant I had to reopen the headlights to get back to the projector housing. On the plus side, the new butyl made it much easier to get the headlight open I just baked it in the oven at 250 degrees for about 5 minutes and used a long/thin screw driver to pop off the lens. But one thing I wasnt quite prepared for was the gooey mess. I found the best (possibly the only) way to get the butyl off the track was to use a ball of butyl. The factory butyl was hard whereas the aftermarket butyl was extremely sticky. A few hours later, I had them cleaned up enough so they could be resealed. But before that, I still had to correct the demon eye issue, which took all but two seconds to fix. After unplugging the projector beam, I removed the four torx screws to gain access to the demon eye/heat sink. I then gently bent the demon eye up about 45 degrees from the original position. I triple-checked to make sure the new position could no longer be seen and then resealed the headlight. The next issue was with my front tow hook receiver. I originally installed it after taking the front bumper off to start on the long transformation process. Although I did test the tow hook fitment at a few points along the way, once I had everything back together I found I could no longer get the hook into the receiver. I dont know for sure, but the story I am going with is it may have to something to do with the T3 Rad Support. By design (to make the mail slot functional), it offers a lot more support and almost goes all the way to inside edge of the front bumper. My guess is with the extra support, the front bumper doesnt sit as low as it did stock but Im only talking about 1/8 or so. Anyway, I reached out to ZL1-Addons (great customer service BTW) and they suggested I try taking a belt sander to shave down the base. That certainly did the trick, between the belt sander and an angle grinder, I was able to get the 1/8 off the base plate. Although it is still somewhat of a tight fit initially, which I may notch out the slat on the grill a little, I am at least able to get the front tow hook mounted. My plan was to only install it when needed, but now I think I will leave it there. |
|
|
|
|
|
|
|
 |
|
|


